Advertisement
Quick Links
Advertisement

Related Manuals for rc3Dprint Grumman X-29


Summary of Contents for rc3Dprint Grumman X-29
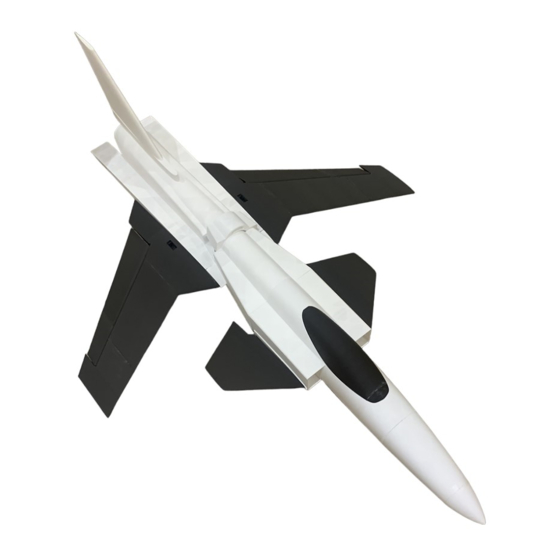
- Page 1 P R I N T I N G A N D A S S E M B L Y M A N U A L...
- Page 2 As you are printing and assembling the model yourself we take no liability for damage or loss resulting from your use of these files. Please fly responsibly and follow all local laws. Share your flights on instagram and tag @rc3dprint for discount codes on future orders.
-
Page 3: Parts List
P A R T S L I S T R E Q U I R E D 64mm, 70mm or 80mm EDF 4S(min) LiPo and a suitable ESC 4 - Channel radio kit. 3 x 9g servos Pultruded Carbon Tubes: 1m with 8mm Outside Diameter 1m with 4mm Outside Diameter 2mm wire for landing gear. - Page 4 I N C L U D E D S T L . F I L E S F U S E L A G E...
- Page 5 W I N G C A N A R D...
- Page 6 T A I L...
-
Page 7: Specifications
S P E C I F I C A T I O N S Wing Span 1005mm Flying Weight (1600mAh 4S): 1000g Wing Area 26.55dm Wing Loading 37.77g/dm 12.3oz/ft Wing Cube Loading Channels Mixed Elevons and nose wheel steering Centre of Gravity = At the aft edge of the canard, marked on the underside of the Fuselage. - Page 8 P R I N T I N G P R O F I L E S Printing with LW-PLA or other low density foaming filaments requires some individual printer set up. You should follow the manufacturers guidance. The table below will provide some ball park figures for printing temperature and flow rate.
- Page 9 When you preview the part you should see something like this: A single wall around the outside with lines of infill and any other built in structure on the inside. A S S E M B L Y I know how excited we all get and like to bound ahead without looking at instructions so here are…...
- Page 10 3. T H E E L E V O N S N E E D T O B E I N P L A C E W H E N T H E W I N G I S G L U E D T O T H E F U S E L A G E . A S S E M B L E T H E 3 A F T F U S E L A G E P I E C E S F I R S T .
- Page 11 • If you plan on using a landing gear, set the nose gear in place before gluing forward fuselage together as this is easier. As the model is lightweight I used a simple wire nose gear. To strengthen the LW PLA there are two discs that should be printed in PLA or ABS. These are glued in either side of the fuselage to spread the load of the nose gear wire.
-
Page 12: Component Placement
C U R A C O M P O N E N T P L A C E M E N T N O S E 1% Infill F U S E L A G E 1... - Page 13 F U S E L A G E 2 F U S E L A G E 3...
- Page 14 F U S E L A G E 4 1.5% infill A F T F U S E L A G E 1 1.5% infill...
- Page 15 A F T F U S E L A G E 2 Infill 1.5% A F T F U S E L A G E 3 Infill 1.5%...
- Page 16 E D F H A T C H F I N 1...
- Page 17 F I N A F T 2% infill C A N A R D 2% infill Supports ON...
- Page 18 C A N O P Y L A T C H 10% infill C A N O P Y (For shorter Z printers the Canopy has been split into 2 - print in the same orientation as seen here)
- Page 19 W I N G 1 A 2% infill W I N G 1 B 1% infill...
- Page 20 W I N G 2 2% infill W I N G 3 2% infill...
- Page 21 E L E V O N 1 2% infill E L E V O N 2 2% infill...
- Page 22 C O N T R O L L I N K A G E S X 2 Standard PLA profile Adhesion: Brim S T E E R I N G D I S C S A N D A R M Standard PLA Profile...
- Page 23 M A I N G E A R L E G S PLA or LW-PLA 10% infill...
Need help?
Do you have a question about the Grumman X-29 and is the answer not in the manual?
Questions and answers