
Subscribe to Our Youtube Channel
Related Manuals for Ezon Professional Hiking Series


Summary of Contents for Ezon Professional Hiking Series
- Page 1 登 山 运 动 腕 表 系 列 Professional Hiking Series 使 用 说 明 书 Operation Instruction Manual 中...
- Page 2 M001-2...
-
Page 3: Table Of Contents
目 录 1.简介..................1 2.功能特征................1 3.按键及LCD显示............2 4.模式选择................3 4.1.时间模式 ..............3 4.2.高度、气压、指南针模式 ......3 4.3.模式菜单 ..............4 5.调整设置................5 5.1.设置菜单..............5 5.2.单位设置 ..............6 6.使用高度计 ..............8 6.1.高度校准 ..............8 6.1.1.输入海平面气压 ........... 8 6.1.2.输入当前高度..........9 6.2.进入/退出高度模式.......... 9 6.3.海拔高度测量 ............. 10 6.4.相对高度测量... - Page 4 8.3.进入指南针模式 .........18 8.4.测量目标方位角 .........19 8.5.追踪目标方向 ........19 9.计时功能 ............ 2 0 9.1.时间与日期设置 ........20 9.2.查看时间日期和日出日落时间..21 9.3.查看世界时 ........22 10.闹铃功能 ..........2 3 10.1.闹铃设置..........2 3 10.1.1.闹铃1-3设置......23 10.1.2.闹铃4-5设置......24 10.1.3.开启/关闭整点报时功能..26 10.2.开启/关闭闹铃.........26 11.跑表功能..........28 11.1.单段计时 ..........2 8 11.2.分段计时 ..........2 9 12.倒计时功能 ..........30 12.1.设置倒计时初值 ......30 12.2.使用倒计时器...
-
Page 5: 功能特征
1.简介 感谢您购买EZON宜准登山运动腕表,在 使 用 之 前 请 仔 细 阅 读 说 明 书 。 了 解 该 产 品 的 功能、操作方法及注意事项。 本表是集高度计、气压计、温度计和电子 指南针等组合的多功能手表,不仅具有时间、 日历、闹铃、跑表、倒计时等功能,同时还具 有测量高度、气压、温度和方位等功能,并且 能显示世界48个城市的时间和中国40城市的日 出日落时间。 2.功能特征 高 度 计 指南计 气 压 计 温 度 计 天 气 预 报... -
Page 6: 按键及Lcd显示
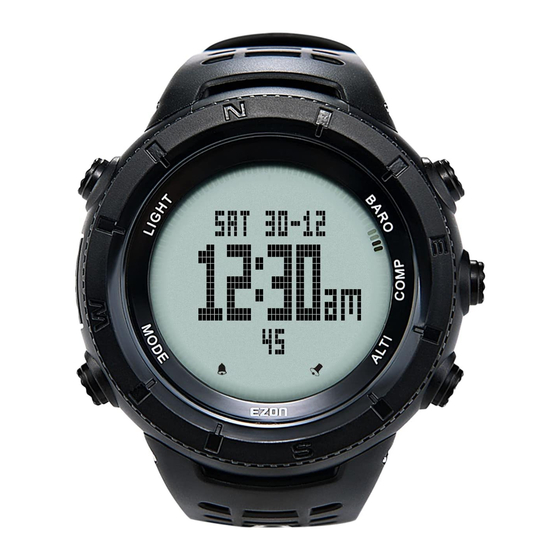
3.按键及LCD显示 按键 :背景灯/锁键 按键 :模式选择/返回 按键 :高度计/向下/减少 按键 :气压计/向上/增加 按键 :指南针/确认 闹铃符号 整点报时符号 跑表符号 倒计时符号 指南针符号 按键锁符号 天气预报符号 天气预报符号 返回按键提示 确认按键提示 增加按键提示 减少按键提示 低电压提示符号... -
Page 7: 模式选择
4.模式选择 本表为多功能手表,需根据所使用的功能, 先选择相应的功能模式。 4.1时间模式 本表一般情况下为时间模式,显示当地时 间、日期和星期。 星期 日期 时:分 秒 本表在非时间模式,如果不操作按键,约 分 钟 后 会 自 动 返 回 时 间 模 式 ( 跑 表 运 行 、 倒计时运行、气压模式、高度模式除外)。 4.2.高度、气压、指南针模式 时间模式按[C]键、[D]键和[E]键可分别进 入高度、气压、指南针模式(先显示模式标题, 2-3秒后显示测量值);按[B]键返回时间模式。 时间模式 高度模式 气压模式 指南针模式... -
Page 8: 模式菜单
4.3.模式菜单 本表的其他模式都是在模式菜单中选择,其 方法如下: 在时间模式按住[B]键 秒进入模式菜单: alarm 闹铃模式 topwatch 跑表模式 timer 倒计时模式 worldtime 世界时模式 memor y 记录模式 settings 设置模式 按[C]键或[D]键选择菜单,按[E]键确认选 择并进入相应模式;按[B]键返回时间模式。 时间模式 闹铃模式 设置模式 跑表模式 记录模式 倒计时模式 世界时模式... -
Page 9: 调整设置
5.调整设置 使用手表前,用户要根据具体情况或使用 习惯对手表设置进行调整。本表所有的设置均 在设置模式下进行。 5.1.设置菜单 1)在时间模式按住[B]键2秒进入模式菜单,按 [C]键 或[D]键 选 择"settinngs"(设 置 模 式), 按 [E]键确认选择进入设置菜单; 2)按[C]键或[D]键选择菜单,按[E]键确定选择 并进入相应的设置状态;按[B]键返回模式菜单。 设置模式 时间、日期设置 单位设置 闹铃设置 指南针设置 倒计时设置 高度气压设置... -
Page 10: 单位设置
5.2.单位设置 本表可根据用户的使用习惯,设置显示格 式和数值单位。如不设置,本表将使用原有设 置格式和单位。 1)在时间模式按住[B]键2秒进入模式菜单,按 [C]键或[D]键选择"settinngs"(设置模式),按 [E]键确认并进入设置菜单; 2)按[C]键或[D]键选择"unit"(单位设置),按[E] 键确认; 3)按[C]键或[D]键选择设置项目:时间格式、 日 期 格 式 、 温 度 单 位 、 气 压 单 位 、 高 度 单 位,按[E]键确认并进入设置状态; 4)按[C]键或[D]键修改设置; 5)按[E]键确认设置。 12小时制 时间格式设置 24小时制 日-月 日期格式设置 月-日... - Page 11 摄氏 温度单位设置 华氏 百帕 气压单位设置 英寸汞柱 米 高度单位设置 英尺...
-
Page 12: 使用高度计
6.使用高度计 6.1.高度校准 本表使用气压传感器测量当地的气压值, 再根据海平面气压值和ISA(国际标准大气压)换 算关系,计算出该地的海拔高度。而海平面气 压值会根据地域、季节、气候、时段的不同有 所不同。所以测量海拔高度前,需先将该地当 天海平面气压值或当前高度输入表中,以校准 高度计。 6.1.1.输入海平面气压 海平面气压值可以在该地的天文台查询, 其输入方法是: 1)在时间模式按住[B]键2秒进入模式菜单,按 [C]键 或[D]键 选 择"settinngs"(设 置 模 式), 按 [E]键确认进入设置菜单; 2)按[C]键 或[D]键 选 择"alti-baro"(高 度-气 压 设置),按[E]键确认; )按[C]键 或[D]键 选 择"sea level"(海 平 面 气 压设置),按[E]键确认并进入设置状态; 高度-气压设置 海平面气压设置 输入数值... -
Page 13: 输入当前高度
4)输入当地当时海平面气压值(按[C]键或[D]键 调整数值,按住[C]键或[D]键快速调整数值); 5)按[E]键确认设置。 6.1.2.输入当前高度 登山前,可通过地标或地形图查询当前的 海 拔 高 度 ; 或 者 使 用 精 密 的 高 度 计 测 量 当前 高度,然后将该高度值输入本表,以校准高度 计。 1)在时间模式按住[B]键2秒进入模式菜单,按 [C]键或[D]键选择"settinngs"(设置模式),按 [E]键确认选择进入设置菜单; 2)按[C]键或[D]键选择"alti-baro"(高度-气压 设置),按[E]键确认; 3)按[C]键或[D]键选择"altitude"(海拔高度设 置),按[E]键确认并进入设置状态; )输入当前海拔高度值(按[C]键或[D]键调整数 值,按住[C]键或[D]键快速调整数值); 5)按[E]键确认设置。 高度气压设置 海拔高度设置 6.2.进入/退出高度模式 在时间模式、气压模式或指南针模式按[C] 键进入高度模式(先显示模式标题,约2秒后,... -
Page 14: 海拔高度测量
显示测量值)。首3分 钟,每5秒测量一次,其后 一分钟测量一次 ,其后一分钟测量一次 。 按[B]键退出高度模式并回到时间模式。 高度走势图 相对高度 海拔高度 当前时间 高度模式 海拔高度指某地与海平面的高度差。 目前 平 海拔 我国都是以青岛的黄海海 面作为 零点。 相对高度指某地与参考点的高度差,本表 默认的参考点为海拔零点,可另设参考点。 高度走势图显示的是最后 分钟所测量的 高度变化趋势。 高度下降通常表明在下山途中。 高度上升通常表明 在上山途中 。 6.3.海拔高度测量 高度校准后,进入高度模式(参见第6.2.章 节),就可测量并查看登山过程中任意一点的海 拔高度。 高度模式 海平面气压设置 本表是根据气压换算成高度,即使在相同的 位置,因天气的变化也会导致测量结果不同。 请勿在精度要求高的场合依赖本表测量高 度,如跳伞等。... -
Page 15: 相对高度测量
因为商用客机机舱内的空气经过压缩,所 以在飞机上无法测量飞行高度。 6.4.相对高度测量 在起始点进入高度模式(参见第6.2章节), 再按住[A]键将相对高度值设置为0,然后就可 以测量并查看登山过程中任意一点与起始点的 高 度差。 高度模式 相对高度值为0 测 量 点 100m 起 点 相对高度值为100 海拔零点 6.5.手动存储登山记录 登山过程,如果想把某点的高度测量值存 储下来,在高度模式,按住[C]键约2-3秒(直到 不显示"record”为止),该点的高度值及当前时 间和日期就存储在表内。 高度模式 高度值存储中 本表最多可以存储50条记录。 6.6.自动存储 登山开始时,进入高度模式(参见第6.2章节), 登山结束时再按[B]键退出高度模式,本表会自 动记录登山过程中最大高度、最小高度、总的 上升高度、总的下降高度。... -
Page 16: 查看或删除登山记录
最大高度: 800m 最小高度: 800m 总的上升高度: 1090m 总的下降高度: 1000m 300m 终点 100m 起点 进 入 高 度 模 式 分 钟 后 , 本 表 才 会 启 动 自 动保存记录功能,最多可存储30组记录。 6.7.查看或删除登山记录 在记录模式中查看登山记录,方法如下: 1)在时间模式按住[B]键2秒进入模式菜单,按 [C]键 或 [D]键 选 择 "memory"(记 录 模 式 ), 按 [E]键确认;... - Page 17 (接上页) 自动记录清单 存储时间、日期或年 最大高度 最小高度 总的上升高度 总的下降高度 )按[C]键 或[D]键 选 择 查 看 手 动 存 储 记 录 或 自 动 存 储 记 录 , 按[E]键 确 认 ; 按[B]键 退 出 记 录 模式。 查看记录时,按住[E]键约 秒可删除当前 记录。...
-
Page 18: 使用气压计和温度计
7.使用气压计和温度计 7.1.天气设置 该表通过气压变化趋势来预测未来天气, 为了使预测更加准确,建议使用天气预报前先 设置当前的天气。 1)在时间模式按住[B]键2秒进入模式菜单,按 [C]键 或[D]键 选 择"settinngs"(设 置 模 式), 按 [E]键确认选择并进入设置菜单; 2)按[C]键 或[D]键 选 择"alti-baro"(高 度-气 压 设置),按[E]键确认; 3)按[C]键或[D]键选择"weather"(天气设置), 按[E]键确认选择并进入设置状态; 4)按[C]键或[D]键选择当前天气(晴天、多云、 阴天、雨天); 3)按[E]键确认设置。 天气设置 晴天 雨天 多云 阴天... -
Page 19: 查看气压、温度和天气预报
7.2.查看气压、温度和天气预报 在 时 间 模 式 、 高 度 模 式 或 指 南 针 模 式 按 [D]键直接进入气压模式(先显示模式标题,约 2秒后,显示测量值)。首3分钟,每5秒测量一 次,其后每分钟测量一次。 气压走势图 天气预报 温度测量值 气压测量值 当前时间 气压模式 天气预报图示含义: 阴天 晴天 雨天 多云 按[B]键退出气压模式并回到时间模式。 气压走势图显示的是最后12个小时气压大 致变化趋势。 气压下降通常表明天气正在恶化。 气压上升通常表明天气正在好转。 气温快速变化或者空气流动不畅会影响气 压测量结果。 本表根据气压变化推算出天气变化,并非 是一个专业天气预报装置。... -
Page 20: 使用指南针
8.使用指南针 使用指南针时,尽量保持手表处于水平位 置,而且要远离磁场干扰环境。测量方位前, 一般要先进行指南针校准和设置磁偏角。 8.1.指南针校准 在更换电池后或到另一个地区,为消除磁场 干扰,指南针需进行校准。 1)在时间模式按[B]键2秒进入模式菜单,按[C]键 或[D]键选择"settinngs"(设置模式),按[E]键确 认选择并进入设置菜单; 2)按[C]键或[D]键选择"compass"(指南针设置), 按[E]键确认; 3)按[C]或[D]键选择"calibrate"(指南针校准), 按[E]键确认并进入校准状态; 4)手表保持水平,慢速旋转(每圈时间超过15秒)手 表至少2圈;手表显示"done",表示校准成功。 指南针校准 水平旋转 校准成功 校准失败可能是周围存在磁场干扰。 强烈 建议在户外空旷场所(远离高压电线、电信基站 等)校准指南针。在室内由于家用电器(电视机、 音响、电冰箱等)产生磁场干扰,常常导致校准 不成功。 换电池后,第一次使用指南针,手表会自 动跳转到校准状态。... -
Page 21: 磁偏角设置
8.2.磁偏角设置 日常地图指示的是地理北极,而指南针指示 的是地磁北极,地磁北极与地理北极之间夹角角 度称为磁偏角。地磁北极向东偏则磁偏角为正。 向西偏则磁偏角为负。为确保指南针读数正确,使 用指南针之前,应设置当地的磁偏角,方法如下: 1)在时间模式按住[B]键2秒进入模式菜单,按 [C]键或[D]键选择"settinngs"(设置模式),按[E]键 确认选择并进入设置菜单; 2)按[C]键或[D]键选择"compass"(指南针设置), 按[E]键确认; 磁偏角设置 磁偏角关 磁偏角开 磁偏角向东 磁偏角向西... -
Page 22: 进入指南针模式
3)按[C]键或[D]键选择"declination"(磁偏角设 置),按[E]键确认并进入设置选项:磁偏角开/关、 磁偏角向东/西、磁偏角角度值; 4)按[C]键或[D]键修改设置或调整数值; 5)按[E]键确认设置并进入下一设置选项,或按[B]键 确认设置并返回上一设置选项。 有的越野地图指示的是地磁北极,使用此类 地图应将手表中磁偏角关闭。 磁偏角可通过网络查询。 8.3.进入指南针模式 在时间模式、气压模式或高度模式按[E]键 进入指南针模式(先显示模式标题,约2秒后, 显示测量值)。 按[B]键退出指南针模式并回到时间模式。 北向 12时参考位 方位指示器 方位角 当前时间 指南针模式 方位及方位角含义: 北 西 东 南 在磁源附近(如:永磁铁、家用电器、高压 电 线 、 钢 筋 混 凝 土 建 筑 物 内 等)使 用 指 南 针 , 测量误差较大。... -
Page 23: 测量目标方位角
指南针被磁化也会导致测量误差,所以手 表平时存放时必须远离任何强磁源(永磁铁、金 属门窗、家用电器、个人电脑、音响等),尽量 避 免 磁 化 。 如 发 现 指 南 针 被 磁 化 , 请 远 离 磁 源,依照第8.1章节重新校准。 8.4.测量目标方位角 目标方位角指目标方 目标位置 向 和 北 极 方 向 间 的 夹 角 和 方位。其测量方法是: 当前位置 1)进入指南针模式; 2)打... -
Page 24: 计时功能
9.计时功能 9.1.时间与日期设置 时间与日期的设置方法如下: 1 )在时间模式按住[B]键2秒进入模式菜 单 , 按 [C]键或[D]键选择"settinngs"(设置模式),按 [E]键确认选择并进入设置菜单; 2)按[C]键或[D]键选择"time-date"(时间-日期 置),按[E]键确认; 3)其设置选项为:城市选择、小时、分钟、秒、 年、月、日、键音开/关; )按[C]键或[D]键改变设置或调整数值,按住 [C]键或[D]键可快速调整数值; 时间-日期设置 城市选择 键音开/关 小时设置 日设置 分钟设置 秒清零 月设置 年 设置 (2010-2059) -
Page 25: 查看时间日期和日出日落时间
)按 键确认设置并进入下一设置选项,或按 键则确认设置并返回上一设置选项。 请正确设置使用城市,因为其决定手表所 显示的日出日落时间。 本表可查寻中国40座城市日出日落时间: 北 京 、 长 春 、 长 沙 、 成 都 、 重 庆 、 大 理 、 大 连 、 福 州 、 广 州 、 贵 阳 、 海 口 、 杭 州 、 哈 尔 滨、合肥、呼和浩特、香港、济南、高雄、昆... -
Page 26: 查看世界时
9.3.查看世界时 本表内置了全球24个时区,48座重要城市 的当地时间。 48座城市见下表: 城市英文名称 城市中文名称 城市英文名称 城市中文名称 时区 时区 开 罗 Pago Pago Cairo 帕 果 帕 果 耶 路 撒 冷 Jerusalem 檀 香 山 Honolulu Moscow 莫 斯 科 Anchorage 安 克 雷 奇 吉 达 Jeddah Vancouver 温... -
Page 27: 闹铃功能
城市名称 当地时间 世界时模式 按住[E]键可以开启或关闭夏令时(该地如 果使用夏令时,要开启夏令时)。 夏令时关闭 夏令时开启 10.闹铃功能 本表含具有5组闹铃和整点报时功能。闹铃 1-3组为日常或工作日闹铃,可用于日常作息提 醒。闹铃4-5组为指定日期闹铃,可用于特殊日 期提醒。 10.1.闹铃设置 闹铃1-3设置方法相同 , 闹铃4-5设置方法 相同。 10.1.1.闹铃1-3设置 1)在时间模式按住[B]键2秒进入模式菜单,按 [C]键或[D]键选择"settinngs"(设置模式),按 [E]键确认选择并进入设置菜单; 2)按[C]键或[D]键选择"alarm"(闹铃设置),按 [E]键确认; 3)按[C]键或[D]键选择闹铃1、2或3,按[E]键确 认并进入设置选项:闹铃方式(闹铃关、周一到 周五闹铃、周一到周六闹铃或每天闹铃)、闹铃 小时、闹铃分钟; 4)按[C]键或[D]键改变设置或调整数值,按住 [C]键或[D]键快速调整数值;... -
Page 28: 闹铃4-5设置
5)按[E]键确认设置并进入下一设置选项,或按 [B]键确认设置并返回上一设置选项。 闹铃关 周一-周五闹铃 每天闹铃 周一-周六闹铃 闹铃小时设置 闹铃分钟设置 10.1.2.闹铃4-5设置 1)在时间模式按住[B]键2秒进入模式菜单,按 [C]键或[D]键选择"settinngs"(设置模式), 按[E]键确认选择进入设置菜单; 2)按[C]键或[D]键选择选择"alarm"(闹铃设 置),按[E]键确认;... - Page 29 3)按[C]键或[D]键选择闹铃4或5,按[E]键确认 选 择 并 进 入 设 置 选 项 : 闹 铃 开 关 、 小 时 、 分 钟、月、日; 4)按[C]键或[D]键改变设置或调整数值,按住 [C]键或[D]键快速调整数值; 5)按[E]键确认设置并进入下一设置选项,或按 [B]键确认设置并返回上一设置选项。 闹铃关 闹铃开 闹铃小时设置 闹铃分钟设置 闹铃月设置 闹铃日设置 只有闹铃开启后才可设置闹铃时间、日期 等信息。...
-
Page 30: 开启/关闭整点报时功能
10.1.3.开启/关闭整点报时功能 1)在时间模式按住[B]键2秒进入模式菜单,按 [C]键或[D]键选择"settinngs"(设置模式),按 [E]键确认选择并进入设置菜单; 2)按[C]键或[D]键选择"alarm"(闹铃设置),按 [E]键确认; 3)按[C]键或[D]键选择CHIME,按[E]键确认; 4)按[C]键 或[D]键 开 启 / 关 闭 整 点 报 时 功 能 , 按[E]键确认。 整点报时开启 整点报时关闭 10.2.开启/关闭闹铃 设置好闹铃后,如需关闭或开启闹铃,可 在闹铃模式下操作,方法如下: 1 )在 时 间 模 式 按 住[ B ]键 2秒进入模式菜单,按[C] 键或[D]键选择"alarm"(闹 铃模式),按[E]键确认; 2)按[C]键或[D]键选择整... - Page 31 整点报时开启(显示 整点报时关闭(不显示 闹铃开启(显示 闹铃关闭(不显示 如果选择闹铃1-3,按[E]键闹铃关 - 每天 -周 一 到 周 六 - 周 一 到 周 五 循 环 切 换 , 用 户 根 据需要进行选择; 闹铃关 每天闹铃 周一-周五闹铃 周一-周六闹铃 4)按[B]键确认设置并返回模式菜单。 闹铃开启且闹铃时间到达时,手表内部的 蜂鸣器会发出约20秒的鸣响,按任意键中止。 时间模式下,显示 ,表示至少有一组闹 铃开启;若不显示表示所有闹铃都关闭。 时 间 模 式 下 , 显 示 ,...
-
Page 32: 跑表功能
11.跑表功能 表内置一个百分之一秒跑表计时器,最大 计时时间是99小时59分59秒。根据使用方法可 分为本分单段计时和分段计时两种。 11.1.单段计时 单段计时可用来测量一名选手的跑步时间, 方法如下: 在时间模式按住[B]键2秒进入模式菜单, 按[C]键或[D]键选择"stopwatch"(跑表模式), 按[E]键确认;按[E]键跑表开始计时,再按[E] 键停止计时,再按[E]键继续计时。 跑表模式 跑表清零 跑表计时 当前时间 跑表计时 跑表停止 跑表停止时,按住[D]键约2秒,跑表清零。... -
Page 33: 分段计时
11.2.分段计时 分段计时用来测量同时起跑的多名选手各 自的跑步时间,方法如下: )在时间模式按住[B]键2秒进入模式菜单,按 [C]键或[D]键选择选择"stopwatch"(跑表模式), 按[E]键确认; )按[E]键开始计时; )第一名选手到达终点时,按[D]键,屏幕显示 其所用时间;(此时跑表内部继续计时),再按 [D]键 ,返回跑表运行状态; )依此类推,每名选手到达终点时,按[D]键屏 幕显示其所用时间,再按[D]键,返回跑表运行 状态; )最后一名选手到达时,按[E]键跑表停止计时。 在跑表停止时,按住[D]键约2秒,跑表清零。 跑表清零 跑表计时 当前时间 跑表运行 分段计时 跑表停止 本表不保存计时数据,须实时查看记录。... -
Page 34: 倒计时功能
12.倒计时功能 本表可设定一时段后倒数计时;倒数为零 后,蜂鸣提示;按任意键中断蜂鸣。倒计时最 大时段长度为99小时59分59秒。使用倒计时之 前必须先设置倒计时初值,否则本表从99小时 59分59秒开始倒数计时。 12.1.设置倒计时初值 1)在时间模式按住[B]键2秒进入模式菜单,按[C] 键或[D]键选择"settinngs"(设置模式),按[E]键 确认选择并进入设置菜单; 2)按[C]键或 [D]键选择"timer"(倒计时设置),按 [E]键确认并进入设置选项:小时、分钟、秒; 3)按[C]键或[D]键调整数值,按住[C]键或[D]键 快速调整数值; 4)按[E]键确认设置并进入下一设置选项,或按 [B]键确认设置并返回上一设置选项。 倒计时设置 秒设置 小时设置 分钟设置 倒计时在运行时不可以设置倒计时初值, 必须先停止倒计时,才可以重新设置。 12.2.使用倒计时器 设置倒计时初值后,在时间模式按住[B]键2秒 进入模式菜单,按[C]键或[D]键选"timer"(倒计时模 式),按[E]键确认;按[E]键倒计时开始运行,再 按[E]键倒计时暂停,再按[E]键倒计时继续运行。... -
Page 35: 按键锁定/解锁
倒计时暂停时,按[D]键约2秒可恢复至初 值。 倒计时模式 倒计时初值 倒 计 时 当前时间 倒计时运行 倒计时暂停 倒计时结束后,表内的蜂鸣器将鸣响5秒 并自动恢复至倒计时初值。 若倒计时未停止,即使退出倒计时模式, 倒计时仍会继续运行直至倒数为零。 在时间模式屏幕显示 ,表示倒计时在运行。 13. 按键锁定/解锁 为了防止佩戴时不小心碰到按键造成误操 作,可将按键锁定,方法如下: 在时间模式按住[A]键直至 显示,表示按 键已锁定。 在按键锁定状态时,按住[A]键直至 不显 示,表示按键已解锁。... -
Page 36: 休眠模式
按键解锁( 不显示) 按键锁定( 显示) 按键锁定时,按所有按键均无效,只有按 键解锁后才可以使用按键。 14. 休眠模式 如果长时间不用佩戴,在时间模式同时按 住[A][B][C][D]四 个 按 键 进 入 休 眠 模 式 , 在 休 眠模式,手表会关闭传感器,跑表,闹铃,倒 计时等功能,只保留时间功能但不显示以节省 电源。 在休眠模式,同时按住[A][B][C][D]四个 按键回到时间模式并显示当前时间。 15.打开背景灯 除休眠模式及按键锁定外,按[A]键可打开 背景光约3秒。 16.防水性 本表具有50米防水性 ,可佩戴洗手、凉水 淋浴、游泳,但不可佩戴潜水和桑拿等。 为保持防水性: 1)要定期更换防水圈,一般是1-2年,如不更 换可能会因胶圈老化而受潮; 2)不能在水中操作按键。 17.更换电池 如果屏幕显示 ,表明电池电量不足,... -
Page 37: 注意事项
1) 2) 3) 4) 5) 6) 7) 8) 必须使用合格电池,如果用了不合格电池 或者未依照程序更换电池可能导致产品失效。 警告 - 请勿挤压或刺穿废旧电池,更不能 将其投入火中或水中,以免引起火灾。请正确 回收或丢弃废旧电池。 18.注意事项 警告 - 本表内置的高度,气压,指南针,温 度测量功能不能用于精度要求高的专业场合。... -
Page 38: 产品规格
注意 - 本表虽然符合行业标准,但本产品 与皮肤接触可能产生过敏反应或皮肤刺激。若 发生这种情况,请立即停止使用并咨询医生。 注意 - 本表由精密零件组装而成,请不要 自行拆卸或粗暴使用。 注意 - 不要在严寒,酷热,温度骤变的环 境中佩戴。 注意 - 不要在强磁,强电环境中佩戴。 注意 - 请确保传感器外表干净。 注意 - 请使用软布及清水清洁本表,不要 使用洗涤剂、溶剂、杀虫剂等化学品。 注意 - 本表如果出现功能异常,或者内部 出现水珠,水雾等,请找有资质的维修点维修。 19.产品规格 手表走时精度:+/-1秒/天 ( +/-30秒/月) 高度计测量范围:-500m—9000m (-1640ft—29527ft) 高度计分辨率: 1m 3ft 气压计测量范围: 300hPa—1100hPa — (8.86inHg 32.48inHg) 气压计分辨率:... - Page 39 CONTENTS ..................1 1.Introduction ...................1 2.Function ..........2 3.Pusher Button and LCD Display ................3 4.Selecting Mode .................3 4.1.Time Mode ........3 4.2.Altimeter/Barometer/Compass Mode ................4 4.3.Modes Menu ................5 5.Adjustment Menu ................5 5.1.Setting Menu ..................6 5.2.Setting Unit ................8 6.Using Altimeter ..............8 6.1.Altitude Calibration ............8 6.1.1.Input Sea Level Pressure...
- Page 40 ........18 8.3.Enter into Compass Mode ........19 8.4.Measuring Target Azimuth ........19 8.5.Tracking Target Orientation ................. 20 9.Time ..........20 9.1.Setting Time and Date .. 21 9.2.Review Time/ Date/ Sunrise and Sunset Time..............22 9.3.World Time ................23 10.Alarm ............23 10.1.Setting Alarm ....
-
Page 41: Introduction
1. Introduction We thank you for purchasing EZON hiking series and please read this operation instruction closely to know the function, the way of operation and the safety information of our product. This is a multi-functional watch combines altimeter, barometer, thermometer and electronic compass, and also time, calendar, alarm, stopwatch, timer. -
Page 42: Pusher Button And Lcd Display
3.Pusher Button and LCD Display : Button Backlight/Button Locked : Button Selecting Mode/Back : Button Altimeter/Down/Minus : Button Barometer/Up/ Plus : Button Compass/ Confirm Alarm Hourly Chime Stopwatch Timer Compass Button Lock Weather Forecast Weather Forecast Back Confirm Plus Minus Low Battery Level... -
Page 43: Selecting Mode
4.Selecting Mode This is a multi-functional watch, so you must select corresponding mode before using the function. 4.1. Time Mode Under the normal circumstance, our watch is in the time mode and displaying local time,date and week. Week Date Hour Minute Second Apart from the stopwatch mode, timer mode, barometer mode, altimeter mode, our watch will be back to... -
Page 44: Modes Menu
4.3.Modes menu The other mode of our watch can be selected in the mode menu, and the operating methods just as the following: In the time mode, hold on button[B]for 2 seconds to enter into mode menus: alalrm stopwatch timer world time memery Settings... -
Page 45: Adjustment Menu
5.Adjustment settings Before using our watch, you should setup it base on the specific situation or according to your usage habit. You should setup our watch in the setting mode. 5.1. Setting menu 1) In the time mode, hold on button[B]for 2 seconds to enter into mode menu, press button[C]/[D]to select “settings”... -
Page 46: Setting Unit
5.2. Setting Unit User can set display format and unit according to his/her habit. The watch will display with the initial format and unit if user do not set it. 1) In the time mode, hold on buton[B]for 2 seconds to enter into mode menu. - Page 47 Degree Celsius Setting Temperature Unit Degrees Fahrenheit Setting Pressure Unit inHg Meter Setting Altitude Unit Feet...
-
Page 48: Using Altimeter
6.Using Altimeter 6.1. Altitude Calibration By measuring the local air pressure with sensor, and based on sea level pressure and ISA (international standard atmospheric pressure conversion), our watch can extrapolate the current altitude. But the sea level pressure will be difference due to the different geographical regions, seasons, climate and time period. -
Page 49: Input Current Altitude
4)Input local sea level pressure, press button[C]/[D] to minus/plus number, hold on button[C]/[D]to minus/plus number quickly. 5) Press button[E]to confirm. 6.1.2. Input Current Altitude Before climbing the mountain, through the landmark or topographic map query current altitude; or make a precise altimeter measurement current height, then the height of the table value input, to calibrate altimeters. -
Page 50: Altitude Measurement
and then display the result of measurement after 2 seconds). In the first 3 minutes, it will measure altitude every 5 seconds. After 3 minutes, it will measure altitude every 1 minute. Press button[B]to exit altimeter mode and back to the time mode. Altitude Trend Graph Relative Altitude Altitude... -
Page 51: Relative Altitude Measurement
Our watch can not measure the aircraft flying altitude due to the air in the aircraft has been compressed. 6.4. Relative altitude measurement Enter into the altimeter mode at the beginning point (see chapter 6.2), then hold on button[ A ] to setup 0 as relative altitude. -
Page 52: Altitude Record Query/Delete
:800m Maximum altitude : 0m Minimum altitude 800m : 1090m Total upward altitud : 1000m Total downward altitude 300m Ending Point 100m Beginning Point Entering into altimeter mode for 3 minutes, our watch can record altitude automatically, and can save up to 30 records. - Page 53 (Connect to the former Page) Automatic Record List Recording Time or Date or Year Maximum Altitude Minimum Altitude Total Upward Altitude Total Downward Altitude 2)Press button[C]/[D]to review manual/automatic record, press button[E]to confirm, press button[B]to exit memory mode. Press button[E]for about 2 seconds can delete the current record when you are looking the memory.
-
Page 54: Using Barometer And Thermometer
7.Using barometer and thermometer 7.1. Setting weather Our watch can predict weather by the changes of the pressure trend. In order to improve the accuracy of the weather forecast, please set the current weather before using weather forecast. 1)In the time mode, hold on button[B]for 2 seconds to enter into mode menu, press button[C]/[D]to select “settings”... -
Page 55: Review Pressure/Temperature/Weather Forecast
7.2.Review pressure/temperature/weather forecast In the time/altimeter/compass mode, press button [D]to enter into the barometer mode (display mode mark and then display the result of measurement after 2 seconds). In the first 3 minutes, it will measure pressure and temperature every 5 seconds. After 3 minutes, it will measure pressure and temperature every 1 minute. -
Page 56: Using Compass
8. Using compass While using compass, please keep the watch in the horizontal position and also far from the magnetic fields.It often needs to calibrate the compass and set the declination before measuring orientation. 8.1Compass calibration In order to avoid the magnetic impact, please calibrate compass after replacing battery or moving to the other place. -
Page 57: Setting Declination
8.2. Setting declination Daily map indicates the geographic north pole, but compass indicates the geomagnetic north pole. The angle between geographic and geomagnetic is considered as declination. Geomagnetic north pole trend to east means that the angle of deviation is positive, and trends to west means that the angle of deviation is negative. -
Page 58: Enter Into Compass Mode
3)Press button[C]/[D]to select “declination” (setting declination), press button[E]to confirm and enter into the setting items: turn on/off the declination, declination trend to east/ west,declination. 4)Press button[C] / [D]to revise setting and minus/plus number. 5) Press button[E]to confirm setting and enter into the next setting item, or press button[B]to confirm setting and back to the former item. -
Page 59: Measuring Target Azimuth
There may be some error due to the compass has been magnetized, so you should place the watch far from strong magnetic sources to avoid be magnetized. If you find the compass has been magnetized, then calibrate the compass refer to chapter 8.1. 8.4. -
Page 60: Setting Time And Date
Setting time-date Select Cities Turn on/off Key Tone Setting Hour Setting Date Setting Minute Setting Month Setting Year (2010-2059) Second Cleared... -
Page 61: Time
5)Press button[E]to confirm setting and enter into the next setting item, press button[B]to confirm setting and back to the former setting item. Please select to the right city since it will effect the sunrise and sunset time. Our watch can display 40 cities sunrise and sunset time. -
Page 62: Worldtime
9.3. WorldTime Our watch contains 48 cities local time in the 24 time zone. 48 cities chart as below: City Name City Name Time Zone Time Zone Pago Pago Cairo Jerusalem Honolulu Moscow Anchorage Jeddah Vancouver Los Angeles Tehran Dubai Edmonton Kabul Denver... -
Page 63: Alarm
City Name Local Time Worldtime Mode Hold on button[E]to turn on/off daylight saving time. You should turn on the daylight saving time if the local people use it. Turn off daylight saving time Turn on daylight saving time 10. Alarm Our watch has 5 sets of alarm and hourly chime function. -
Page 64: Setting Alarm-4 And Alarm-5
5) Press button[E]to confirm setting and enter into the next setting item, or press button[B]to confirm setting and back to the former setting item. Alarm OFF Monday to Friday Daily Alarm Monday to Saturday Hour setup Minute setup 10.1.2.Setting alarm-4 and alarm-5 1)In the time mode, hold on button[B]for 2 seconds to enter into mode menu, press button[C]/[D]to select “settings”(setting mode), press button[E]to confirm... - Page 65 3)Press button[C]/[D]to select alarm-4/alarm-5, press button[E]to confirm and enter into setting items: turn on/off alarm, hour, minute, month and date; 4) Press button[C]/[D]to revise setting or minus/plus the number, hold on button[C]/[D]to minus/plus the number quickly. 5) Press butt on[E]to confirm setting and enter into the next setting item,or press button[B]to confirm setting and back to the former setting item.
-
Page 66: Turn On/Off Hourly Chime
10.1.3.Turn on/off hourly chime 1)In time mode, hold on button[B]to enter mode menu, press button [C]/[D]to select “settings”, press button [E]to confirm. 2)Press button[C] / [D]to select “alarm”, press button[E] to confirm; 3)Press button[C] / [D]to select “chime”, press button[E] to confirm;... - Page 67 Chime On (display Chime Off (will not display Alarm On (display Alarm Off (will not display If you select alarm-1/alarm-2/alarm-3, press button[E]to convert: turn off alarm, daily alarm, Monday to Saturday alarm, Monday to Friday alarm. You can select it base on your needs. Alarm off Daily alarm Monday to Friday alarm...
-
Page 68: Stopwatch
11. Stopwatch There is a hundredths timer with 1% second stopwatch in our watch. The maximum time period of the stopwatch is 99 hours and 59 minutes 59 seconds. It can further divide into stopwatch and split according to the different methods of usage. -
Page 69: Split
11.2.Split Split is available to measure the running time of each athlete among different members and just operating it as the following steps: 1)In time mode, hold on button[B]for 2 seconds to enter mode menu, press button[C]/[D]to select “stopwatch” and press button[E]to confirm. 2)Press button[E]to begin chronograph. -
Page 70: Timer
12. Timer Our watch can set a time period for countdown. When countdown to the zero, there will be a chime, and press any button can stop the chime. The maximum countdown time period is 99 hours 59 minutes and 59 seconds. You must set initial countdown time before using timer. -
Page 71: Button Locked/Unlocked
In the status of stopping countdown, press button[D] can back to the initial countdown time. Timer Mode Setting Initial Countdown Time Timer Current Time Countdown Timer Running Countdown Timer Pause At the end of countdown time, there will be a chime last for about 5 seconds and back to the initial countdown time automatically. -
Page 72: Sleeping Mode
Button Unocked (will not display Button Lock (display Under the status of button lock, it is no use to operate all buttons. Only in the status of button unlocked, you can operate the buttons 14. Sleeping Mode If you do not wear our watch for a long time, in time mode, press button[A][B][C][D]together to make the watch enter into the sleeping mode. -
Page 73: Safety Information
1) 2) 3) 4) 5) 6) 7) 8) It is necessary to use qualified battery because to that the unqualified battery or failed to follow the operating steps may cause failure to use our watch. Warning: In order to avoid the fire, please do not crush, puncture or even throw the used battery in a fire or in water. -
Page 74: Product Specification
Note:Our watches complies with industrial standards, but please stop wearing it if there are any allergic reaction or skin irritation and please consult a doctor. Note:Our watch consists of precision electric parts, please do not attempt to remove or rough wearing. Note:Please do not wear our watch in the environment of severely cold, extremely hot, temperature changing rapidly.
Need help?
Do you have a question about the Professional Hiking Series and is the answer not in the manual?
Questions and answers