
Subscribe to Our Youtube Channel
Related Manuals for Ezon Running Training Series


Summary of Contents for Ezon Running Training Series
- Page 1 健 步 运 动 腕 表 系 列 Running Training Series 使 用 说 明 书 Operation Instruction Manual 中...
- Page 2 M019- 2 M020-2...
-
Page 3: Table Of Contents
目 录 1.简介............1 2.功能特征..........1 3.按键及LCD显示 ........2 4.休眠状态..........2 5.计时功能..........3 5.1.查看时间..........3 5.2.时间与日期设置........3 6.闹铃及整点报时........5 7.计步器............6 7.1.用户资料设置........7 7.2.测 量 步 长..........8 7.3.使用计步器...........8 7.4.实时查询锻炼数据.......9 7.5.关闭计步器.........10 7.6.查看锻炼记录........11 8.跑表功能..........13 8.1.进入跑表模式........13 8.2.单段计时..........13 8.3.圈计时..........14 8.4.查看圈计时记录.........15 8.5.删除圈计时记录.........16 8.6.退出跑表模式........16 9.按锁键............17 10.背景光..........17 11.防水性..........17 12.更换电池..........18 13.注意事项..........19 14.产品规格..........19... -
Page 4: 功能特征
1.简介 感 谢 您 购 买 宜 准 健 步 运 动 腕 表 , E Z O N 在 使 用 之 前 请 仔 细 阅 读 说 明 书 。 了 解 该 产 品 的功能、操作方法及注意事项 。 本表为可测量行进步数的多功能手表,不... -
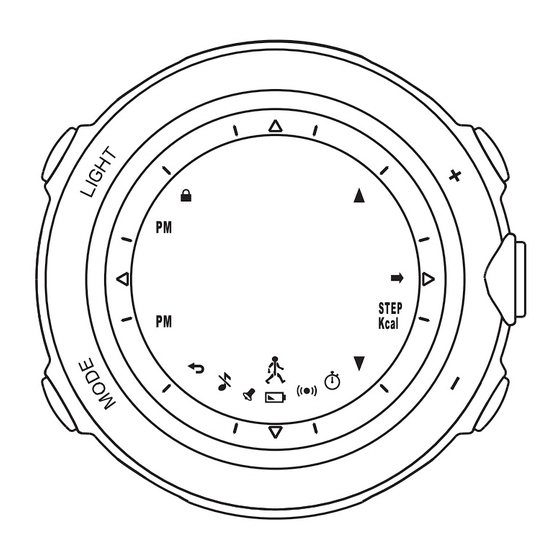
Page 5: 按键及Lcd显示
3.按键及LCD显示 按键[A]: 背光/锁键 按键[B]: 设置/返回 按键[C]: 记录/向下/减少 按键[D]: 跑表/向上/增加 按键[E]: 确认/开始/停止 计步符号 跑表符号 闹铃符号 整点报时符号 确认按键提示 返回按键提示 增加按键提示 减少按键提示 按键锁符号 键音关符号 低电压提示符号 步数 卡路里燃烧值 4.休眠状态 如果长时间不佩戴,为节约电池电 源,可 在时间模 式 同 时 按 住[A][B][C][D]四个 按 键 进 入 休眠 状态。在休眠状态,手表只保留计时 功 能... -
Page 6: 计时功能
5.计时功能 5.1.查看时间 在 时 间 模 式 , 连 续 按[ B ]键 可以循环查看 当前时间、星期及日期、秒。 时间 时间 星期、日期 时间 秒 时间模式 5.2.时间与日期设置 1)在时间模式按住[B]键,进入设置菜单; 2)在设置菜单按[C]键或[D]键 选 择"Time- ate" (时 间-日 期 设 置), 按[ E]键 确 认 ; 3)其 设 置 选 项 为:小时、分钟、秒 、12/ 2 4 时 制、年、月、日、日期格式、键音开/关;... - Page 7 时间模式 设置菜单 小时 键音开/关 分钟 日期格式 秒清零 日 12/24时制 月 年...
-
Page 8: 闹铃及整点报时
6.闹铃及整点报时设置 若开启闹铃,在设定的时间手表蜂鸣约20 秒;蜂鸣时按任意键可中止蜂鸣。 若开启整点报时,整点时手表蜂鸣提醒。 在时间模式,显示 表示闹铃开启,不显 示 表示闹铃关闭。 在时间模式,显示 表示整点报时开启, 不显示 表示整点报时关闭。 闹铃开启 整点报时开启 开启或关闭闹铃及整点报时,方法如下: 1)在时间模式按住[B]键,进入设置菜单; 2)按[C]键或[D]键选择"Alarm"(闹铃设置),按 [E]键确认; 3)其设置选项为:整点报时开关、闹铃开关、 闹铃小时、闹铃分钟; 按[C]键或[D]键改变设置或调整数值,按 住[C]键或[D]键可快速调整数值; 4)按[E]键确认设置并进入下一设置选项;或按 [B]键确认设置并返回上一个设置选项; 5)回到设置菜单时,按[B]键返回时间模式。... -
Page 9: 计步器
设置菜单 整点报时开关 闹铃开关 闹铃分钟 闹铃小时 7.计步器 7.1.用户资料设置 锻炼前建议先将年龄性别等个人资料输入 表中。 1)在时间模式按住[B]键,进入设置菜单; 2)按[C]键或[D]键选择"User"(用户资料设置), 按[E]键确认; 3)其设置选项为:性 别、年龄、单位、体重、身 高、步长; 按[C]键或[D]键调整数值或改变设置,按 住[C]键或[D]键可快速调整数值; 4)按[ E]键 确 认 设 置 并 进 入 下 一 设 置 选 项 ; 或 按[B]键确认设置并返回上一个设置选项;... - Page 10 5)设置结束后,本表可自动算出用户BMI(身体 质量指数); 6)回到设置菜单时,按[B]键返回时间模式。 设置菜单 性别 年龄 BMI指数 步长 公制/英制单位 身高 体重 正 常 人 体 的 BMI指 数 在 18.5-24.0, 小 于 18.5偏 瘦 , 大 于 24.0偏 胖 , 大 于 30.0属 于 肥 胖。...
-
Page 11: 测量步长
7.2.测量步长 步长是指 一只脚的脚尖到另一只脚的脚尖 的距离, 每个人的步长与个人身高、走路姿势、 习惯步频有关,可以通过下面方法进行测量。 按照个人习惯走10步以上(步数越多,其测量结 果 越 准 确), 然 后 测 量 出 起 点 到 最 后 一 步 的 距 离,再将距离除以步数,得出个人步长。例如: A 走了10步,距离是6.0米,那么他的步长为: 6.0米/10=60厘米。 6.0米 使用计步器 7.3. 在时间模式,按[E]键进入锻炼模式(先 显示 锻炼模式标识2秒,然后进入锻炼模式), 计 步 器 开 始 测 量 。 每天第一次使用计步器时,起始数据为零;... -
Page 12: 实时查询锻炼数据
计步器是通过感应步行中手臂的摆动来测 量步数,出现下列情况计步器可能无法正确测 量: 1)手表佩戴过于宽松; 2)将手插入口袋; 3)将手表挂在背包等物品上; 穿着拖鞋、木屐等行走; 5 在拥挤场所行走; 6 频繁起立和坐下; 7 步行外的剧列运动,如打篮球、网球、羽毛 球等球类; 8 乘坐交通工具,如骑自行车、坐公交车等; 9 上下楼梯或山峰; 10 频繁变更行进速度; 11 短距离快跑; 12)步行停止时手臂连续摆动。 每人每天步行1万步以上有益身体健康。 如果您存在下列情况:长时间未锻炼、身 体有心血管呼吸道等疾病、孕妇、正在使用医 疗器械、经常抽烟酗酒,高强度的锻炼具有一 定的风险,使用本表之前,先咨询医生。 7.4.实时查询锻炼信息 在 锻 炼 模 式 , 可 实 时 查 询 锻 炼 数 据 , 按 [C]键或[D]键可循环查看步数、当前时间、锻... -
Page 13: 关闭计步器
步数 卡路里 距离 锻炼时间 当前时间 7.5.关闭计步器 在锻炼模式按住[E]键直到手表返回到时间 模式,计步器停止计步。... -
Page 14: 查看锻炼记录
锻炼模式 时间模式 计步器运行时,如果手表静置超过1小时, 手表将自动关闭计步器,并返回时间模式。 7.6.查看锻炼记录 本表每晚12点自动存储当天锻炼数据,本 表只保留最后10天的锻炼记录。查看锻炼记录 的方法如下: 1)在 时 间 模 按 住[C]键 进 入 记 录 模 式(先 显 示 记 录 模 式 标 识 ,2秒 后 显 示 记 录 中 卡 路 里 燃 烧 值 柱状图,1个柱状表示一天数据);... - Page 15 时间模式 时间模式 记录模式标识 记录模式标识 卡路里柱状图 步数 卡路里燃烧 卡路里燃烧 速度 锻炼持续时间 锻炼持续时间 距离...
-
Page 16: 跑表功能
8.跑表功能 跑表测量范围为99小时59分59秒,有单 段 计时和圈计时两种方式。 8 .1.进入跑表模式 时间模 式按[D]键可进入跑表模 式( 先显示 模式标题,约2秒后进入跑表模式);或连续按[D] 两次,快速进入跑表模式。 时间模式 跑表模式 8.2.单段计时 单段计时可 用 来 测 量一名选手总的跑步时 间,方法如下: 在跑表模式 按[ E]键开始计时,再 按[ E]键 停止计时,再按[E]键继续计时。 跑表清零(不显示 ) 跑表停止(不显示 ) 跑表运行(显示... -
Page 17: 圈计时
8.3.圈计时 在跑道跑步或赛车时,可用圈计时记录每 圈所用时间和总跑步时间。本表最多可记录30 个圈计时。 进入跑表模式;起跑时按[E]键开始计时, 第一圈结束时按[D]键,屏幕显示第一圈圈记录 (圈计时和总计时),并且开始下一圈计时;约5秒 后手表自动 返 回 跑 表 运 行 界面;依次类推,每 圈结束时按[D]键;最后一圈结束时按[D]键, 再按[E]键停止跑表运行。 跑表清零(不显示 ) 圈计时 总计时 跑表运行(显示 圈号 圈计时 总计时 圈记录( 闪烁) 跑表停止(不显示 ) 本表最多只可记录30圈圈计时。 每次使用圈计时前,应先将上次的存储记 录删除(参见8.5章节)。... -
Page 18: 查看圈计时记录
8.4.查看圈计时记录 跑表停止运行后,按[C]键进入跑表记录界 面,然后连续按[C]键或[D]键可循环查询各圈记 录(圈计时和总计时)、最佳圈及圈计时、平均圈 计时 。按[B]键返回跑表模式 。 跑表停止 圈号 圈计时 总计时 第1圈记录 其他圈记录 圈号 圈计时 最佳圈计时 平均圈计时... -
Page 19: 删除圈计时记录
最佳 圈(BEST LAP)指圈计时数据最小的圈。 平均圈计时(AVG LAP)=总时间/总圈数 8.5.删除圈计时数据 跑表停止时,按住[D]键约3秒( 环绕一 圈)即可删除跑表数据。 跑表停止 数据删除中 跑表清零 8.6.退出跑表模式 在跑表模式按[B]键返回时间模式。 在时间模式,显示 表示跑表处于计时状 态。不显示 表示跑表停止计时. 在跑表模式,跑表停止一分钟后,本表将 自动回到时间模式。... -
Page 20: 按锁键
9.按键锁 为了防止佩戴时不小心碰到按键造成误操 作,可将按键锁定,方法如下: 在时间 模 式 按 住[A]键直至 显 示,表示 按键锁已锁定。 按键锁锁定时,按住[A]键直至 不显示, 表示按键锁已打开。 按键锁定 按键锁锁定时,用户仍可进入或退出休眠 状态,但进行其他按键操作须先打开按键锁。 10.背景光 除休眠状态和按键锁定外,按[A]键可点亮 背景光约3秒。 11.防水性 手表具有50米防水性。可佩 戴 洗手、凉水 淋浴、游泳,但不可佩戴潜水和桑拿等。 为保持防水性: 1)要定期更换防水圈,一 般 是1 - 2年,如不更 换,手表可能会因胶圈老化而受潮; 2)不 能 在 水 中 操 作 手 表 按 键。... -
Page 21: 更换电池
12.更换电池 屏幕出现 ,表示手表 电池电压太低,需更换电池。 更换电池方法及步骤如下: 低电压提醒 1) 2) 6) 7) 8) 警告 - 请勿挤压或 刺 穿 废 旧 电 池,更不能 将其投入火中或水中,以免引 起火灾。请正确 回收或丢弃废旧电池。 必须使用合格电池,如果 用了不合格电池 或者未依照程序更换电池可能导致产品失效。... -
Page 22: 注意事项
13.注意事项 警告 - 本表内置测量功能不能用于要求高 精度的专业测量。 警告 - 本表 测 量 数 据只供参考,使用其在 锻 炼 过程中出现危险或伤亡者,本表不负任何 责任。 注意 - 本表虽然符合行业标准,但本产品与 皮肤接触可能产生过敏反应或皮肤刺激,若发 生这种情况,请立即停止使用并咨询医生。 注意 - 本表由精密零件组装而成,请不要 自行拆卸或粗暴使用。 注意 - 不要在严寒,酷热,温度骤变的环 境中佩戴 注意 - 不要在强磁,强电环境中佩戴。 注意 - 请确保传感器外表干净。 注意 - 请使用软布及清水清洁本表,不要 使用洗涤剂、溶剂、杀虫剂等化学品。 注意 - 本表如果出现功能异常,或者内部 出... - Page 23 CONTENTS 1.Introduction............1 2.Function............1 3.Button and LCD Screen........2 4.Sleeping Status..........2 5.Time..............3 5.1.Viewing Time..........3 5.2.Setting Time and Date........3 6.Alarm and Hourly Chime........5 7.Pedometer............6 7.1.Setting User Information........6 7.2.Measuring Step Distance.......8 7.3.Using Pedometer...........8 7.4.Viewing Exercise Data in Real time....9 7.5.Turning off Pedometer........10 7.6.Viewing Exercise Record......11 8.Stopwatch............13 8.1.Entering Stopwatch Mode.....,..13 8.2.Count up Timer..........13...
-
Page 24: Introduction
1.Introduction Thank you for purchasing EZON running training series watch. Please read this operation instruction to know the functions, the way of operation and the safety information before using this watch. This is a multi-functional watch which has time, ca- lendar, alarm, stopwatch, and also can measure steps, distance, speed and calories. -
Page 25: Button And Lcd Screen
3.Pusher Button and LCD Display Button [A]: Backlight/Button Lock Button [B]: Set/Back Button [C]: Record/Down/Minus Button [D]: Stopwatch/Up/Plus Button [E]: Confirm/Start/Stop Pedometer Stopwatch Alarm Hourly Chime Confirm indicator Back indicator Plus indicator Minus indicator Button Lock Key Tone Low Battery Indicator Step number Calories Consumption... -
Page 26: Time
5. Time 5. .V iewing Time In the time mode, the watch display current time. Press button [B] scroll through to view current time, week and date, second. Time Time Week Date Time Second Time Mode 5.2. Setting Time and Date 1)In the time mode, press down button [B] to enter the setting menu. - Page 27 Time Mode Setting Menu Hour Key Tone Minute Date Format Second Cleared Date 12h/24h Format Month Year...
-
Page 28: Alarm And Hourly Chime
6. Alarm and Hourly Chime If you turn on the alarm, this watch will chime for about 20 seconds while reaching the alarm time. You can stop the chime with any button. If you turn on hourly chime, this watch will beep once every hour on the hour. -
Page 29: Pedometer
Setting Menu Hourly Chime on off Alarm on off Alarm Minute Alarm Hour 7. Pedometer 7.1. Setting User Information Please set user information such as age, sex, etc. before using pedometer. 1)In the time mode, press down button [B] to enter the setting menu. - Page 30 5)After setting user information, the watch will calcu- late user BMI (Body Mess index). 6)In the setting menu, press button [B] to return to the time mode. Setting Menu BMI Index Step Distance Imperial and Metric Units Height Weight The BMI between 18.5 and 24.0 means normal, less than 18.5 means a little thin, more than 24.0 me- ans a little fat, more than 30.0 means too fat.
-
Page 31: Measuring Step Distance
7.2 Measuring Step Distance Step distance means the distance between one tiptoe and another tiptoe. It concerned with height, walking pose and frequency. We can measuring step distance as the following: Walk more than 10 steps with your habit (the more steps, the more accurate), then measure the distance between the starting point and the last step, the distance divided by step number is step distance. -
Page 32: Viewing Exercise Data In Real Time
The p edometer measures the step number by se- nsing the user arm swing, Using the pedometer with the following way may lead to inaccurate result. 1)Wearing the watch loosely; 2)Putting hands in the pocket; 3)Hanging the watch on the bag, etc.; 4)Wearing slipper or wooden clogs while walking;... -
Page 33: Turning Off Pedometer
Step number Calories Distance Exercise Time Current Time 7.5. Turning off Pedometer In the exercise mode, press down button [E] until the watch returns to the time mode, then the pedometer stops running. -
Page 34: Viewing Exercise Record
Exercise Mode Time Mode While the pedometer is running, if you keep the watch motionless for one hour, this watch will turn off the pedometer and return to the time mode automa- tically. 7.6. Viewing Exercise Record This watch saves the exercise data at 12 o'clock at night every day. - Page 35 Time Mode Record Mode Mark Histogram Steps Calories Speed Exercise Time Distance...
-
Page 36: Stopwatch
8. Stopwatch The maximum of stopwatch measurement is 99 hours 59 minutes and 59 seconds. It has two ways to measure: count up timer and lap timer. 8.1. Entering Stopwatch Mode time mode, press button to enter stop- watch mode ( the watch will display the mode mark for 2 seconds, then enter... -
Page 37: Lap Timer
8.3. Lap Timer While running or racing on the track, you can use lap timer to measure each lap time and total time. This watch can save up to 30 laps data. stopwatch mode, press button start the stopwatch. At the end of the first lap, press button , the watch will display the first lap data(lap time... -
Page 38: Viewing Lap Timer Record
8.4. Viewing Lap Timer Record After stopping the stopwatch , press button view lap timer record, then press button [C]/[D] t o scroll through the following view: each data (lap time and total time), best lap and best lap time, average lap time. Press button return stopwatch mode. -
Page 39: Deleting Lap Timer Record
Best lap indicates the lap which the ap time is the shortest. Average lap time (AVG LAP)= Total time/Lap num- ber. 8.5. Deleting Lap Timer Record en the stopwatch stop , s you can delete stop- watch record by pressing down button [D] until runs a round . -
Page 40: Button Lock
9. Button Lock In order to prevent mis-operation due to pressing a button accidentally when you wear the watch, you can turn the button lock off. The way is as following: In the time mode, press down button [A] un appears , it indicates... -
Page 41: Replacing Battery
12. Replacing Battery means battery in low level appears in the screen. You should replace battery in time. The way is as the following: Low Battery Warning 1) 2) 6) 7) 8) Warning: In order to avoid the fire, please do not crush, puncture or even throw the used battery into fire or water. -
Page 42: Safety Information
13. Safety Information Warning: The function of our watch can not be use in professional field where requires high accuracy. Warning: The measurement result in our watch is only for your reference, and we take no responsibility for you risk, hurt or even dead during exercising. Note: The watch complies with industrial standa- rds.
Need help?
Do you have a question about the Running Training Series and is the answer not in the manual?
Questions and answers