Table of Contents
Advertisement
Advertisement
Table of Contents

Subscribe to Our Youtube Channel
Related Manuals for KAYO MOTOR TS90


Summary of Contents for KAYO MOTOR TS90
- Page 1 ZHEJIANG KAYO MOTOR CO., LTD. KAYO MOTO TS90 SERVICE MANUAL www.kayomoto.com...
- Page 2 ZHEJIANG KAYO MOTOR CO., LTD.
- Page 3 The vehicle pictured in this owner’s manual may not match your actual vehicle. PREFACE Congratulations on your purchase of the 2021 TS90 Dirt Bike, and we believe that this choice won’t let you down. This manual will give you an understanding of the better use of our product,it has specialized the maintenance and adjustment procedures, disassembly and assembly points, inspection and repair www.kayomoto.com...
-
Page 4: Table Of Contents
AUGUST. 2021 CONTENT MEANINGS OF REPRESENTATION…………………………………………………………….. 9 SYMBOLS USED………………………………………………………………………………9 DEGREES OF RISK AND SYMBOLS……………………………………………………...…9 ADVICE………………………………………………………………………………….………….10 COMPONENTS AND POSITIONS………………………….……………………………………..11 2021 TS90 COMPONENTS AND POSITIONS………………………………………….12 VIN CODE AND ENGINE NUMBER……………………………………………………….……..13 VIN CODE……….………………....................13 ENGINE NUMBER……………....................13 PARAMETER............................14 2021 TS90 DIMENSION AND QUALITY PARAMETER............14 www.kayomoto.com... - Page 5 ZHEJIANG KAYO MOTOR CO., LTD. CONTROLS............................15 FRONT DISC BRAKE........................15 THROTTLE LEVER........................15 STARTING...........................16 STOPPING...........................16 FUEL TANK SWITCH........................16 SHIFTING............................17 REAR DISC BRAKE........................17 PARKING SUPPORT........................18 PREPAREING FOR USE........................18 ADVICE ON FIRST USE......................18 RUNNING-IN PROCESS......................18 RIDING INSTRUCTIONS.........................19 PREPARATION BEFORE RIDING..................19 PRECAUTIONS FOR STARTING..................19 PREACUSTIONS STOPPING.....................20 PREACUTIONS FOR TURNING...…………………………………………………………..20...
- Page 6 ZHEJIANG KAYO MOTOR CO., LTD. REMOVING OR INSTALLING THE MUFFLER TUBE………………………....28 REMOVING OR INSTALLING THE FUEL TANK………………………………....29 CHECK AND CLEAN THE CHAIN…………...…………………………......….29 REMOVING OR INSTALLING THE CHAIN……... ……………………………....29 CHECK AND ADJUST THE CHAIN TENSION. ………………………………....….29 CHECK THE STRUCTURE OF THE REAR SPROCKET, ENGINE SPROCKET AND GUIDE CHAIN……………....................…………30...
- Page 7 ZHEJIANG KAYO MOTOR CO., LTD. REMOVAL OF CYLINDER HEAD LEFT COVER...............42 TIMING CHECKING......................42 REMOVAL VALVE COVER....................43 CHECK THE VALVE CLEARANCE...................43 REMOVAL OF CYLINDER HEAD..................43 DISASSEMBLE OF CYLINDER HEAD................44 CHECK THE VALVE AND VALVE SPRING................45 CHECK THE LINKAGE AND LINKAGE AXLE..............45 CHECK THE CAMSHAFT COMPENTS................
- Page 8 ZHEJIANG KAYO MOTOR CO., LTD. ASSEMBLE THE OIL PUMB..................60 ASSEMBLE THE DRIVING DEAR AND DRIVN GEAR...........60 ASSEMBLE THE CLUTCH..................60 INSTALLING THE CLUTH.......................61 INSTALLING THE RIGHT CRANKSHAFT COVER…………………………..61 ASSEMBLE THE RIGHT CRANKSHAFT COVER.............62 ASSEMBLE THE RIGHT DECORATIVE COVER..............62 MAGNETO、TIMING CHAIN..................62 NOTICES........................62 REMOVAL OF THE REAR LEFT COVER..............63...
-
Page 9: Meanings Of Representation
ZHEJIANG KAYO MOTOR CO., LTD. LEFT AND RIGHT CRANKCASE BEARING INSPECTION........71 SHIFT FORK AND SHIFT FORK SHAFT INSPECTION……………………….....71 MAIN AND COUNTER SHAFT COMBINATION INSPECTION.........71 STARTER SHAFT INSPECTION....................71 VARIABLE SPEED DRUM INSPECTION................72 INSTALLATION OF THE VARIABLE SPEED DRUM............72 INSTALLATION OF MAIN AND COUNTER SHAFT.............72 INSTALLATION OF THE CRANK SHAFT AND THE STARTER SHAFT......72... -
Page 10: Advice
ZHEJIANG KAYO MOTOR CO., LTD. taken. Other important information: Please note that it is not practical or possible to warn you about all hazards associated with operating or maintaining a motorcycle. Therefore, you must have basic mechanical safety knowledge and use your own good judgement. -
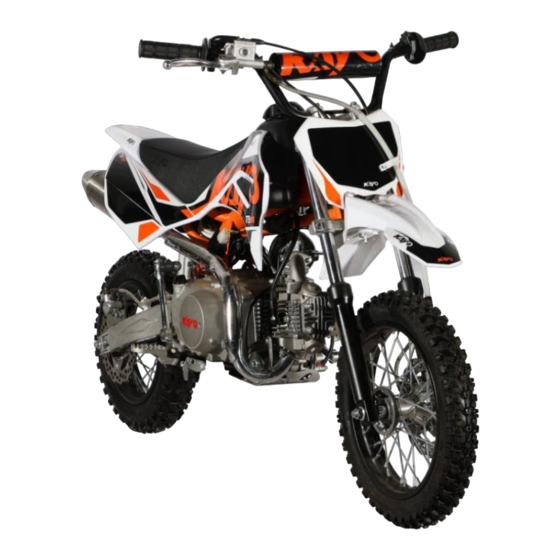
Page 11: 2021 Ts90 Components And Positions
ZHEJIANG KAYO MOTOR CO., LTD. APPEARANCE 2021 TS90 COMPONENTS AND POSITIONS 9 10 11 12 13 14 Name Name Front fender Front shock Fuel tank Front panel Handlebar Carburetor Vent pipe Gear shift lever Fuel tank cap Pedal Fuel tank petcock... - Page 12 ZHEJIANG KAYO MOTOR CO., LTD. 26 27 Name Name Rear fender Rear brake caliper Exhaust pipe muffler Swing arm Seat Rear brake oil cup Rear shock Brake pedal Upper clamp Exhaust pipe Lower clamp Front disc brake Rear disc brake...
-
Page 13: Vin Code
ZHEJIANG KAYO MOTOR CO., LTD. VIN CODE Vin code of 2021 TS90 are located on the head pipe. ENGINE NUMBER The engine number of the 21 TS90 is located on the engine box inside the shift lever. PARAMETER www.kayomoto.com... -
Page 14: Controls
ZHEJIANG KAYO MOTOR CO., LTD. DIMENSIONS AND QUALITY PARAMETER – 2021 TS90 L*W*H(mm) 1445×670×885 Wheelbase(mm) 1025 Net weight(kg) Tire size F:2.50-12;R:3.00-10 Seat height(mm) Min ground clearance ( mm) Tank volume(L) Engine Parameters 、 、air coooling、automatic clutch Engine type Single cylinder... -
Page 15: Front Disc Brake
ZHEJIANG KAYO MOTOR CO., LTD. FRONT DISC BRAKE The front disc brake is controlled by the hand brake lever, which is fitted on the right side of the handlebar and functioned by the pinching the lever with your right hand. -
Page 16: Stopping
ZHEJIANG KAYO MOTOR CO., LTD. The start button is a round yellow one and fitted on the right side of the handlebars, near the throttle grip. It needs long press on the button when starting. Attention : When starting, you should pinch the brake... -
Page 17: Rear Disc Brake
The gearshift is located on the left side of the engine, which is functioned by stepping on and hooking on the shift lever. 2021 TS90 has engage four speed transmission. gearshift REAR DISC BRAKE The foot brake pedal is located on the right side of the engine and is functioned by stepping. -
Page 18: Prepareing For Use
ZHEJIANG KAYO MOTOR CO., LTD. 2021 TS90 use a single side stand for parking. It locate on the left side of the motorcycle. when using, straighten the vehicle, kick the single stand to expend it, and lean the motocycle to the left until its weight rest on the side stand. -
Page 19: Precautions For Starting
ZHEJIANG KAYO MOTOR CO., LTD. 5. Check brake pad wear condition at the foot brake clamp system. 6. Check braking system operate condition. 7. Check the chain. 8. Inspect rear sprocket, engine sprocket and chain guide structure. 9. Check the chain adjuster. -
Page 20: Precautions For Shifting
To ensure the best driving characteristics of the vehicle and avoid damage to swingarm, shock absorbers, linkage and frame, the basic setting of the suspension components must match the driver's weight. Check tire The total standard rider mass of the 2021 TS90 off-road pressure○●●●Check hub bearings for www.kayomoto.com... -
Page 21: Suspension System
ZHEJIANG KAYO MOTOR CO., LTD. loose●●●Check the wheel hub●●●Check motorcycle is shown in the table below. for rim edge pulsation○●●●Check the TS90 20~40kg spoke tension○●●●Check chain, rear sprocket, engine sprocket, guide sleeve If the rider's weight is above or below the standard and chain guide→p.46●●●Check chain... -
Page 22: Driver
"A2". Use a single stand to support the vehicle Calculate the difference between "A1" and "A2" and denote it as "D1". The value of "D1" when 2021 TS90 motorcycle leaves factory is shown below TS90 10~34mm MEASURE DISTANCE BETWEEN REAR WHEEL CENTER AND REAR FENDER IN... -
Page 23: Adjusting The Spring Preload Of Rear Shock Absorber
ZHEJIANG KAYO MOTOR CO., LTD. factory value, you should decrease the spring preload appropriately; Conversely, increase the spring preload. If "D2" is far less than the factory value, replace the spring with a softer one; Conversely, replace the spring preload with a harder one. -
Page 24: Removing Or Installing The Front Disc Brake
ZHEJIANG KAYO MOTOR CO., LTD. Raise you motorcycle on its center stand always when carrying out the related maintenance. It is helpful to remove or install various parts. REMOVING OR INSTALLING THE FRONT DISC BRAKE oil pipe clamp Removing Steps are as follow: 1. -
Page 25: Removing Or Installing The Linkage
ZHEJIANG KAYO MOTOR CO., LTD. Removing Steps as follows: 1. remove the front disc brake. 2. Remove the front wheel. 3. Loosen the mounting bolt on the linkage. 4. Remove the front shock absorber. Installing Steps: The installment should be carried out in the reverse order of removal. -
Page 26: Lubrication And Installation Of Steering Head Bearing
ZHEJIANG KAYO MOTOR CO., LTD. 2. By turning the handlebar left to right to control the motorcycle head, if it turns smoothly and there is no obstruction, the motorcycle head turning is normal If you find that the steering of the front of the car is obstructive, remove the link plate to check whether the steering bearing is normal. -
Page 27: Removing Or Installing The Rear Shock Absorber
ZHEJIANG KAYO MOTOR CO., LTD. Removing Steps are as follows: 1. Remove the fix screw. 2. Pull out the Front Fender. Installing Steps: The installment should be carried out in the reverse order of removal. REMOVING OR INSTALLING THE REAR SHOCK ABSORBER Check the rear shock absorber whether the spring is cracked or not,etc. -
Page 28: Removing Or Installing The Exhaust Pipe
ZHEJIANG KAYO MOTOR CO., LTD. 2. Check whether the air filter sponge is damaged. 3. Check whether the fire net is damaged 4. Check whether the air filter block is degummed with the sponge surface If the air filter is damaged, replace the corresponding parts; if no parts are damaged, perform maintenance as follows: 1. -
Page 29: Check And Clean The Chain
ZHEJIANG KAYO MOTOR CO., LTD. 4. Remove the fuel tank from the frame Installing Steps: The installment should be carried out in the reverse order of removal. CHECK AND CLEAN THE CHAIN Checking Steps are as follows: 1. Observe the chain from the rear of the vehicle to check whether the chain is skewed as a whole 2. -
Page 30: Check The Structure Of The Rear Sprocket, Engine Sprocket And Guide Chain
ZHEJIANG KAYO MOTOR CO., LTD. When checking the chain tension, you should also check the chain guide and sprocket through visual inspection not limited to chain. When the chain is over-used, or the stretch exceeds 2%, the chain should be replaced, and change the relevant guide rail and sprocket at the same time. -
Page 31: Check The Throttle Cable
ZHEJIANG KAYO MOTOR CO., LTD. 1. Checking Steps are as follows 2. Check whether there are cracks on the surface of the flat fork 3. Check whether there is any deformation at the mounting point of the cradle on the flat fork Check whether the surface paint of the flat fork is damaged or not. -
Page 32: Check The Front Brake Liquid Level
3.0mm 3.0mm CHECK THE FRONT BRAKE LIQUID LEVEL 2021 TS90 uses hydraulic disc brakes, and you can check the liquid level through the observation hole. If the liquid level is lower than the bottom edge of the observation hole, you should immediately refuel the fluid to the upper edge. -
Page 33: Check The Free-Play Of Foot Brake
ZHEJIANG KAYO MOTOR CO., LTD. replacement work, please go to the KAYO dealer and have a professional to complete the replacement. CHECK THE FREE-PLAY OF FOOT BRAKE Rear foot brake pedal: In normal use,the free-play of the brake pedal is shown in the table below. -
Page 34: Tire Inspection And Maintenance
ZHEJIANG KAYO MOTOR CO., LTD. DANGER: If it is found that the brake system is too worn, the corresponding parts should be replaced immediately to avoid safety accidents. The specific work should be carried out after consulting the KAYO dealer. -
Page 35: Tire Inspection
ZHEJIANG KAYO MOTOR CO., LTD. the rear wheel axle gradually with another hand Remove the rear wheel Installing Steps: The installment should be carried out in the reverse order of removal. TIRE INSPECTION Checking Steps are as follows: 1. Check the tires if there are crosswise lines, holes, or foreign bodies 2. -
Page 36: Adjustment
ZHEJIANG KAYO MOTOR CO., LTD. Install the throttle cable and air filter, the interface should be sealed. 3. Install the transmission chain. 4. Install the left rear cover or sprocket guard and fasten it with bolts. Pay attention to the outgoing wire of the magneto. -
Page 37: The Engine Adjustment
ZHEJIANG KAYO MOTOR CO., LTD. highest-pressure value of the engine cylinder. Standard 1200~1250Pa Minimum 1100Pa Low pressure indicates the following faults: Excessive wear of the cylinder wall. The piston or piston ring is worn. The piston ring is stuck in the ring groove. The valve is not properly engaged with the valve seat. -
Page 38: Check The Shift Lever Position
ZHEJIANG KAYO MOTOR CO., LTD. TS90 carburetor oil drain bolt ride. Therefore, the carburetor should be cleaned after each ride to avoid the generation of grease stains and affect the use of the carburetor. The cleaning steps as follows: 1. Place a container under the carburetor for receiving fuel 2. -
Page 39: Lubricant Selection
ZHEJIANG KAYO MOTOR CO., LTD. instrument to measure the distance between the electrodes and adjust them to prevent abnormal bending of the external electrodes. If the spark plug electrode is rusty, damaged, or the insulator is broken, the spark plug must be replaced. -
Page 40: Cylinder Head And Valve
ZHEJIANG KAYO MOTOR CO., LTD. gasket. The tightening torque is: 15~20N·m. Refill with new lubricating oil and check the oil position. ENGINE INSPECTION Cylinder head and valve NOTICE The camshaft journal is lubricated by the oil passage on the cylinder head. No foreign matter can enter the oil ◆... -
Page 41: Cover
ZHEJIANG KAYO MOTOR CO., LTD. Leaking or damaged oil baffle Too large piston ring clearance Leakage on cylinder head gasket combination Too big valve clearance The valve is stuck or the valve spring is broken Excessive noise or abnormal Excessive wear of the rocker arm... - Page 42 ZHEJIANG KAYO MOTOR CO., LTD. 4. Remove the left cover of the cylinder head. 5. Remove the 3 GB/T 5783/M5×12 hexagon head bolts that fasten the timing driven sprocket and remove the timing driven sprocket from the camshaft. 6. Remove one M6×20 bolt connecting the cylinder head and the cylinder body.
-
Page 43: Cylinder Head Inspection
ZHEJIANG KAYO MOTOR CO., LTD. Check whether the rocker arm shaft is worn out, if the wear is serious, you need to replace it with a new rocker arm Inspection of camshaft parts shaft. The camshaft convex hull has no obvious unevenness when touched by handThe inspection steps of camshaft parts... -
Page 44: Installing The Cylinder Head
ZHEJIANG KAYO MOTOR CO., LTD. After coating the intake and exhaust valve rods with lubricating oil, install the valve guides, install the inner and outer springs of the valve, the valve spring seat and the valve lock clip. Depress the valve spring with a valve puller, and then install the valve lock clip into the valve spring seat. -
Page 45: Cylinder Block And Piston
ZHEJIANG KAYO MOTOR CO., LTD. Note: When assembling the timing bolts, do not drop the bolts into the cylinder. Timing sprocket bolt torque: 7~11N•m. Adjust the clearance between the intake and exhaust valves, and turn the crankshaft counterclockwise for two turns to align the O marking on the timing sprocket with the timing mark on the cylinder head. - Page 46 ZHEJIANG KAYO MOTOR CO., LTD. Φ46.96 Piston pin hole diameter φ13.002~φ13.008 φ13.017 Piston pin hole and piston pin clearance 0.001~0.012 0.025 PISTON RING clearance Closed First ring 0.1~0.25 Second ring 0.1~0.25 Oil ring 0.2~0.8 Side clearance First ring 0.03~0.06 0.08...
-
Page 47: Trouble Occurence And Cause Analysis
ZHEJIANG KAYO MOTOR CO., LTD. Second ring 0.02~0.06 0.08 CYLINDER AND PISTON CLEARANCE 0.025~0.035 0.07 PISTON PIN OUTER DIAMETER φ12.994~φ13 φ12.985 INNER DIAMETER OF SMALL END OF CONNECTING ROD φ13.012~φ13.022 Φ13.035 CLEARANCE BETWEEN SMALL END OF CONNECTING ROD AND PISTON PIN 0.016~0.033... -
Page 48: Cylinder Block Inspection
ZHEJIANG KAYO MOTOR CO., LTD. Scratches on the piston or cylinder wall Engine overheated Excessive carbon deposits in the piston Knocking or abnormal noise Pistons or cylinders are worn Excessive carbon deposits in the piston REMOVAL OF CYLINDER BLOCK The cylinder block removal steps are as follows: 1. -
Page 49: Installing The Piston Ring
ZHEJIANG KAYO MOTOR CO., LTD. Measure the outer diameter at a height of 7 mm from the piston skirt. Repair limit value: φ46.96mm; Calculate the cylinder clearance. Repair limit value:0.1mm; Measure the inner diameter of the piston pin hole. Repair limit value:φ13.017 mm 4. -
Page 50: Clutch 、 Driving Gear 、 Driven Gear 、 Shift
ZHEJIANG KAYO MOTOR CO., LTD. After staggering the openings between the piston rings by 120°, gently assemble the cylinder block in place. Assemble the chain guide roller pin and the aluminum washer in place. Then install the chain guide roller into the cylinder block, the guide roller pin passes through the cylinder block and the chain guide roller, tighten the guide wheel pin pin shaft. -
Page 51: Trouble Occurence And Cause Analysis
ZHEJIANG KAYO MOTOR CO., LTD. End surface clearance between rotor and cover 0.04~0.1 TROUBLE OCCURENCE AND CAUSE ANALYSIS TROUBLE OCCURENCE Analysis Remarks Clutch slips when accelerating Not enough free travel Bent clutch plate Clutch disc wear Excessive handle pressure The clutch cable is sticky, damaged or dirty... -
Page 52: Removal Of The Right Cover
ZHEJIANG KAYO MOTOR CO., LTD. The chute of the clutch cover has burrs Difficult shifting Shift arm bent Incorrect adjustment of clutch cable position The spring of the shift drum positioning plate is broken or the elasticity is not enough... -
Page 53: Removal Of The Clutch
ZHEJIANG KAYO MOTOR CO., LTD. The removal steps of the right crankcase cover are as follows: Drain the oil first (remove the oil drain plug M12×1.5 on the right, and wait for the oil in the box to run out). -
Page 54: Removal Of The Shift Mechanism
ZHEJIANG KAYO MOTOR CO., LTD. Note: There is an oil pump pin φ4×7 inside and outside the oil pump. The removed spring washers, washers and oil pump pins should be kept properly to avoid losing them. REMOVAL OF THE SHIFT MECHANISM The removal steps of the shifting mechanism are as follows: Remove the shift arm components. -
Page 55: Driving Gear And Driven Gear Inspection
ZHEJIANG KAYO MOTOR CO., LTD. Note: If the friction plate of the clutch is burnt, the friction plate needs to be replaced, if it is serious, the clutch needs to be replaced. DRIVING GEAR AND DRIVEN GEAR INSPECTION Check whether the driving and driven gear is worn or damaged. If the abrasion and damage are serious, you need to replace the new driving and driven gear. -
Page 56: Assemble The Driving Dear And Drivn Gear
ZHEJIANG KAYO MOTOR CO., LTD. The assembly steps of the oil pump are as follows: First install the inner and outer rotors of the oil pump into the oil pump body, then install the oil pump shaft, and finally install the oil pump cover, and install 3 M5×10 bolts to tighten. -
Page 57: Installing The Right Crankshaft Cover
ZHEJIANG KAYO MOTOR CO., LTD. place, the inner ring of the rotating bearing should rotate flexibly without jamming. Install the oil-passing pipe and the oil-passing pipe spring on the clutch end cover Note: 1. Tightening torque of big round nut: 40~50N·m;... -
Page 58: Removal Of The Rear Left Cover
ZHEJIANG KAYO MOTOR CO., LTD. REMOVAL OF THE REAR LEFT COVER The removal steps of the left rear cover are as follows: Remove the fastening bolts of the left rear cover. Remove the left rear cover. REMOVAL OF THE FRONT LEFT COVER The removal steps of the left front cover are as follows: Remove the 3 GB/T 5787/M6×32 and 1 GB/T 5787/M6×50 fastening bolts of the left front cover. -
Page 59: Removal Of The Starter Motor And Starter Sprocket
ZHEJIANG KAYO MOTOR CO., LTD. Note: 1. When disassembling the magneto rotor, only special tools can be used to remove it, and it is not allowed to knock the magneto rotor; 2. If the magneto rotor is accidentally impacted during the disassemble and assemble process, such as the magneto rotor falling to the ground or being knocked by foreign objects, the magneto rotor should be replaced with a new one. -
Page 60: Inspection
ZHEJIANG KAYO MOTOR CO., LTD. The inspection steps of the left front cover and left rear cover are as follows: Check whether the left front cover and left rear cover are damaged, whether the left front cover gasket is damaged, replace the new left front cover, left front cover gasket and left rear cover. -
Page 61: Installation Of The Transition Plate
ZHEJIANG KAYO MOTOR CO., LTD. 4. The tension arm and rod move flexibly without jamming. INSTALLATION OF THE TRANSITION PLATE The installation steps of the transition board are as follows. Install 2 pieces of seal rings 6.8×1.9 on the left crankcase body. -
Page 62: Installation Of The Magneto Rotor
ZHEJIANG KAYO MOTOR CO., LTD. Note: The trigger positioning plate cannot be pressed against the wiring harness. INSTALLATION OF THE MAGNETO ROTOR The rotor keyway is aligned with the crankshaft semicircle keys The installation steps of the magneto rotor are as follows: Install the magneto rotor on the left crank. -
Page 63: Trouble Occurence And Cause
ZHEJIANG KAYO MOTOR CO., LTD. Φ34~φ34.039 Φ34.041 Thickness of fork claw 4.85~4.95 Crankshaft connecting rod Inner diameter of connecting rod small head φ14.016~φ14.027 φ16.025 Axial backlash of connecting rod big end 0.1~0.3 Big end radial backlash of connecting rod 0.004~0.012 0.015... -
Page 64: Disassemble Of The
ZHEJIANG KAYO MOTOR CO., LTD. Bent or worn gear shift fork Crankshaft noise The big end needle bearing of the connecting rod is worn out Bending connecting rod Crankshaft bearings are worn Gear noise of main and counter shaft The main and counter shaft gears are worn... -
Page 65: Removal Of The Main And Counter Shaft
ZHEJIANG KAYO MOTOR CO., LTD. REMOVAL OF THE MAIN AND COUNTER SHAFT The removal steps of the crankshaft and the main and auxiliary shafts are as follows: Take out the crankshaft assembly from the box. Take out the shift fork shaft, shift fork, shift drum and main and counter shaft components from the box. -
Page 66: Shift Fork And Shift Fork Shaft Inspection
ZHEJIANG KAYO MOTOR CO., LTD. SHIFT FORK AND SHIFT FORK SHAFT INSPECTION The inspection steps of shift fork, shift fork shaft, and shift drum are as follows: 1 、 Check whether the gear shift forks are worn, bent or any other malfunctions, and measure the inner diameter of the gear shift forks. -
Page 67: Installation Of The
ZHEJIANG KAYO MOTOR CO., LTD. counter shaft are combined, and then install the main and counter shaft assembly and the shifting drum assembly into the corresponding hole on the left body. Note: 1. Do not install the shifting drum fork into the position of the main and counter shafts by mistake. - Page 68 ZHEJIANG KAYO MOTOR CO., LTD. The engine cannot be started or difficult to start Check whether the fuel flows into the carburetor Fuel does not flow into the carburetor No gasoline in the fuel tank Blocked tubing from the fuel tank to the carburetor...
- Page 69 ZHEJIANG KAYO MOTOR CO., LTD. High-voltage cable is open or short-circuited Ignition coil is open or short-circuited The ignition switch is faulty Test cylinder pressure Low Pressure The starting mechanism is slipping, and the engine cannot be turned Normal pressure...
- Page 70 ZHEJIANG KAYO MOTOR CO., LTD. Re-start the engine The engine ignites but does not start The choke door is opened too much Improper adjustment of the carburetor fine-tuning screw Engine does not ignite Air intake pipe leaks Incorrect ignition timing...
- Page 71 ZHEJIANG KAYO MOTOR CO., LTD. Check the adjustment of the fine adjustment screw of the carburetor plunger Incorrect Improper adjustment Correct Check whether the carburetor gasket is leaking Air leak Deterioration of carburetor seal ring Airtight Loose carburetor Damaged carburetor gasket...
- Page 72 ZHEJIANG KAYO MOTOR CO., LTD. The power circuit is faulty The engine performs poorly at high speeds Check the ignition timing and valve clearance Incorrect The ignition controller is faulty Improper valve clearance adjustment The magneto is faulty Valve clearance and ignition timing are correct...
- Page 73 ZHEJIANG KAYO MOTOR CO., LTD. Unblocked Float stuck Filter blocked Check gas timing Incorrect Adjust gas timing Correct Check valve spring pressure Insufficient Pressure Worn or broken valve spring The engine has abnormal noise Check whether there is abnormal noise in the valve...
- Page 74 ZHEJIANG KAYO MOTOR CO., LTD. Check whether the timing chain produces abnormal noise Abnormal noise in the chain Camshaft wear Timing driven sprocket wear Timing chain stretched The timing chain automatic tensioner fails, or the guide wheel is worn Check whether the driving gear and the driven gear produce abnormal noise...
-
Page 75: Maintenance Points
ZHEJIANG KAYO MOTOR CO., LTD. Drive the motorcycle for a short period of time until the engine reaches the working temperature; Lubricate the chain and all other parts that need to be lubricated. WARINING : Never use high-pressure water to clean the vehicle. Avoid direct contact with coils, pipe plugs, carburetor or any electrical components. - Page 76 ZHEJIANG KAYO MOTOR CO., LTD. In the following content, we will enumerate the problems that occurred during your use, find out the possible causes and give general solutions. Problems Reason Solution The crank of the engine cannot be turned Crank stuck...
- Page 77 ZHEJIANG KAYO MOTOR CO., LTD. Warning: In safety sake, the spark plug should be wrapped with dry cloth to avoid spark jumping. Incorrect mixing of air and fuel Clean the fuel tank vent pipe, adjust the air filter duct Open exhaust valve...
- Page 78 ZHEJIANG KAYO MOTOR CO., LTD. Dirt in the air filter Clean the air filter and replace if necessary Damaged or leaking exhaust system Check whether the exhaust system is damaged, and replace related accessories if necessary Dirt in the carburetor nozzle...
- Page 79 ZHEJIANG KAYO MOTOR CO., LTD. Remove and clean the air filter The combustible mixture is too rich Adjust the carburetor valve Gearbox gear does not mesh Clutch abnormality Contact KAYO Service Center The fork is bent or stuck Check and adjust the fork...
- Page 80 ZHEJIANG KAYO MOTOR CO., LTD. Worn fork shaft Check the fork shaft and replace if necessary The selector position spring is damaged Replace the selector position spring Clutch slip Clutch disc wear Replace the clutch disc The clutch pressure plate spring is too soft or damaged...
- Page 81 ZHEJIANG KAYO MOTOR CO., LTD. Tire pressure is too high Check tire pressure and adjust to proper pressure Damping adjustment error Re-adjust damping Damping is too soft Insufficient front fork oil level Add the right amount of fork oil Note: It is required to add the same kind of oil...
- Page 82 ZHEJIANG KAYO MOTOR CO., LTD. Replace the front fork spring Disc brake disc wear Check the disc brake disc, if its thickness is less than the limit thickness, replace it Damaged cylinder head Contact KAYO Service Center Brackets, nuts, and bolts are not tightly fastened...
-
Page 83: Tightening Torque Table For The Whole Vehicle
ZHEJIANG KAYO MOTOR CO., LTD. Improper steering adjustment Check and readjust Bent steering shaft Contact KAYO Service Center There is a problem with the fork Contact KAYO Service Center Vehicle is not aligned Re-adjust the spoke tension and contact KAYO Service Center if necessary... - Page 84 ZHEJIANG KAYO MOTOR CO., LTD. Front brake caliper mounting bolt M8×40 full thread 20~32 Steering column cap Chrome silver Upper pressure block mounting screws M8×25 20~32 Front disc brake rotor mounting bolt M8×16 25~35 Front axle mounting nut M14×1.5 124~165 Shift lever mounting bolt M6×20...
- Page 85 ZHEJIANG KAYO MOTOR CO., LTD. 20~32 Guide chain sleeve mounting screws M6×12 7~11 Flat fork shaft mounting nut M10×1.25 40~70 Chain bolt M8×40 S10 20~25 Adjusting chain nut 20~25 Rear shock mounting bolt M10×45×1.25 40~70 Rear shock mounting nut M10×1.25 40~70...
- Page 86 ZHEJIANG KAYO MOTOR CO., LTD. M14×1.5 124~165 Rear brake disc guard mounting bolt M6×12 7~11 Rear brake pump mounting bolt full thread M6×20 7~11 High voltage package mounting bolt M6×20 7~11 Voltage stabilizer mounting bolt full thread M6×16 7~11 Front fender bolt M6×16...
- Page 87 ZHEJIANG KAYO MOTOR CO., LTD. Spark plug 25~30 www.kayomoto.com...
Need help?
Do you have a question about the TS90 and is the answer not in the manual?
Questions and answers
values of engine valve clearances for TS 90