Advertisement
Torsion Fan- Installation instructions
Should you have any questions or difficulty installing your new fan, please contact
Modern Fan Co. customer service immediately.
Note: Power supply must be turned off prior to any contact with electrical wires. It is
recommended that a licensed electrician be hired to install your ceiling fan.
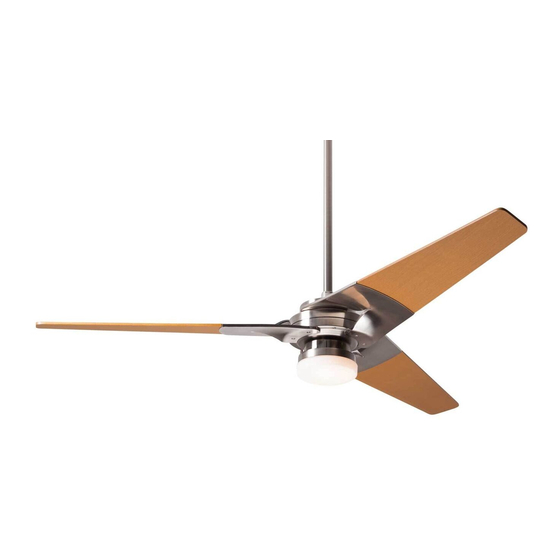
(1) Remove and identify contents of carton.
fan body
optional
control
LED Light Kit Parts (optional):
Glass diffuser
(2) If installing optional #271 LED Light Kit, carefully place the fan on the packing
foam (bottom side up) and follow the steps below. Otherwise, proceed to next step.
hanging bracket
balancing
hardware
kit
package
Heatsink
Light cup
LED Cover
Remove bottom cap (rotate to unthread) and
remove white plate held by three screws shown
here.
Torsion
MODERN FAN COMPANY
Customer Service
M-F 8am - 4pm (PST)
(ph) 888.588.3267
www.modernfan.com
canopy
blades
down
half
rods
ball
LED Board
Hardware/Screws
Bridge Connector
Advertisement
Table of Contents

Subscribe to Our Youtube Channel
Related Manuals for The Modern Fan Company Torsion


Summary of Contents for The Modern Fan Company Torsion
- Page 1 M-F 8am - 4pm (PST) (ph) 888.588.3267 www.modernfan.com Torsion Fan- Installation instructions Should you have any questions or difficulty installing your new fan, please contact Modern Fan Co. customer service immediately. Note: Power supply must be turned off prior to any contact with electrical wires. It is recommended that a licensed electrician be hired to install your ceiling fan.
- Page 2 Join ends of bridge connector wires with wire leads from fan. Position wires so that connectors are flat and to side of three posts inside connection cavity. Place light cup over wire connectors so that the three posts are seated in holes on back of light cup and two pin connector passes through center hole.
- Page 3 (6) Run fan wires through selected down rod. Reinstall stopper screw from step (4) and firmly tighten set screw on fan collar against down rod. Note: If ceiling height allows, using a longer down rod will increase airflow and efficiency. (7) Slide fan canopy over down rod and carefully rest on top of fan body.
- Page 4 (14) Your fan is reversible for summer and winter operation. The reverse switch is located on the top of the fan body. When reading the REVERSE label, the LEFT position is for summer and the RIGHT position is for winter. reverse switch (15) The motor and blade arm assembly of your fan have been dynamically balanced prior to shipment.
Need help?
Do you have a question about the Torsion and is the answer not in the manual?
Questions and answers