
Related Manuals for MSI MS-6852


Summary of Contents for MSI MS-6852
- Page 1 MSI DUAL NET CARD (MS-6852) Wireless 11g + Bluetooth Combo PCI Card User’s Manual...
-
Page 2: Revision History
FCC Caution 1. The device complies with Part 15 of the FCC rules. Operation is subject to the following two conditions: (1) This device may not cause harmful interference, and (2) This device must accept any interference received, including interference that may cause undesired operation. -
Page 3: Important Safety Precautions
Important Safety Precautions Always read and follow these basic safety precautions carefully when handling any piece of electronic component. Keep this User’s Guide for future reference. Keep this equipment away from humidity. Lay this equipment on a reliable flat surface before setting it up. The openings on the enclosure are for air convection hence protects the equipment from overheating. -
Page 4: Technical Support
How to Use This Guide This User’s Manual provides instructions and illustrations on how to install and use your MSI DUAL NET CARD - the Wireless 11g + Bluetooth Combo PCI Card. Chapter 1, Introduction, provides a general information on the product you bought, including its application, specification, and requirements. -
Page 5: Table Of Contents
1. Introduction ... 1 1.1 MSI DUAL NET CARD - Wireless 11g + Bluetooth Combo PCI Card ... 1 1.2 How DUAL NET CARD Works ... 2 1.2.1 In WLAN Environment ... 2 1.2.2 In Bluetooth Connection ... 4 1.3 Specifications ... 5 1.4 Product View ... - Page 6 6. Using Bluetooth ... 38 6.1 Introduction to BlueSoleil 6.1.1 Bluetooth Functions ... 38 6.1.2 Main Window ... 39 6.2 Basic Operations ... 41 6.2.1 Inserting the Adapter ... 41 6.2.2 Installing the Software ... 41 6.2.3 Starting BlueSoleil ... 42 6.2.4 Searching for Other Bluetooth-enabled Devices ...
-
Page 7: Introduction
+ Bluetooth Combo PCI Card Compliant with IEEE802.11g, the Wireless 11g + Bluetooth Combo PCI Card - MSI DUAL NET CARD is a high-efficiency device for wireless networking at home, in office or in public places. The data rate can be up to 54 Mbps and auto-negotiated to 48, 36, 24, 18, 12, 9, 6Mbps (IEEE 802.11g), or 11, 5.5, 2,... -
Page 8: How Dual Net Card Works
LAN comput- ers that are in this wireless LAN workgroup, and are within range. Wireless-enabled notebook PC DUAL NET CARD WLAN+Bluetooth Combo PCI Card... - Page 9 Internet, email, file transfer, and printer sharing. The scale and range of the Infrastructure networking are larger and wider than that of the Ad-hoc networking. Wireless-enabled notebook PC DUAL NET CARD WLAN+Bluetooth Combo PCI Card...
-
Page 10: In Bluetooth Connection
Every Bluetooth device that provides a service must be prepared to respond to a connection request. Bluetooth soft- ware is always running in the background on the server, ready to respond to connection requests. DUAL NET CARD WLAN+Bluetooth Combo PCI Card Bluetooth-enabled Devices... -
Page 11: Specifications
>>> 1.3 Specifications Hardware Form Factor Specifications Operating Voltage Compliant Standards Operational Environment Weight and Dimension Raw Data Rates and Modulation Types WLAN Specifications Frequency and Channels Communication Protocol Access Method 32-bit PCI v2.2 3.3V - IEEE 802.11g/b - USB 1.1 - Operational Temperature: 0 ~ 60 - Storage Temperature: -20 ~ 100 - Humidity: 10 ~ 90% (Non-Condensing) - Page 12 Transmitter Output Power Wireless Coverage Bluetooth Connection Interface Specification Throughput Operating Voltage Spread Spectrum Frequency Output Power 16dBm USB connector Around 723 Kbps (data channels) 5V from USB interface FHSS (Frequency Hopping Spread Spectrum) 2.4 ~ 2.4835 GHz 4dBm (max.)
-
Page 13: Product View
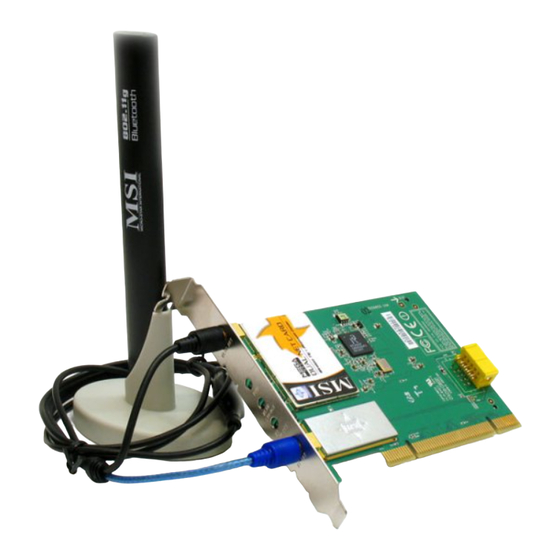
>>> 1.4 Product View Antenna Connector - Wireless LAN connector LEDs - PWR - WLAN LNK/ACT - BT LNK/ACT Antenna Connector - Bluetooth connector External Antenna Golden Finger LEDs PWR: a solid GREEN light to indicate DUAL NET CARD is installed correctly and power inputted. -
Page 14: Hardware Installation
Hardware Installation The following diagrams provide you a basic installation for your DUAL NET CARD. For more information about the PCI slot, please refer to the user’s manual of your mainboard. ST EP Turn off the computer and disconnect the power cable. Then, remove the computer’s chassis to locate the PCI slot on your mainboard. - Page 15 ST EP Connect the one end of the provided USB cable to DUAL NET CARD, and the other end to the USB connector on the mainboard. USB Connector ST EP Replace the computer’s chassis after securing the DUAL NET CARD with a bracket screw. ST EP Connect the external antenna to the connectors (Bluetooth and WLAN) on the DUAL NET CARD’s bracket.
-
Page 16: Software Setup
Software Setup This chapter describes the procedures of installing the driver and utility. Follow the instruction step by step to finish the installation. ® ® If you use Windows 98SE/ME, please prepare the Windows Setup CD at hand before installing the driver; because the sys- tem will ask you to insert the Setup CD to copy files during the installation. - Page 17 ST EP Insert the software CD into your CD-ROM drive, and the Setup program should launch automatically. If the Autorun program doesn’t launch automatically, click Start at the taskbar and select Run... Type your CD-drive) in the Open box and click OK to launch the Setup program manually.
- Page 18 Click the Bluetooth button. ST EP The welcome screen of InstallShield Wizard appears. Click Next. Read and accept the License Agreement; then, click Next. Click Next to install the driver in the default destination folder. Click Install and the program will copy the necessary files to the system.
-
Page 19: Introduction To Digicell (For Msi Mainboards Only)
MP3 files manage- ment and communication/802.11g WLAN settings. Moreover, with this unique utility, you will be able to activate the MSI well-known features, Live Update and Core Center, which makes it easier to update the BIOS/drivers online, and to monitor the system hardware status (CPU/Fan temperature and speed) or to overclock the CPU/memory. -
Page 20: Main Screen
Introduction: Click on each icon appears above to enter the sub-menu to make further configuration. Click on this button and to link to MSI website: http://www.msi.com.tw. Quick Guide Click on this button and the quick guide of DigiCell will be displayed for you to review. - Page 21 Comm. In this sub-menu, you can see the configuration details for com- munication products, including the status, strength, speed and channel of the connection of the Ethernet LAN & Wireless LAN. Software Access Point In this sub-menu, you can change your connection mode to dif- ferent ones, and configure the advanced settings for each mode, such as the authentication encrption...
-
Page 22: Communication
>>> 4.2 Communication In the Communication sub-menu, you can see the status of all the LAN/WLAN/Bluetooth on the screen if the hardware is installed. The first icon indicates the onboard LAN on your system, the second icon indicates the wireless LAN status, and the third one is the information about the bluetooth on your system. -
Page 23: Software Access Point
>>> 4.3 Software Access Point In the Software Access Point sub-menu, you can see the status of communicating on your system and choose the desired soft- ware access point mode by clicking on the desired icon, in which the default settings are configured for your usage. The default software access point mode is set to WLAN Card Mode. -
Page 24: Access Point Mode
Internet with a shared modem. In this kind of network, new devices can be quickly added; however, users can only communi- cate with other wireless LAN computers that are in this wireless LAN workgroup, and are within range. Infrastructure Mode The difference between Infrastructure network and Ad-hoc net- work is that the former one includes an Access Point. - Page 25 IP Sharing Click on this icon to enable/disable the IP sharing. The default of this setting is disabled. Disabled. Enabling/disabling IP sharing depends on the different situation. For example: If your family and you are getting on Internet at home with multi computers, and your ISP only provides one IP for you, you may need to enable IP Sharing function in order to use this one IP to get on Internet with multi computers...
-
Page 26: Wlan Card Mode
MAC Address MAC stands for Media Access Control. A MAC address is the hardware address of a device connected to a network. Security This option allows you to enable/disable the authentication function. Authentication Open: Communicates the key across the network. Shared: Devices must have identical WEP settings to communicate. -
Page 28: Networking Basics
Networking Basics This chapter describes how to prepare for connection to net- work and some basic outline of networking basics, including shar- ing files, printing from a computer on the network, or accessing the Internet on multiple computers with one connection. >>>... - Page 29 Under Windows 2000/XP Click Start and choose Control Panel to open the Control Panel window. Double-click the Network Connection icon to open the Network Connection window. Right-click the Wireless Network Connection icon and click Properties from the shortcut menu. The Wireless Network Connection Properties window appears to show the current network settings of the system.
-
Page 30: Status
>>> 5.2 Computer Identification Please verify that each computer has a unique name and common workgroup name, if you had previously given your Windows 98SE/ME/2000/XP computers names. Under Windows 98SE/ME Enter a name for your computer (less than 15 characters without space. Your computer will belong to this workgroup. - Page 31 Under Windows 2000/XP Right-click Enter some information for reference. Your computer’s name. Your computer will belong to this workgroup. Right-click My Computer icon on your Windows desktop, and click Properties from the shortcut menu. The System Properties window appears; choose Computer Name tab.
-
Page 32: Information
To rename the computer and join a workgroup/domain, click Change. The Computer Name Changes window appears as below. Enter a Computer Name, select Workgroup and enter the name of your workgroup. Please NOTE that each computer’s name must be unique on a particular network to avoid confusion. -
Page 33: Configuring A Dynamic/Fixed Ip Address
>>> 5.3 Configuring a Dynamic/Fixed IP Address When the drivers are installed, the default setting here is set to obtain IP dynamically through a DHCP server. If you want to change the settings, please follow the steps below: Under Windows 98SE/ME Go to Start ->... - Page 34 Check this 4.a Configuring a dynamic IP address Enter a fixed IP address and Subnet Mask Click OK. Then, click Yes when prompted to reboot the computer. Check this 4.b Configuring a fixed IP address...
- Page 35 Under Windows 2000/XP Click Start and choose Control Panel to open the Control Panel window. Double-click the Network Connection icon to open the Network Connection window. Right-click the IEEE802.11g Wireless PCI Adapter icon and click Properties from the shortcut menu. When the Wireless Network Connection Proper- ties window appears, choose General tab and select Internet Protocol [TCP/IP], and click Properties to...
- Page 36 Check this 5.a Configuring a dynamic IP address Check this Enter a fixed IP address and Subnet Mask 5.b Configuring a fixed IP address Click OK to complete the configuration.
-
Page 37: Checking Tcp/Ip Address
>>> 5.4 Checking TCP/IP Address Under Windows 98SE/ME Go to Start -> Run... Type winipcfg Type here. The IP Configuration screen will appear, click More Info to bring up a screen containing detail information of your wireless network adapter. Check the configuration of IP Address, Subnet Mask, and Default Gateway are correct. - Page 38 Under Windows 2000/XP Go to Start -> Run... Type Type here. A DOS prompt window appears. Type and press [Enter] to display IP information. in the Open box and click OK. Your Wireless LAN adapter model Check the configuration of IP Address, Subnet Mask, and Default Gateway are correct.
-
Page 39: Checking Connection By Pinging
>>> 5.5 Checking Connection by Pinging Go to Start -> Run... Type (Windows 2000/XP) in the Open box and click OK. A DOS prompt window appears. Type 59.147.160 address of the Gateway in this case, and press [Enter]. You will get reply if the pinging is successful. -
Page 40: Sharing Files
>>> 5.6 Sharing Files You may now open and save files on other computers once your computers are connected together on a network. You will also be able to specify particular folders or disk drives to share and even password to protect them. Please verify that each computer has a unique name and common workgroup name, if you had previ- ously given your Windows names. - Page 41 Select the I want to be able to give others access to my files option, and click OK. Check this Click OK in the Network dialog box. Provide the Windows Setup CD or direct the path to the proper location of the installation files if prompted.
- Page 42 Select the Share As option to set the parameters for sharing this particular disk drive or folder. Share Name This is used to identify the disk drive or folder you are sharing to other computers in the network, which can be helpful as more resources in your network for others.
- Page 43 Password This option allows you to apply a level of security to your shared disk drive and folder. Any other computer (user) will be asked to enter the password you set here before accessing the disk drive or folder. Two passwords are used to give two levels of security (or access) to others in the network using the Depends on Password setting.
-
Page 44: Using Bluetooth
Using Bluetooth >>> 6.1 Introduction to BlueSoleil™ BlueSoleil is a Windows-based software from IVT that allows your Bluetooth® enabled desktop or notebook computer to wirelessly connect to other Bluetooth enabled devices. BlueSoleil allows MS Windows users to wirelessly access a wide variety of Bluetooth enabled digital devices, such as cameras, mobile phones, headsets, printers, and GPS receivers. -
Page 45: Main Window
6.1.2 Main Window By default, BlueSoleil starts with the Main Window open. Use the Main Window to perform your primary connection operations. The Main Window displays the local device (red ball) as well as the remote devices detected in range. Different icons distinguish different types of remote devices. - Page 46 At the top of the Main Window are Service Buttons. After you search for the services supported by a remote device, the sup- ported services of the selected device will be highlighted. Local Device — Basic Operations Hover your mouse over the red ball to display the local device’s Bluetooth name and address.
-
Page 47: Basic Operations
>>> 6.2 Basic Operations 6.2.1 Inserting the Adapter BlueSoleil supports Windows systems enabled with Bluetooth wireless technology via either a USB adapter or a CompactFlash (CF) card. IMPORTANT! Be sure to insert the Bluetooth adapter BE- FORE you install the software! USB Adapter: Simply insert the USB adapter into the USB port of your computer. -
Page 48: Starting Bluesoleil
6.2.3 Starting BlueSoleil 1. Start BlueSoleil. Click on the BlueSoleil icon on your desktop, or go to Start | Programs | IVT BlueSoleil | BlueSoleil. 2. The very first time you use BlueSoleil, the Welcome to Bluetooth screen will appear. Assign your Windows sys- tem a name and device type, to be shown to other Bluetooth enabled devices. -
Page 49: Establishing Connection
If you start another search by double-clicking on the red ball or clicking My Bluetooth | My Device Inquiry or View | Refresh Devices, then the list of previously de- tected devices will not be cleared. If you start another search by pressing F5, then the list of previously detected devices will be cleared. - Page 50 3. After you have started the service in BlueSoleil, now you are ready to initiate the connection from the remote device. For instructions, refer to the user documentation for the remote device. Note: 1. Icons will appear only for Bluetooth functions (Profiles) which BlueSoleil supports in the Server device role.
-
Page 51: Bluetooth Security
device icon. The BlueSoleil icon in the task tray will also turn green to indicate an active connection. Note: A red check mark will appear next to the name of any device that you have previously paired with your computer. 8. -
Page 52: Getting Started
High (Security Mode 3, Link level enforced security) If either of two devices is in Mode 3, Authentication is requested whenever a link connection is initiated between two Bluetooth enabled devices. The passkey must be pro vided on both sides to complete Authentication. Note: In Security Mode 2, the user can add each authenticated device into a trusted device list to expedite future connections. - Page 53 Control Camera to Take Pictures: Step 1: Connect to the camera. A Bluetooth Camera Con- troller will appear. Step 2: Click the button to capture the image. The cap- tured image will be transmitted to your computer and displayed. Receive Picture: Step 1: Assign the directory where you would like to save image files pushed from the client device.
- Page 54 Step 3: Use your email, Internet browsing or other appli- cation that utilizes a dial-up connection. Note: After you successfully connect, a screen will ask if you would like to create a dial-up shortcut on your desktop. This would allow you to conveniently dial up and connect by simply clicking on the shortcut, without having to manually start BlueSoleil.
- Page 55 Connect to a Mobile Phone: Step 1: Connect to the mobile phone’s FTP service. Step 2: The phone’s folders are shown in a window. Users can copy/paste/delete files or folders. Share a Folder on Your Computer with other Bluetooth Enabled Devices: Step 1: Select the folder you would like to use for file shar-...
- Page 56 Step 2: Start the FTP service and initiate the connection in BlueSoleil. Step 3: A Remote Shared Folder screen will appear, dis- playing shared files/folders on the remote device, Use the screen to browse, copy, paste, and/or de- lete files, depending on your folder privileges. Headset The Headset Profile enables users to use a Bluetooth enabled headset as wireless earplug or microphone.
- Page 57 Note: 1. The first time you connect the mouse or keyboard to your computer, the Found New Hardware Wizard will automati cally launch. In the first screen of the wizard, DO NOT INSERT ANY CD and click Next. Follow the next screens until you complete the wizard.
- Page 58 (3) Select Specify TCP/IP addresses and enter the range of IP addresses assigned to LAP clients. Note: In order to use a Windows 98SE/Me system as an access point, you must have already installed a Dial-up Adapter and the Windows Direct Cable Connection component on the system. Object Push The Bluetooth Object Push Profile (OPP) enables users to send and receive Personal Information Management (PIM) data ob-...
- Page 59 Exchange cards: Have your computer and the phone to exchange their default business cards. Method 2: From MS Outlook: 1. Select the contact that you would like to send. 2. In Outlook, click on the Push button on the toolbar, or click File | Push.
- Page 60 all three of these device roles — GN (controller), PANU, and NAP. Typical Usage: Group Ad-hoc Network (Peer-to-peer networking) One device acts as the GN, and others function as PANU devices. These computers can visit each other or use an application based on TCP/IP.
- Page 61 Note: The BT Network Adapter on the PANU side must be set to obtain an IP address automatically. The IP address is in the form of 192.168.2.xxx, such as 192.168.2.1. Printer The Bluetooth Printer Profile (HCRP) enables your computer to connect to a Bluetooth enabled printer.
- Page 62 Connect to a PDA: Step 1: Connect to the PDA’s Serial Port service. Step 2: Use ActiveSync or any other application that uses a serial connection. Note: 1. Serial Port Auto-Connection function. Once a target de vice is assigned to a specific serial port, (e.g., COM5), whenever an application opens that serial port number, BlueSoleil will automatically connect to the target device.
-
Page 63: Bluesoleil User Guides
Step 1: Step 2: Note: 1. Users can start synchronization from MS Outlook using the Bluetooth Add-In menus and buttons installed with BlueSoleil. 2. BlueSoleil can act as synchronization server. Click My Services | Properties. Click on the Information Synchroni- zation tab, and select the type of PIM objects that you would like to synchronize. - Page 64 Click on the red ball to start or stop searching for Bluetooth devices in range. Right-click on the red ball to display a pop-up menu of related operations (e.g., General Inquiry, My Services, Security, etc.). Remote Bluetooth Devices: Remote devices are other Bluetooth enabled devices that are in the radio range of your local device.
- Page 65 Service Window The Service Window displays the local Bluetooth services, (i.e., the Bluetooth services supported by BlueSoleil). Use the Serv- ice Window to start and stop services, as well as to configure service properties. To access the Service Window, click View | Service Window.
- Page 66 My Services Menu Tools Menu Help Menu File Menu: Hide — Hide the BlueSoleil window. Connections can still run when the window is hidden. Always on Top — Keep the BlueSoleil window always on top. Exit — Exit BlueSoleil. You can also exit BlueSoleil by right-clicking on the task tray icon at the bottom of your screen.
- Page 67 Properties — Configure the properties of the local Bluetooth services (e.g., automatic connections, shared file locations, etc.). Tools Menu: My Shortcuts — Display dialog Bluetooth Shortcuts. Connect: Connect the selected shortcut. Delete: Delete the selected shortcut. Find Device — Click to find a device, by either of two search criteria.
-
Page 68: Device Configurations
Bluetooth Device — Advanced hardware configuration, recom- mended for advanced users only. Please refer to 4.2 Hardware Configuration for more details. Help Menu: Contents and Index — Access BlueSoleil Online Help. About BlueSoleil — Information about your version of BlueSoleil. 6.4.2 Device Configurations Hardware Configuration... - Page 69 Device Address: The address of the local device. Every Bluetooth enabled device has a unique device. Accessibility: Connecting Mode: Connectable: Permits other Bluetooth enabled devices to connect with your computer. Non-Connectable: Prohibits other Bluetooth enabled de- vices from connecting with your computer. Discovery Mode: General Discoverable: Permits other Bluetooth enabled devices to detect your computer.
-
Page 70: Security Configuration
6.4.3 Security Configuration Use the Security Configuration screens to specify the security settings of your local device. Pair / Un-pair Devices Once a remote device has paired with your computer by ex- changing passkeys, passkeys will no longer be required for fur- ther connections between your computer and the device. - Page 71 High — If checked, passkeys must be exchanged for every in- coming and outgoing connection, unless the two devices have already paired in the past. Bluetooth Passkey: Set Default Passkey — Use this setting to create a default pass- key for all connections. This saves you the effort of manually creating a passkey whenever one is required.
- Page 72 Authorization — Click to select the devices you wish to allow to use the selected service. In the Service Authorization screen, enter the following settings: Trusted Devices — Select to trust devices listed in this screen to use the selected service on your device. A device can freely ac- cess the service from your local device when trusted.
Need help?
Do you have a question about the MS-6852 and is the answer not in the manual?
Questions and answers