Table of Contents
Advertisement
Quick Links
Scissor Lift - SLX 115V
Ceiling-recessed video projector lift
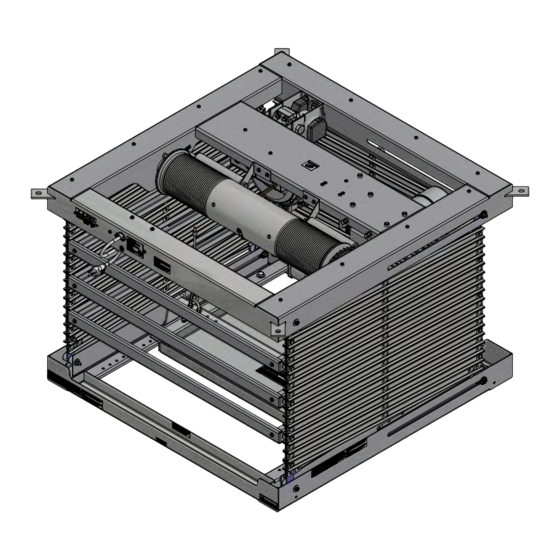
Overview - Components
Overview - Planning
1. Based on screen location and projector
specifications, determine proper position for
projector installation.
2. Confirm that there is adequate space for
installation and operation. Minimum clearance
above ceiling level varies according to height
of projector, optional projector mounting
bracket, optional ceiling closure and optional
Environmental Housing.
3. Arrange to provide service access to the unit.
4. Installer is to provide an RJ45 cable, for
each switch, with a connector on one end to
connect to the lift and open on the other end
to connect to each switch
Contents
Overview - Components .......................................................................................1
Overview - Planning ..............................................................................................1
PLEASE READ - Safety Information ....................................................................2
Section 1 - Hanging Unit ......................................................................................3
Section 2 - Operation............................................................................................3
Section 3 - Adjusting for Level or Center of Gravity ........................................4
Section 4 - Installing Projector ...........................................................................4
Section 5 - Attaching Universal Projector Mount to Projector Pan ..............4
Section 6 - Installing Optional Environmental Air Space Housing ...............5
Installing Optional Ceiling Trim Kit .............................................................................5
NOTICE:
These Instructions apply ONLY
to Scissor Lifts Manufactured
AFTER October, 15th, 2022
Instructions for Lifts Manufactured Prior
to this date can be found:
5. When installed with Environmental Air Space Housing
unit is suitable for use in an environmental air space
in accordance with Section 300.22
Electrical Code, and Section 2-128, 12-010
the Canadian Electrical Code, Part 1, CSA C22.1.
6. Total capacity of lift including cables, closure, projector,
and bracket:
453 LBS
SLX10
435 LBS
SLX14
418 LBS
SLX17
SLX21
393 LBS
SLX24
375 LBS
350 LBS
SLX28
Section 7 - Installing Ceiling Closure .................................................................5
Section 8 - Connecting Controls to Data Cable Splitter Board ....................6
Section 9 - Clearing and Resetting Show Position ..........................................6
Section 10 - Optional Delay Feature ...................................................................6
Section 11 - Electrical Connections ...................................................................7
Section 12 - Operation ..........................................................................................7
Section 13 - Testing Safety Limit Switches .......................................................7
Section 14 - Adjusting Limit Switches ...............................................................7
Section 15 - Wiring Schematic ............................................................................8
Section 16 - Dimensions ......................................................................................8
INSTRUCTIONS
INSTALLATION & OPERATION
HERE
MAKING YOUR OWN CABLES?
PIN OUTS
1 - UP
2 - DOWN
3 - NOT USED
4 - NOT USED
5 - NOT USED
6 - NOT USED
7 - COM
8 - COM
As Soon As Lift Arrives
of the National
1. Open carton and inspect for damage.
(C)
and 12-100 of
(3)
2. Locate the following parts:
A. The unit itself
B. Controls
205KG
C. Any optional equipment
197KG
190KG
178KG
170KG
159KG
If you have any difficulties installing or servicing your
Scissor Lift SLX, call your dealer or Draper, Inc.
Draper, Inc. | 411 S. Pearl St. Spiceland, IN 47385
draperinc.com | 765.987.7999 | 800.238.7999
|
© 2022 All Rights Reserved
FORM: ScissorLiftSLX_115VAC_Inst22
TOOLS REQUIRED
LEVEL
PENCIL
POWER DRILL
HARDWARE
(by others)
TAPE MEASURE
PLIERS
SCREWDRIVER
HEX WRENCH
CAUTION
Read and understand
all warnings
(Page 2
before
of this document)
beginning installation.
Advertisement
Table of Contents

Related Manuals for Draper SLX


Summary of Contents for Draper SLX
- Page 1 Section 16 - Dimensions ..................8 Installing Optional Ceiling Trim Kit ................5 If you have any difficulties installing or servicing your Scissor Lift SLX, call your dealer or Draper, Inc. Draper, Inc. | 411 S. Pearl St. Spiceland, IN 47385 draperinc.com | 765.987.7999 | 800.238.7999 ©...
- Page 2 9. Do not use outdoors. WARNING: Risk of Electric Shock—connect this product to a properly 10. Do not wire motors in parallel without written permission from Draper, Inc. grounded electrical supply. Important installation/operating Instructions WARNING: To prevent injury, this apparatus must be securely attached to the 28.
- Page 3 RS232 / RS485- Serial communication and network communication Show optionally available. Draper GUI Available for Download. 1. Before operating or testing the unit, make sure the packaging has been removed from the unit. Remove the corrugated block from the cardboard...
- Page 4 6. Replace screws. 7. Check level again. If still not level, repeat. Section 4 - Installing Projector Draper’s optional Universal Projector Mount will hold up to 26 lb (12kg) See Installation Instructions included with Universal Projector Mount. If not using Draper’s Universal Projector Mount, generally the video projector should be suspended from the bottom pan according to projector manufacturer’s instructions.
- Page 5 Height is set by drilling out the knockouts at the desired locations then using screws to connect side panels. Draper recommends installing an access panel in the ceiling to allow future access. The optional Environmental Air Space Housing must be installed to isolate the lift from the “other space used for environmental air.”...
- Page 6 Scissor Lift - SLX 115V page 6 of 8 Please Note: Section 8 - Connecting Controls to Data Cable Splitter Board Any control, including automated dry contact systems, being connected to the wall switch input MUST send a 1. Controls plug into the Data Cable Splitter Board...
- Page 7 Scissor Lift - SLX 115V page 7 of 8 Section 11 - Electrical Connections Lift operates on 115V, 60 Hz. current. 14 amps current draw Lift ships with internal wiring complete and control switch fully boxed. (2 amps for lift, 12 amps for Outlet)
- Page 8 8 of 8 Section 14 - Adjusting Limit Switches PLEASE NOTE: Changing the fully open or fully closed position will reset the electronic controls and cause the lift to operate improperly. Please call Draper before attempting these adjustments. DOWN...
Need help?
Do you have a question about the SLX and is the answer not in the manual?
Questions and answers