Table of Contents
Advertisement
Quick Links
Advertisement
Table of Contents

Related Manuals for Garmin TACX NEO BIKE PLUS


Summary of Contents for Garmin TACX NEO BIKE PLUS
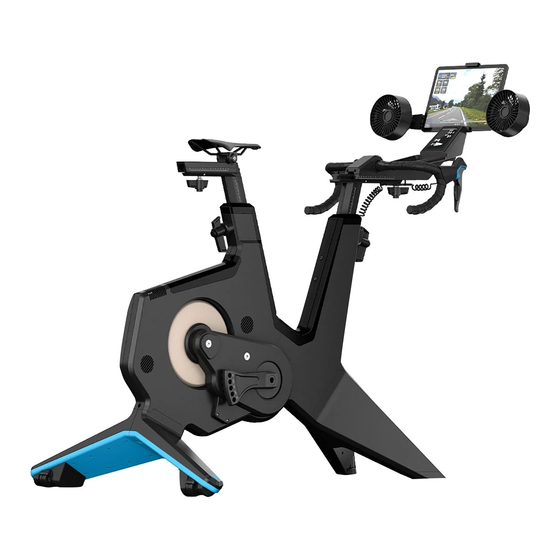
- Page 1 TACX NEO BIKE PLUS ® Owner’s Manual...
- Page 2 © 2022 Garmin Ltd. or its subsidiaries All rights reserved. Under the copyright laws, this manual may not be copied, in whole or in part, without the written consent of Garmin. Garmin reserves the right to change or improve its products and to make changes in the content of this manual without obligation to notify any person or organization of such changes or improvements. Go to www.garmin.com...
-
Page 3: Table Of Contents
Table of Contents Before Assembly......1 Dimensions and Clearance..... 1 Cycling Posture........2 Adjusting the Trainer Geometry..... 3 Tacx NEO Bike Plus Assembly Instructions........4 Order of Assembly........4 Installing the Legs on the Trainer... 5 Installing Your Pedals......7 Attaching the Bottle Cage....... -
Page 5: Before Assembly
Dimensions and Clearance When finding a suitable location for the Tacx NEO Bike Plus trainer, consider the maximum dimensions. The dimensions of the Tacx NEO Bike Plus trainer are shown with and without the fans. Tacx recommends a minimum of 60 cm (24 in.) clearance on all sides of the trainer. -
Page 6: Cycling Posture
Tacx NEO Bike Plus trainer and can impact your cycling posture. The image contains guidelines for the correct cycling posture while using the Tacx NEO Bike Plus trainer. Your elbows should be slightly bent, and you should be able to reach the shifters and brakes comfortably. At the bottom of the pedal stroke, your knee should be slightly bent. -
Page 7: Adjusting The Trainer Geometry
Adjusting the Trainer Geometry Before you assemble the Tacx NEO Bike Plus trainer, consider that the saddle and handlebar have set screws installed from the factory that can be adjusted and tightened using a hex key. To install the 4 handles as shown in this manual, you must remove the 4 set screws using a hex key. -
Page 8: Tacx Neo Bike Plus Assembly Instructions
Tacx NEO Bike Plus Assembly Instructions Order of Assembly Trainer legs: Installing the Legs on the Trainer, page 5 Tacx NEO Bike Plus Assembly Instructions... -
Page 9: Installing The Legs On The Trainer
You must have at least two people to assemble the Tacx NEO Bike Plus trainer. Use care when lifting the trainer. 1 Place the trainer on the floor, and tilt it back to install the front legs... - Page 10 5 Use the M10 x 65 mm bolts , 10 mm washers , and the 8 mm hex key to install the back legs. 6 Turn the knobs on the front legs to stabilize and level the trainer (optional). Tacx NEO Bike Plus Assembly Instructions...
-
Page 11: Installing Your Pedals
Installing Your Pedals Pedals are not included with the Tacx NEO Bike Plus trainer. For installation instructions specific to your pedals, see the manufacturer's instructions. 1 Install the right pedal first. 2 Apply a thin layer of grease on the pedal spindle threads. - Page 12 4 Tighten the spindle according to the instructions provided with your pedal. 5 Repeat steps 2 through 4 to install the left pedal. NOTE: The left pedal spindle has a left-handed (reverse) thread. Tacx NEO Bike Plus Assembly Instructions...
-
Page 13: Attaching The Bottle Cage
The screws and washers are preinstalled on the frame. 1 Open the assembly kit and the gift box. 2 Use the 2 screws and the 4 mm hex key to attach the bottle cage Tacx NEO Bike Plus Assembly Instructions... -
Page 14: Installing The Saddle
1 Open the assembly kit 2 Use the 6 mm hex key to remove the set screw. 3 Place the cap on the saddle rail 4 Slide the saddle onto the saddle rail. Tacx NEO Bike Plus Assembly Instructions... - Page 15 7 Adjust the saddle height, and secure the M16 x 22 handle The maximum saddle height is 26 cm. 8 If necessary, use the 5 mm hex key to adjust the saddle angle bolt Tacx NEO Bike Plus Assembly Instructions...
-
Page 16: Installing The Handlebar
5 Adjust the handlebar reach, and secure the M12 x 25 handle The maximum handlebar distance is 15 cm. 6 Use the 8 mm hex key to remove the set screw from the handlebar post. Tacx NEO Bike Plus Assembly Instructions... - Page 17 9 Use the Torx 20 to remove the handlebar cover 10 Use the 5 mm hex key to loosen the 4 screws. 11 Adjust the angle of the handlebar. 12 Tighten the 4 screws. 13 Replace and secure the handlebar cover. Tacx NEO Bike Plus Assembly Instructions...
-
Page 18: Installing The Fans With Tablet Mount
TIP: You may need to move the fan cables out of the way. Use the M4 x 10 bolts and the Torx 20 wrench to install the fans. Tacx NEO Bike Plus Assembly Instructions... - Page 19 3 Connect the display cable and the fan cables to the ports 4 Use the knobs to adjust the angle of the fans. Place the rubber mat into the tray. Tacx NEO Bike Plus Assembly Instructions...
-
Page 20: Attaching Your Tablet To The Trainer
Attaching Your Tablet to the Trainer NOTICE Before your first ride, read all of the instructions and secure your tablet to the trainer. Garmin ® is not responsible for damage caused to your tablet due to incorrect mounting of the tablet holder. - Page 21 4 If necessary, connect your tablet cable to a USB port TIP: The USB port labeled 12.5 W is for high-output charging. The USB port labeled 2.5 W is for low-output charging and may not work for all devices. Tacx NEO Bike Plus Assembly Instructions...
-
Page 22: Connecting The Power Cable
. Do not attempt to use a third-party power cable or adapter with the Tacx NEO Bike Plus trainer because this could lead to personal injury or damage to the trainer. You can use the Tacx NEO Bike Plus trainer with or without power. Some of the trainer features require power, including downhill assistance and USB charging. -
Page 23: Display Data
Display Data The display turns on as soon as you start pedaling. The display data varies if you are connected to the Tacx Training app, a third-party app, or optional wireless sensors. Displays the ANT+ or Bluetooth connection status. ® ®... -
Page 24: Going For A Ride
Going for a Ride Your first ride on the Tacx NEO Bike Plus trainer should be a short, manual training ride. You should learn how to use the basic features and get comfortable with the controls and settings. 1 Start pedaling. - Page 25 The trainer is off or in standby mode. Standby Mode When not in use, the Tacx NEO Bike Plus trainer goes into standby mode. You can wake up the trainer by rotating the crank. External Power Connected: After 5 minutes of no activity, the trainer goes into standby mode.
-
Page 26: Tacx Training App
• Ride exciting courses without leaving your home. • Create your own rides, workouts, and more. • Manage your training, customize the default settings, and diagnose issues. • Sync your indoor training data with your Garmin Connect ™ account. • Update your trainer software (Updating the Trainer Software, page 26). -
Page 27: Device Information
• Clean the saddle, handlebar, and pedals with a cloth and a mild cleaning solution. • Clean the trainer before storing it. • Use the small wheels on the back of the Tacx NEO Bike Plus trainer to move the trainer. NOTE: You should stabilize and level the trainer after moving it. -
Page 28: Installing The Tablet Mount
Installing the Tablet Mount In the assembly kit , there are M4 X 10 bolts (4) to install either the fans (Installing the Fans with Tablet Mount, page 14) or the tablet mount. 1 Align the tablet mount with the back of the display. 2 Use the M4 x 10 bolts and the Torx 20 wrench to install the tablet mount. -
Page 29: Installing The Sweat Cover
You should replace the handlebar tape if it is worn or uncomfortable. Sweat from your hands can cause the tape to degrade. Garmin recommends wearing cycling gloves. TIP: It's a good idea to replace the tape on one side first, so you can compare it to the other side. -
Page 30: Replacing The Saddle
Replacing the Saddle You can use a third-party, compatible saddle with your trainer. NOTE: To purchase a replacement saddle assembly, go to buy.garmin.com. 1 Use the 5 mm hex key to remove the saddle bolt 2 Remove the saddle. 3 Align the new saddle on the rail, and replace the saddle bolt. -
Page 31: Tips For Proper Bike Fit
Bike fit is unique to each person and requires some trial and error and several rides. After a few rides, if you need help customizing the fit and geometry of your Tacx NEO Bike Plus trainer, you can try these tips. -
Page 32: Tightening The Handles And Screws
Tightening the Handles and Screws CAUTION To avoid personal injury and damaging the trainer, firmly tighten all of the handle bolts or set screws before each use. 1 Confirm the bike geometry, and select an option: • For the handle bolts, firmly tighten each handle by hand. •... - Page 34 November 2022 GUID-8AA4B804-1987-45AC-8B9D-71AE54BD62B0 v1...
Need help?
Do you have a question about the TACX NEO BIKE PLUS and is the answer not in the manual?
Questions and answers