Garmin TREAD Owner's Manual
Hide thumbs
Also See for TREAD:
- Owner's manual (82 pages) ,
- Installation instructions manual (14 pages) ,
- Owner's manual (38 pages)
Table of Contents
Advertisement
Quick Links
Advertisement
Table of Contents

Related Manuals for Garmin TREAD


Summary of Contents for Garmin TREAD
- Page 1 TREAD ™ Owner’s Manual...
- Page 2 © 2020 Garmin Ltd. or its subsidiaries All rights reserved. Under the copyright laws, this manual may not be copied, in whole or in part, without the written consent of Garmin. Garmin reserves the right to change or improve its products and to make changes in the content of this manual without obligation to notify any person or organization of such changes or improvements. Go to www.garmin.com...
-
Page 3: Table Of Contents
Table of Contents Viewing the Altimeter, Barometer, and Compass..........26 Calibrating the Compass....27 Getting Started......... 1 Group Ride..........27 Device Overview........2 Starting a Group Ride......28 Turning the Device On or Off....3 Joining a Group Ride......28 Acquiring GPS Signals...... - Page 4 Viewing Previous Routes and Changing Your Active Route....90 Destinations.......... 63 Adding a Location to Your Route..90 Garmin PowerSwitch™ App....64 Shaping Your Route......91 Activating a Power Switch....65 Avoiding Delays, Tolls, and Areas..92 Turning Off All Switches....65 Avoiding Traffic Delays on Your Customizing a Button.......
- Page 5 Finding a Location by Category..103 Deleting a Saved Location....120 Navigating to Points of Interest Within a Venue..........103 Rider Awareness Features and Viewing Your Garmin Explore Points of Alerts........... 121 Interest..........104 Synchronizing Garmin Explore Enabling or Disabling Rider Alerts..121 Account Data........
- Page 6 My device does not appear as either a portable device or a removable drive or volume on my computer..... 146 Appendix........147 Mounting Your Tread in an Automobile.......... 147 Mounting Your Tread Base Edition in an Automobile.......... 149 Garmin PowerSwitch......150 Table of Contents...
-
Page 7: Getting Started
Title Getting Started (Zumo) Identifier GUID-0B9307AA-7727-453F-B55B-7FC518DD2C82 Language EN-US Description Version Revision Changes Conditioning warning statement for OM only Status Released Last Modified 25/11/2020 10:24:40 Author hizerdanielle Getting Started WARNING See the Important Safety and Product Information guide in the product box for product warnings and other important information. -
Page 8: Device Overview
Title Device Overview (Zumo 396) Identifier GUID-5ACC9F14-E654-4CEB-98E9-4DABAADC56D4 Language EN-US Description Version Revision Changes Status Released Last Modified 16/02/2018 09:58:24 Author mall Device Overview Power button microSD memory card slot ® USB power and data port Getting Started... -
Page 9: Turning The Device On Or Off
Title Turning the Device On or Off (PND) Identifier GUID-BE66547E-AE97-45E0-891D-F8ADB2983BC5 Language EN-US Description Version 1.1.1 Revision Changes Changing key to button for consistency Status Released Last Modified 02/01/2020 17:19:05 Author tillmonmartha Turning the Device On or Off • To turn the device on, press the power button, or connect the device to power. •... -
Page 10: Status Bar Icons
Active vehicle profile. Select to view the vehicle profile settings. Current time. Select to set the time (Setting the Time, page 132). Battery charge level. Tread app connection status (Pairing Your Phone and Headset, page 76). Temperature. Select to view the weather forecast (Viewing the Weather Forecast, page 59). -
Page 11: Using The On-Screen Buttons
Title Using the On-Screen Buttons Identifier GUID-F02C32D7-90EA-4F39-95B1-C60D6702B94D Language EN-US Description No English change. Versioned to fix CZ. Version Revision Changes No English change. Version to fix CZ, DA, KO. Status Released Last Modified 21/05/2020 07:05:13 Author pullins Using the On-Screen Buttons On-screen buttons allow you to navigate the pages, menus, and menu options on your device. -
Page 12: Using The Audio Mixer
Title Using the Audio Mixer Identifier GUID-530BBF6F-FF81-4B06-846A-B82979621418 Language EN-US Description Version Revision Changes Updating for zumo XT menu path Status Released Last Modified 02/01/2020 17:19:05 Author tillmonmartha Using the Audio Mixer You can use the audio mixer to set the volume levels for different audio types, such as navigation prompts or phone calls. -
Page 13: Vehicle Profiles
Title Transportation Modes Identifier GUID-9269975E-8B82-43FF-89F5-1A7921DFDEC5 Language EN-US Description Version Revision Changes Updated the warning based on legal feedback. Added the Other profile, plus trailers. Status Released Last Modified 15/10/2021 09:21:13 Author mall Vehicle Profiles WARNING Entering your vehicle profile characteristics does not guarantee that your vehicle’s characteristics will be accounted for in all route suggestions. -
Page 14: Adding A Vehicle Profile
Title Adding a Vehicle Profile Identifier GUID-4D3B676F-F0DD-42FD-B260-6867E9A59946 Language EN-US Description Version Revision Changes Status Released Last Modified 15/10/2021 09:36:22 Author hizerdanielle Adding a Vehicle Profile You can add a vehicle profile for each vehicle to be used with your device. 1 Select the vehicle profile icon from the status bar, and select 2 Select an option: •... -
Page 15: Installation
Revision Changes Status Released Last Modified 04/12/2020 16:05:33 Author hizerdanielle Mounting Your Device in an ATV or Side-by-Side Title Power Cable Overview (Tread) Identifier GUID-4C425105-0E38-4D43-98E7-38D0E52230C7 Language EN-US Description Version Revision Changes Switching the order of the warnings per Legal. Status... -
Page 16: Mounting Considerations
Mount connector 10 to 30 Vdc system power (red) System ground (black) Title Mounting Considerations (Tread) Identifier GUID-A9C264F4-D160-421A-92E3-F9F1FB4A92B9 Language EN-US Description Version Revision Changes Status Released Last Modified 25/11/2020 10:59:25 Author hizerdanielle Mounting Considerations • The device must be mounted close to the bus bar or battery and within the range of the supplied power cable. -
Page 17: Mounting The Device On A Roll Bar
5 Tighten the knob slightly. 6 If necessary, rotate the Group Ride mount so the Garmin logo faces up, and adjust the mount for better viewing and operation. 7 Tighten the knob to secure the mount. - Page 18 11 Route the power cable along a suitable path in your vehicle, and secure it using the included zip ties. Installation...
-
Page 19: Mounting The Antenna
Title Relocating the Antenna Identifier GUID-F703933D-99ED-4A12-A920-2325A9CB69C0 Language EN-US Description Version Revision Changes No English changes. Version to fix HU Status Released Last Modified 12/05/2021 08:16:38 Author pullins Mounting the Antenna NOTE: The mounted antenna must be at least 4 cm (1.57 in.) away from the nearest roll bar or metal surface to avoid radio interference. - Page 20 4 Place the mount around the roll bar. 5 Tighten the bolt on the mount until the ring is secure. 6 Screw down and tighten the antenna onto the external antenna mount plate. 7 Route the antenna cable along a suitable path in your vehicle, and secure it using the included zip ties. Installation...
-
Page 21: Installing The Antenna On The Group Ride Mount
Title Attaching the Antenna to the Backpack Mount Identifier GUID-65C71F7D-9BC7-404E-823C-D52C2FB909DD Language EN-US Description Version Revision Changes Updating the context statement per Don Schmidt, to encourage using the external antenna mount for better range performance. Status Released Last Modified 14/12/2020 14:26:05 Author hizerdanielle Installing the Antenna on the Group Ride Mount... -
Page 22: Installing The Fist Microphone And Mount
Avoid wires, gauges, air bags, air bag covers, HVAC, and other items when drilling pilot holes and attaching the mount to the vehicle. Garmin is not responsible for any damages or consequences arising from the installation. NOTE: This feature is not available on all product models. -
Page 23: Removing Your Device From The Mount
4 Using the mount as a template, mark the three screw locations. 5 Drill pilot holes (optional). For some types of mounting material, drilling pilot holes is necessary. 6 Securely fasten the mount to the surface using the supplied screws 7 Slide the fist microphone onto the mount. -
Page 24: Replacing The Trim Ring
Title Replacing the Trim Ring Identifier GUID-427F5D95-A609-4999-9965-F0041D228B95 Language EN-US Description Version Revision Changes Status Released Last Modified 25/11/2020 10:37:15 Author hizerdanielle Replacing the Trim Ring You can replace the trim ring on your device with one of the included, colored trim rings. 1 Remove the device from the mount. -
Page 25: Off-Road Navigation Features
Routes Identifier GUID-3E0ED7A1-F29D-4D5F-AC27-CF67452F3670 Language EN-US Description Version Revision Changes Adding information about straight line routes for Tread Status Released Last Modified 25/11/2020 10:37:09 Author hizerdanielle Routes A route is a path from your current location to one or more destinations. -
Page 26: Adventure Roads And Trails
Title Adventure Roads and Trails Identifier GUID-08C3F289-54FB-48F4-BB6F-9C368DFFB664 Language EN-US Description Version Revision Changes Status Released Last Modified 15/10/2021 09:15:17 Author mall Adventure Roads and Trails WARNING Entering your vehicle profile characteristics does not guarantee that your vehicle's characteristics will be accounted for in all route suggestions. -
Page 27: Straight Line Routes
Title Straight Line Routes Identifier GUID-2BDEF66C-8C39-4E99-91E0-A954CF3B83BD Language EN-US Description Version Revision Changes Removing map perspective, updating context statement to remove off-road use specifically Status Released Last Modified 15/10/2021 09:41:39 Author hizerdanielle Straight Line Routes For areas without defined roads or trails, the device guides you to your destination using a straight line route. You can set multiple waypoints to navigate a route through areas without roads. -
Page 28: Skipping The Next Stop On Your Route
Title Skipping the Next Stop on Your Route Identifier GUID-1017059B-9EFD-4579-8B38-C1E979F10D8D Language EN-US Description Version Revision Changes Status Released Last Modified 25/11/2020 10:27:34 Author hizerdanielle Skipping the Next Stop on Your Route You can skip an upcoming location you previously added to your route. From the map, select >... -
Page 29: Recording Tracks
Status Released Last Modified 15/10/2021 09:39:47 Author pullins Navigating a Track You can navigate a saved track using the Garmin Explore app on your device. 1 Select Explore > Tracks. 2 Select a track. 3 Select Go!. Off-Road Navigation Features... -
Page 30: Viewing Your Collections On The Map
Viewing Your Collections on the Map Before you can view the Collections map layer, you must pair your device with the Tread app and sync your device with your Garmin Explore account. You can view your Garmin Explore collections directly on the map. You must enable the collections map layer to use this feature. -
Page 31: Calibrating Pitch And Roll
Identifier GUID-2858EE1B-7E27-4B7A-9B96-ED20E0DC7E40 Language EN-US Description Version Revision Changes Pitch and Roll is on the home screen for Tread Status Released Last Modified 15/10/2021 09:36:26 Author hizerdanielle Calibrating Pitch and Roll You can set the angle of your vehicle to zero at any time. -
Page 32: Enabling Or Disabling Warning Angle Alerts
Enabling or Disabling Warning Angle Alerts Identifier GUID-C24C31CE-86AF-4485-A9F1-E7B58D67E405 Language EN-US Description Version Revision Changes Pitch and Roll is on the home screen for Tread Status Released Last Modified 15/10/2021 09:38:01 Author hizerdanielle Enabling or Disabling Warning Angle Alerts 1 Select Pitch and Roll >... -
Page 33: Calibrating The Compass
Calibrating the Compass Identifier GUID-083F58F9-76F6-4D66-A4FE-6FABDCD98F41 Language EN-US Description Version Revision Changes Updating the path for Tread, removed mention of "magnetic" mount. Status Released Last Modified 15/10/2021 09:36:28 Author hizerdanielle Calibrating the Compass NOTICE Calibrate the electronic compass outdoors. To improve heading accuracy, do not stand near metal objects or objects that influence magnetic fields, such as vehicles, electronic devices, buildings, or overhead power lines. -
Page 34: Starting A Group Ride
• To start a group ride with riders that have a Group Ride mount, select Create a Radio Group Ride. • To start a group ride with riders using the Tread app, select Create a Mobile Group Ride. 3 If necessary, select the radio channel, and select Next. -
Page 35: Rejoining A Recent Group Ride
Title Rejoining a Recent Group Ride Identifier GUID-5F1A07EA-C7CE-4C82-9096-30E82F991AF9 Language EN-US Description Version Revision Changes Status Released Last Modified 25/11/2020 10:40:34 Author hizerdanielle Rejoining a Recent Group Ride You can rejoin any of your ten most-recent group rides. 1 From the main menu, select Group Ride > Recent Group Rides. 2 Select a recent group ride, and select Join. -
Page 36: Broadcasting A Message
Title Broadcasting a Message Identifier GUID-1BDD4847-73EC-4858-B29D-A3481896194D Language EN-US Description Version Revision Changes No English change. Versioned to fix DA. Status Released Last Modified 14/04/2021 11:04:16 Author pullins Broadcasting a Message WARNING Do not read, send, or reply to any messages while driving. If you do so, you could become distracted by the display, which could lead to an accident causing personal injury or death. -
Page 37: Viewing A Group Ride Notification
Title Viewing a Group Ride Notification Identifier GUID-AD516DC9-2F2F-41C8-924F-7E19CA86F55D Language EN-US Description Version Revision Changes Status Released Last Modified 25/11/2020 10:44:25 Author hizerdanielle Viewing a Group Ride Notification WARNING Do not read or reply to any notifications while driving. If you do so, you could become distracted by the display, which could lead to an accident causing serious personal injury or death. -
Page 38: Group Ride Settings
You can use the radio app to create radio presets, select a radio channel, and select squelch codes. To use this feature, you must connect the device and the antenna to the Group Ride mount. The Tread device configures radio settings automatically when you join or create a group ride. -
Page 39: Selecting A Preset
Title Selecting a Preset Identifier GUID-B63830E6-C876-4D9C-938F-7779D80D743E Language EN-US Description Version Revision Changes Status Released Last Modified 14/10/2021 10:47:53 Author hizerdanielle Selecting a Preset NOTE: For some product models, the Radio app is located in the apps menu. 1 From the main menu, select Radio. 2 Select an option: •... -
Page 40: Adjusting The Squelch
Title Adjusting the Squelch Identifier GUID-9E1FEA8D-2664-43B4-9857-206A0652BCDE Language EN-US Description Version Revision Changes Status Released Last Modified 25/11/2020 10:18:52 Author hizerdanielle Adjusting the Squelch You can adjust the squelch and change between CTCSS, DCS, and Open squelch modes to improve audio quality and avoid radio interference in your area. -
Page 41: Selecting A Roger Tone
Title Selecting a Roger Tone Identifier GUID-2EF1ABCD-5B51-48D0-9247-3F45D4E9FC52 Language EN-US Description Version Revision Changes Status Released Last Modified 25/11/2020 10:36:57 Author hizerdanielle Selecting a Roger Tone You can select the tone other devices play when you operate your radio. 1 Select Radio > >... -
Page 42: Transmitting Your Voice
Transmitting Your Voice Before you can transmit your voice, you must pair your Tread device with a compatible Bluetooth headset or connect the fist microphone. You can transmit your voice over the radio using the connected fist microphone or a compatible Bluetooth headset. -
Page 43: Radio Settings
Remote ® The inReach remote function allows you to control your inReach satellite communication device (sold separately) using your Tread device. You can send messages, view weather reports, trigger an SOS alert, and more. Go to buy.garmin.com to purchase an inReach device. -
Page 44: Sending An Inreach Message
15/10/2021 09:40:53 Author tillmonmartha Sending an inReach Message Before you can send an inReach message using your Tread device, you must pair it with a compatible inReach device (Connecting an inReach Device, page 37). You can use your device to send inReach messages to your contacts. - Page 45 Last Modified 15/12/2021 13:41:43 Author hizerdanielle Initiating an SOS Rescue Before you can initiate an SOS rescue using your Tread device, you must pair it with a compatible inReach device (Connecting an inReach Device, page 37). NOTICE While the device is in SOS mode, do not turn off or attempt to turn off the inReach device. Doing so could prevent this feature from operating properly and could delay receipt of assistance in the event of an emergency.
-
Page 46: Using The Map
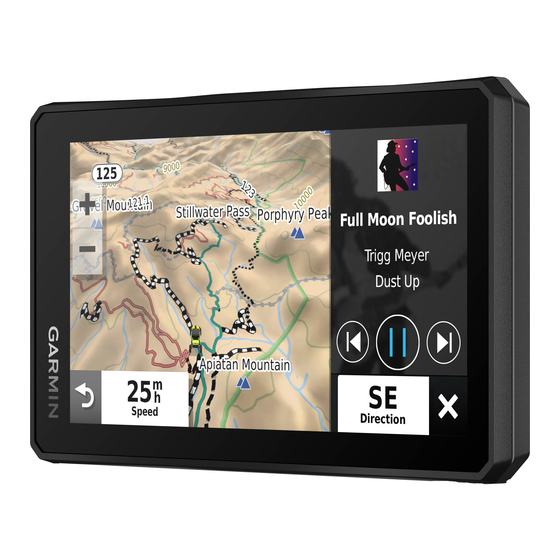
Title Using the Map Identifier GUID-B358E5AB-409D-4DD9-BD9E-EC9BD6E87396 Language EN-US Description Version Revision Changes Added map layers, added 2D to map perspective, removed filter by category option. Status Released Last Modified 15/10/2021 09:22:14 Author hizerdanielle Using the Map You can use the map to navigate a route (Your Route on the Map, page 87) or to view a map of your surroundings when no route is active. -
Page 47: Map Tools
Report Safety Camera: Allows you to report a speed or red light camera. This tool is available only when you have speed or red light camera data on your device and you have an active connection to the Tread app (Pairing Your Phone and Headset, page 76). -
Page 48: Viewing A Map Tool
Title Viewing a Map Tool Identifier GUID-5333AF88-C717-4783-AF04-AD3002CEC4C9 Language EN-US Description Version Revision Changes Update map tool icon. No longer uses context menu icon. Status Released Last Modified 24/11/2015 09:57:05 Author petersenj Viewing a Map Tool 1 From the map, select 2 Select a map tool. -
Page 49: Viewing Upcoming Locations
Title Viewing Upcoming Locations Identifier GUID-033B9E44-1B66-4923-9E36-F2DB57CA85A4 Language EN-US Description Version Revision Changes Removing number of categories to make it more reusable Status Released Last Modified 29/04/2020 16:31:44 Author hizerdanielle Viewing Upcoming Locations 1 From the map, select > Up Ahead. While you are traveling, the map tool shows the next location along your road or route. -
Page 50: Cities Ahead
Title Cities Ahead Identifier GUID-346636C4-D7A6-41F3-92F1-C9218CA3A685 Language EN-US Description Version Revision Changes Status Released Last Modified 14/09/2018 14:17:45 Author petersenj Cities Ahead While you are traveling on a highway or navigating a route that includes a highway, the Cities Ahead tool provides information about upcoming cities along the highway. -
Page 51: Trip Information
Title Trip Information Identifier GUID-CFF93ABF-0542-40C2-A511-1831B64AC668 Language EN-US Description Title only, no index entries. Version Revision Changes QA’d EN, AF, AR, BG, CS, DA, DE, EL, EN-GB, ES, ET, FI, FR, HR, HU, IT, KO, ZH-CN, ZH-TW, SL, SK, LT, LV, NO, PL, PT, RO, RU, SV, TR Status Released... -
Page 52: Viewing The Trip Information Page
Title Viewing the Trip Computer Identifier GUID-D5D0C929-FFF0-4901-8CB8-CDE468CF0873 Language EN-US Description Version Revision Changes Removed the note since it is no longer required in the software. Status Released Last Modified 19/12/2018 15:34:06 Author mall Viewing the Trip Information Page The trip information page displays your speed and provides statistics about your trip. From the map, select Speed. -
Page 53: Viewing Upcoming Elevation Changes
Author hizerdanielle Viewing Upcoming Traffic NOTICE Garmin is not responsible for the accuracy or timeliness of the traffic information. Before you can use this feature, your device must be receiving traffic data (Traffic, page 99). You can view traffic incidents coming up along your route or along the road on which you are traveling. -
Page 54: Viewing Traffic On The Map
Title Viewing Traffic on the Map Identifier GUID-84924A76-20B5-400F-9124-565E325E482E Language EN-US Description Version Revision Changes Updated for 2013 traffic UI. QA’d EN, AF, AR, BG, CS, DA, DE, EL, EN-GB, ES, ET, FI, FR, HR, HU, IT, KO, ZH- CN, ZH-TW, SL, SK, LT, LV, NO, PL, PT, RO, RU, SV, TR spacing issue in ZH-CN. Status Released Last Modified... -
Page 55: Customizing The Map
Title Customizing the Map Identifier GUID-967C4E16-DAAA-48B9-9480-109AE1B69C8A Language EN-US Description Version Revision Changes QA’d EN, AF, AR, BG, CS, DA, DE, EL, EN-GB, ES, ET, FI, FR, HR, HU, IT, KO, ZH-CN, ZH-TW, SL, SK, LT, LV, NO, PL, PT, RO, RU, SV, TR Status Released Last Modified... -
Page 56: Enabling Adventure Roads And Trails Map Layers
Title Enabling Adventure Roads and Trails Map Keys Identifier GUID-CB889F86-0900-43C8-96D1-43C39AE87CC8 Language EN-US Description Version Revision Changes Status Released Last Modified 25/11/2020 11:03:58 Author hizerdanielle Enabling Adventure Roads and Trails Map Layers You can enable or disable map layers that display accessible or inaccessible roads for different types of motor vehicles. -
Page 57: Changing The Map Perspective
Title Changing the Map Perspective Identifier GUID-7714E17E-4BE8-4797-80FE-B707A03409E0 Language EN-US Description Version Revision Changes No English Change. Versioned to fix ZH-CN. Status Released Last Modified 21/12/2020 13:46:46 Author pullins Changing the Map Perspective 1 Select > Map Display > Driving Map View. 2 Select an option: •... -
Page 58: Music Player
Author hizerdanielle Music Player The music player can play music or audio from these sources. • Music files stored on your Tread device. • Bluetooth audio from a paired phone. Title Adding the Media Player Tool to the Map Identifier... -
Page 59: Changing The Media Source
Changing the Media Source Identifier GUID-F78CCC16-3288-452D-B688-EA58FD288EB1 Language EN-US Description Version Revision Changes Updating the path for Tread Status Released Last Modified 25/11/2020 11:05:17 Author hizerdanielle Changing the Media Source You can change the source from which media is played on your device. -
Page 60: Downloading Birdseye Imagery
Identifier GUID-98109A68-8513-4327-8456-2044B21ED56A Language EN-US Description Version Revision Changes Updating the path for Tread Status Released Last Modified 15/10/2021 09:37:56 Author hizerdanielle Downloading BirdsEye Imagery Before you can download BirdsEye imagery directly to your device, you must connect to a wireless network (Connecting to a Wi‑Fi Network, page... -
Page 61: Planning A Route
Title Planning a Route Identifier GUID-84374EC5-29FE-43E3-9BBB-8BBC26F4BBC2 Language EN-US Description Version Revision Changes Adding Apps and Create Route to step 1. Spacing issue in the HU, Status Released Last Modified 15/10/2021 09:39:51 Author hizerdanielle Planning a Route A route can include many locations, and it must include at least a starting location and one destination. The starting location is the location from which you plan to start your route. -
Page 62: Changing Routing Options For A Route
Title Changing Routing Options for a Route Identifier GUID-2D958878-CADB-475F-8FC5-23CDE3ED936F Language EN-US Description Version Revision Changes Adding Apps to step 1 Status Released Last Modified 07/06/2021 16:06:39 Author hizerdanielle Changing Routing Options for a Route You can customize how the device calculates your route. 1 Select >... -
Page 63: Editing And Saving Your Active Route
• To share a route using a Bluetooth connection, select Bluetooth. • To copy the route to a microSD card, select Memory Card. 3 Select a route. 4 Select Done. 5 Follow the on-screen instructions on your Tread device to complete the sharing process. Using the Apps... -
Page 64: Tracback
Title About TracBack Identifier GUID-89C29221-22C7-417B-A141-559796093837 Language EN-US Description Version Revision Changes Status Released Last Modified 05/08/2012 15:27:02 Author petersenj TracBack ® Title Following Your Recent Track Identifier GUID-2A0E0BF1-95A6-41EA-B661-AD8C836448AA Language EN-US Description Version Revision Changes Changed the context to indicate it only records the most recent segment of your track. Status Released Last Modified... -
Page 65: Viewing The Weather Forecast
Viewing the Weather Forecast NOTICE Garmin is not responsible for the accuracy or timeliness of the weather data. Before you can use this feature, your device must be receiving weather data. You can connect your device to the Tread app to receive weather data (Pairing Your Phone and Headset, page 76). -
Page 66: Viewing The Weather Radar
Last Modified 07/06/2021 16:06:39 Author pullins Viewing the Weather Radar Before you can use this feature, your device must be connected to a supported phone running the Tread app (Pairing Your Phone and Headset, page 76). 1 Select > Weather Radar. -
Page 67: Checking Road Conditions
Author petersenj Checking Road Conditions Before you can use this feature, your device must be connected to a supported phone running the Tread app (Pairing Your Phone and Headset, page 76). You can view weather-related road conditions for the roads in your area, on your route, or in another city. -
Page 68: Creating A Round-Trip Route
Title Round Trip Identifier GUID-23DDBD0C-2E4A-4A99-B7E7-B2CEF94F384F Language EN-US Description Version Revision Changes Adding a step to select road type Status Released Last Modified 03/11/2021 15:27:24 Author hizerdanielle Creating a Round-Trip Route The device can create a round-trip route using a specified starting location and a distance, duration, or destination. -
Page 69: Viewing Previous Routes And Destinations
Title Viewing Previous Routes and Destinations Identifier GUID-F6BBFDCE-B843-4EB4-BD68-62E777BEFB92 Language EN-US Description Version Revision Changes versioned to fix HU translation Status Released Last Modified 29/01/2020 17:18:49 Author mall Viewing Previous Routes and Destinations Before you can use this feature, you must enable the travel history feature (Device and Privacy Settings, page 133). -
Page 70: Garmin Powerswitch App
Enters editing mode to customize the app layout and functions Turns off all outputs Activates each connected output Power buttons Displays input voltage Displays the total amperage of the selected Garmin PowerSwitch device Displays the device name Displays Garmin PowerSwitch device tabs and custom layout tabs Using the Apps... -
Page 71: Activating A Power Switch
Activating a Power Switch Before you can use the Garmin PowerSwitch app to activate a switch, you must install your Garmin PowerSwitch device in your vehicle and pair it with the Garmin PowerSwitch app. From the Garmin PowerSwitch app, select a power button to turn a switch on or off. -
Page 72: Customizing A Button
Before you can use control input functions, you must connect a control input to your Garmin PowerSwitch device (Connecting a Control Input, page 155). You can assign one or more switches to turn on when the Garmin PowerSwitch device receives a signal from a control input. 1 Select 2 Select your Garmin PowerSwitch device. -
Page 73: Adding A Custom Layout
Author pullins Adding a Custom Layout You can add a custom layout tab to the Garmin PowerSwitch app. Buttons added to a custom layout can control multiple switches at the same time. 1 From the Garmin PowerSwitch app, select The device enters editing mode. - Page 74 10 If applicable, use the slider to set the brightness of lights. 11 Select . 12 If necessary, select Add Action to add additional actions for the button. You can add one action for every switch on the Garmin PowerSwitch device. Using the Apps...
- Page 75 15/01/2021 11:22:18 Author pullins Arranging Buttons In a Custom Layout 1 From the Garmin PowerSwitch app, select a custom layout tab. 2 Select The app enters editing mode. 3 On the button you want to move, hold , and drag the button to a new location.
-
Page 76: Routines
Routines Routines automate your Garmin PowerSwitch device. When you define a routine on your compatible Garmin navigation device, it turns switches on or off automatically when the conditions of the routine are met. For example, you can set a routine to turn on a switch at specific time each day or when your vehicle reaches a specific speed. -
Page 77: Dog Tracking
The dog tracking features allow you to see information transmitted from your compatible Garmin handheld dog device on your Tread device. You can navigate to your dogs, view their current status and location, and observe the distance they have traveled. -
Page 78: Receiving Data From Your Handheld Device
Place your handheld dog device within 3 m (10 ft) of your Tread device. TIP: Your Tread device receives data from one compatible handheld dog device at a time. Stay more than 3 m (10 ft) away from other handheld dog devices or disable broadcasting on handheld dog devices from which you do not want to receive data. -
Page 79: Viewing Your Dogs On The Map
Title Dog Status Icons (PND) Identifier GUID-3CC9CC55-595D-4D6A-8DBC-A6E7F163812E Language EN-US Description Version Revision Changes Status Released Last Modified 06/05/2016 13:34:52 Author mall Dog Status Icons Icons indicate the status and location of your dogs. Sitting Running On point Treed Unknown* Collar battery low Collar connection lost Collar GPS reception lost *The unknown status icon indicates the collar has not acquired a satellite signal and the handheld device... -
Page 80: Live Services, Traffic, And Smartphone Features
NOTICE Garmin is not responsible for the accuracy or timeliness of the traffic information. The Tread app allows your device to receive smart notifications and live information, such as live traffic data and weather information. Live traffic data: Sends live traffic data to your device, such as traffic incidents and delays, construction zones,... -
Page 81: Bluetooth Feature Status Icons
• A gray icon indicates the feature is disabled or disconnected for that device. • A colored icon indicates the feature is connected and active for that device. Hands-free calling Smart notifications Tread features and services Media streaming Headset is connected Live Services, Traffic, and Smartphone Features... -
Page 82: Pairing Your Phone And Headset
Some features also require the Tread app. You can connect to the Tread app during the pairing process or later. 1 Place the Tread device and your headset or phone within 3 m (10 ft.) of each other. -
Page 83: Receiving Notifications
Do not read or reply to notifications while driving. If you do so, you could become distracted by the display, which could lead to an accident causing serious personal injury or death. Before you can use this feature, your device must be connected to a supported phone running the Tread app (Pairing Your Phone and Headset, page 76). - Page 84 Do not read or reply to notifications while driving. If you do so, you could become distracted by the display, which could lead to an accident causing serious personal injury or death. Before you can use this feature, your device must be connected to a supported phone running the Tread app (Pairing Your Phone and Headset, page 76).
-
Page 85: Viewing The List Of Notifications
All features may not be available for your phone. Using Bluetooth wireless technology, your device can connect to your compatible mobile phone and wireless headset or helmet to become a hands-free device. To check compatibility, go to www.garmin.com/bluetooth. Live Services, Traffic, and Smartphone Features... -
Page 86: Placing A Call
Title Placing a Call (Tread) Identifier GUID-42B0756A-16C3-41ED-8CFE-1DE3A3FE9FAD Language EN-US Description Version Revision Changes Status Released Last Modified 25/11/2020 10:37:19 Author hizerdanielle Placing a Call 1 Select > Phone. 2 Select an option: • To dial a number, select Dial, enter the phone number, and select Dial. -
Page 87: Using In-Call Options
Identifier GUID-70B17F4A-C471-4E66-9E70-F161A69818C0 Language EN-US Description Version Revision Changes New UI for Tread Status Released Last Modified 25/03/2021 15:17:42 Author hizerdanielle Using In-Call Options In-call options appear on the map when you answer a call. Some options may not be compatible with your phone. -
Page 88: Disabling Bluetooth Features (Iphone®)
Disabling Bluetooth Features for Your Apple Device Identifier GUID-E4E83559-4762-46D7-B575-523DD60FFFE1 Language EN-US Description Version Revision Changes Removing information about disabling Garmin Drive Status Released Last Modified 02/01/2020 17:19:05 Author tillmonmartha Disabling Bluetooth Features (iPhone ® By default, all compatible Bluetooth features are enabled when you pair your phone. You can disable specific Bluetooth features and remain connected to the other features. -
Page 89: Disabling Bluetooth Features (Android)
Identifier GUID-CD185F7D-B245-48F6-81DC-F9669505B9A6 Language EN-US Description Version Revision Changes Removing the option to disable Garmin Drive data and smart notifications Status Released Last Modified 02/05/2019 15:55:53 Author tillmonmartha Disabling Bluetooth Features (Android) By default, all compatible Bluetooth features are enabled when you pair your phone. You can disable specific Bluetooth features and remain connected to the other features. -
Page 90: Disconnecting A Bluetooth Device
Disconnecting a Bluetooth Device You can temporarily disconnect a Bluetooth device without deleting it from the paired devices list. The Bluetooth device can connect to your Tread device automatically in the future. 1 Select > Wireless Networks. 2 Select the device to disconnect. -
Page 91: Street Navigation
Title Street Navigation (title only) Identifier GUID-3FFC1737-0EA8-4994-9D64-942F6F7FAF14 Language EN-US Description Version Revision Changes Status Released Last Modified 01/04/2019 12:51:29 Author mall Street Navigation Title Starting a Route Identifier GUID-8A6627F6-AB1E-4DDE-9CB3-193224CAEDB9 Language EN-US Description Version Revision Changes No English change. Versioned to fix ZH-CN and ZH-TW Status Released Last Modified... -
Page 92: Starting A Route By Using The Map
GUID-0020E6C8-320B-4F07-8C24-54CEB6867385 Language EN-US Description Version 3.1.3 Revision Changes Branch for Tread to focus on off-road use. Status Released Last Modified 25/11/2020 10:21:18 Author mall Starting a Route by Using the Map You can start a route by selecting a location from the map. -
Page 93: Your Route On The Map
Title Your Route on the Map (with glyphs) Identifier GUID-B80737A7-7EC9-488C-AC8C-AC12B7BF8EB4 Language EN-US Description Version Revision Changes Adding Map Layers Status Released Last Modified 25/11/2020 11:03:45 Author tillmonmartha Your Route on the Map As you travel, the device guides you to your destination using voice prompts and information on the map. Instructions for your next turn or exit, or other actions appear across the top of the map. -
Page 94: Active Lane Guidance
Title Active Lane Guidance Identifier GUID-E6EA81D1-5E15-4F3D-8021-4A8421F0BD0C Language EN-US Description Version Revision Changes No English Changes. Versioned to fix JA-JP and KO-KR. Status Released Last Modified 30/12/2019 08:53:49 Author pullins Active Lane Guidance As you approach some turns, exits, or interchanges in your route, a detailed simulation of the road appears beside the map, if available. -
Page 95: Viewing The Entire Route On The Map
Title Viewing the Entire Route on the Map Identifier GUID-371BBB60-175E-4251-9C07-FF647D53E46C Language EN-US Description Version Revision Changes New map button is simpler and presents a better "happy path." QA’d EN, AF, AR, BG, CS, DA, DE, EL, EN- GB, ES, ET, FI, FR, HR, HU, IT, KO, ZH-CN, ZH-TW, SL, SK, LT, LV, NO, PL, PT, RO, RU, SV, TR Status Released Last Modified... -
Page 96: Changing Your Active Route
Title Changing Your Active Route Identifier GUID-0E9562DB-43DB-4A5F-ABE6-E1899613A3A5 Language EN-US Description Version Revision Changes Status Released Last Modified 08/11/2016 12:33:17 Author petersenj Changing Your Active Route Title Adding a Point to a Route Identifier GUID-A55B7087-E78E-4B3D-A2B9-CC2A56997D9A Language EN-US Description Version Revision Changes Update language to current software terminology of "destinations"... -
Page 97: Shaping Your Route
Title Shaping Your Route Identifier GUID-D5BD0328-31DA-43AF-B860-0CDC11B46497 Language EN-US Description Version Revision Changes No English change. Versioned to fix ET. Status Released Last Modified 26/08/2020 09:15:53 Author pullins Shaping Your Route Before you can shape your route, you must start a route (Starting a Route, page 85). -
Page 98: Avoiding Delays, Tolls, And Areas
Title Avoiding Delays Fees and Areas Identifier GUID-2DED9D60-3C7D-44FE-9997-7A0358FE7DB0 Language EN-US Description Title only, no index. Version Revision Changes Changing Fees to Tolls to prevent translation problems. Status Released Last Modified 04/05/2015 15:49:02 Author petersenj Avoiding Delays, Tolls, and Areas Title Avoiding Traffic Delays on Your Route Identifier GUID-A482BB24-F5E9-4B93-A930-68478FC1C14D... -
Page 99: Avoiding Toll Roads
Identifier GUID-24CA27A5-2C6B-4B63-847F-6AE0569774F6 Language EN-US Description Version Revision Changes Conditioning "Save" for Garmin OS Status Released Last Modified 17/03/2020 13:48:51 Author hizerdanielle Avoiding Toll Roads Your device can avoid routing you through areas that require tolls, such as toll roads, toll bridges, or congestion areas. -
Page 100: Avoiding Road Features
Title Avoiding Road Features Identifier GUID-6DA8594E-0E5E-4278-9F0C-CF0B33B8C559 Language EN-US Description Version Revision Changes Changing OK to Save Status Released Last Modified 25/11/2020 10:40:53 Author hizerdanielle Avoiding Road Features 1 Select > Navigation > Avoidances. 2 Select the road features to avoid on your routes, and select Save. Title Custom Avoidances Identifier... - Page 101 Title Avoiding an Area Identifier GUID-EB175D20-9C23-48F6-A46F-A0E5C5AFAD76 Language EN-US Description Version Revision Changes Updated path for newer Android devices Status Released Last Modified 29/01/2020 17:18:49 Author mall Avoiding an Area 1 Select > Navigation > Custom Avoidances. 2 If necessary, select Add Avoidance. 3 Select Add Avoid Area.
-
Page 102: Arriving At Your Destination
Title Deleting Custom Avoidances Identifier GUID-6371947F-B2A0-474A-A0E2-C3C20DDDF29D Language EN-US Description Version Revision Changes Updated to match latest software. ZH-CN spacing issue. Status Released Last Modified 29/01/2020 17:18:49 Author mall Deleting Custom Avoidances 1 Select > Navigation > Custom Avoidances > 2 Select an option: •... -
Page 103: Changing The Route Calculation Mode
Your device can calculate adventurous routes that prefer curvy roads, hills, and fewer highways. This feature can provide a more enjoyable ride, but it may increase the time or distance to your destination. The Garmin Adventurous Routing feature is not compatible with off-road trails. -
Page 104: Taking A Detour
Title Taking a Detour Identifier GUID-D4DAE69E-9CC2-48E9-B739-5AE2A51ADD86 Language EN-US Description 2014 Essential Series changed "Detour" to "Change Route." Version Revision Changes No English change. Versioned to fix the ZH-CN. Status Released Last Modified 03/09/2021 14:30:00 Author pullins Taking a Detour You can take a detour for a specified distance along your route or detour around specific roads. This is useful if you encounter construction zones, closed roads, or poor road conditions. -
Page 105: Parking Near Your Destination
To provide traffic information, your device must be receiving traffic data. • All product models can receive subscription-free traffic data using the Tread app. Traffic data is not available in all areas. For information about traffic coverage areas, go to garmin.com/traffic. Street Navigation... -
Page 106: Receiving Traffic Data Using Your Smartphone
17/03/2020 13:53:24 Author mall Receiving Traffic Data Using Your Smartphone Your device can receive subscription-free traffic data while connected to a smartphone running the Tread app. 1 Connect your device to the Tread app (Pairing Your Phone and Headset, page 76). -
Page 107: Finding And Saving Locations
Title Finding and Saving Locations Identifier GUID-0CAA56CC-20EF-42EE-86F1-C2356C804582 Language EN-US Description Version Revision Changes Updated Trucking POI path Spacing error in the ET and ZH-CN. Status Released Last Modified 07/06/2021 16:06:39 Author mall Finding and Saving Locations The maps loaded in your device contain locations, such as restaurants, hotels, auto services, and detailed street information. -
Page 108: Finding A Location Using The Search Bar
Title Finding a Location Using the Search Bar Identifier GUID-B23F6873-1D88-489F-9FFC-2932A09C7F73 Language EN-US Description Version Revision Changes Changed entries of "street number" to "house number" QA’d EN, AF, AR, BG, CS, DA, DE, EL, EN-GB, ES, ET, FI, FR, HR, HU, IT, KO, ZH-CN, ZH-TW, SL, SK, LT, LV, NO, PL, PT, RO, RU, SV, TR KO-space needed after end quotation marks (1st bullet) Status Released... -
Page 109: Finding A Location By Category
Title Finding a Location by Category Identifier GUID-B51EA668-A0A9-40CE-90AA-D3C93FFE5842 Language EN-US Description Version Revision Changes Version 1 was released during 35xx UAT Testing. Version 2 will apply to the zumo 3x0. QA’d EN, AF, AR, BG, CS, DA, DE, EL, EN-GB, ES, ET, FI, FR, HR, HU, IT, KO, ZH-CN, ZH-TW, SL, SK, LT, LV, NO, PL, PT, RO, RU, SV, TR Status Released... -
Page 110: Viewing Your Garmin Explore Points Of Interest
Before you can synchronize account data, you must connect to the Tread app and enable Garmin Explore. You can synchronize data, such as tracks, with your Garmin Explore account. This can be helpful to keep your data available on each of your compatible devices. Your device periodically synchronizes data with your account automatically. -
Page 111: Location Search Results
Select to find parking areas near the location. Select to view alternate routes to the locations. Select to start navigating to the location using Garmin Adventurous Routing. Select to start navigating to the location using the recommended route. Select to view the search results on the map. -
Page 112: Location Search Results On The Map
Title Location Search Results on the Map Identifier GUID-8091E640-D07B-41AD-A3A2-C5B176FBE0A7 Language EN-US Description Version Revision Changes No English Changes. Versioned to fix JP, KO, UK. Status Released Last Modified 08/06/2020 14:26:54 Author pullins Location Search Results on the Map You can view the results of a location search on the map instead of in a list. From the location search results, select . -
Page 113: Changing The Search Area
Title Changing the Search Area Identifier GUID-AEBC9185-86D3-4033-8EAE-B21B7E6DE349 Language EN-US Description No English Changes. Versioned to fix KO-KR. Version Revision Changes Removing "From the main menu" for consistency and standards compliance. Status Released Last Modified 23/07/2018 13:08:37 Author petersenj Changing the Search Area By default, the device searches near your current location. -
Page 114: Finding Parking Near A Specified Location
Title Finding Parking Near a Specified Location Identifier GUID-69F77D61-097B-4701-A94A-56AF28644CB1 Language EN-US Description Version Revision Changes Adding a condition to the filter parking step Status Released Last Modified 04/12/2020 16:05:33 Author hizerdanielle Finding Parking Near a Specified Location 1 Select Search. 2 Search for a location. -
Page 115: Finding An Address
Title Finding an Address Identifier GUID-949C9C38-0295-4278-9195-9ED07B557CFB Language EN-US Description Version Revision Changes No Englsih Change. Versioned to fix ZH-CN and ZH-TW. Status Released Last Modified 23/12/2020 09:26:23 Author pullins Finding an Address NOTE: The order of the steps may change depending on the map data loaded on your device. 1 Select Search. -
Page 116: Finding A Location Using Coordinates
Author hizerdanielle Finding Fuel Stations and Prices Before you can use this feature, your device must be connected to a supported phone running the Tread app (Pairing Your Phone and Headset, page 76). You can find nearby fuel stations and compare fuel prices. -
Page 117: Finding History Points Of Interest
Title Finding History Channel Points of Interest Identifier GUID-6CF3F383-1675-4726-86CE-DC6E74AEBF83 Language EN-US Description Version Revision Changes Adding a notice per Legal Status Released Last Modified 15/12/2021 13:41:35 Author hizerdanielle Finding HISTORY Points of Interest NOTE: This feature is not available on all product models or for all map regions. NOTICE You are responsible for understanding and complying with any applicable rules, laws, or regulations associated with campsites and points of interest. -
Page 118: Finding National Parks
Title Finding National Parks Identifier GUID-CE274BA0-D4B4-4C64-886A-C5E1BA0FB903 Language EN-US Description Version Revision Changes Adding a notice per Legal Status Released Last Modified 15/12/2021 13:41:38 Author hizerdanielle Finding National Parks Device models that include maps for North America or the United States also include detailed information for national parks in the United States. -
Page 119: Finding Ultimate Campgrounds Points Of Interest
Title Finding Ultimate Public Campgrounds Points of Interest Identifier GUID-6A930D4E-BEAE-4EE4-A530-0E277B64C630 Language EN-US Description Version Revision Changes Adding a notice per Legal Status Released Last Modified 15/12/2021 13:41:41 Author hizerdanielle Finding Ultimate Campgrounds Points of Interest NOTE: This feature is not available in all areas. NOTICE You are responsible for understanding and complying with any applicable rules, laws, or regulations associated with campsites and points of interest. -
Page 120: Finding Powersport Points Of Interest
Tripadvisor NOTICE Garmin is not responsible for the accuracy or timeliness of the Tripadvisor information. You are responsible for understanding and complying with any applicable rules, laws, or regulations associated with points of interest. Your device includes Tripadvisor traveler ratings. Tripadvisor ratings appear automatically in the search results list for restaurants, hotels, and attractions. -
Page 121: Finding Tripadvisor Points Of Interest
Title Finding TripAdvisor Points of Interest Identifier GUID-D5EA2DE3-FCD8-4C0B-BE47-4515C281CAEC Language EN-US Description Version Revision Changes Fixed a spacing issue. Status Released Last Modified 31/03/2021 12:57:30 Author hizerdanielle Finding Tripadvisor Points of Interest 1 Select Search > Tripadvisor. 2 Select a category. A list of nearby Tripadvisor points of interest for the category appears. -
Page 122: Viewing Current Location Information
Title Viewing Current Location Information Identifier GUID-0B6FCF45-E6A9-49F4-9C8C-0F624403E487 Language EN-US Description Version Revision Changes Versioned to fix DE translation only. QA’d EN, AF, AR, BG, CS, DA, DE, EL, EN-GB, ES, ET, FI, FR, HR, HU, IT, KO, ZH-CN, ZH-TW, SL, SK, LT, LV, NO, PL, PT, RO, RU, SV, TR Status Released Last Modified... -
Page 123: Getting Directions To Your Current Location
Title Getting Directions to Your Current Location Identifier GUID-3DA36718-7033-4C31-B74D-31D93C827DBC Language EN-US Description Version Revision Changes No English change. Versioned to fix ZH-TW. Status Released Last Modified 15/10/2021 09:16:02 Author pullins Getting Directions to Your Current Location If you need to tell another person how to get to your current location, your device can give you a list of directions. -
Page 124: Removing A Shortcut
Title Removing a Shortcut Identifier GUID-6FE0C37C-1272-4F7B-AD03-034A3CBD6037 Language EN-US Description Version Revision Changes No English Change. Versioned to fix ZH-CN. Status Released Last Modified 15/10/2021 09:17:30 Author pullins Removing a Shortcut 1 Select Search > > Remove Shortcut(s). 2 Select a shortcut to remove. 3 Select the shortcut again to confirm. -
Page 125: Saving Your Current Location
Title Saving Your Current Location Identifier GUID-E8F9ED3C-E71E-4E5D-A488-89259CFEA9B6 Language EN-US Description Version Revision Changes versioned to fix HU translation Status Released Last Modified 31/03/2021 12:51:28 Author mall Saving Your Current Location 1 From the map, select the vehicle icon. 2 Select Save. 3 Enter a name, and select Done. -
Page 126: Assigning Categories To A Saved Location
Title Assigning Categories to a Saved Location Identifier GUID-3D090AF9-1B1E-40FD-9E8B-C6D4C8D78B81 Language EN-US Description Version Revision Changes No English change. Versioned to fix ZH-TW. Status Released Last Modified 15/10/2021 09:36:25 Author pullins Assigning Categories to a Saved Location You can add custom categories to organize your saved locations. NOTE: Categories appear in the saved locations menu after you have saved at least 12 locations. -
Page 127: Rider Awareness Features And Alerts
The rider alerts and speed limit features are for information only and do not replace your responsibility to abide by all posted speed limit signs and to use safe driving judgment at all times. Garmin is not responsible for any traffic fines or citations you receive for failing to follow all applicable traffic laws and signs. -
Page 128: Red Light And Speed Cameras
Red Light and Speed Cameras NOTICE Garmin is not responsible for the accuracy of or the consequences of using a red light or speed camera database. NOTE: This feature is not available for all regions or product models. Information about red light and speed camera locations is available in some areas for some product models. -
Page 129: Enabling Fuel Tracking
Identifier GUID-60C599D6-8931-4E48-B9FF-9C65B02EA21A Language EN-US Description Version Revision Changes Updated prereq to indicate Tread usage modes Status Released Last Modified 25/11/2020 10:40:39 Author hizerdanielle Enabling Fuel Tracking Before you can enable fuel tracking, the device must be in ATV, side-by-side, snowmobile, or motorcycle mode and placed in the mount. -
Page 130: Resetting The Fuel Tank Mileage
While you are using a motorcycle vehicle profile, helmet law and eye protection notifications may appear on your Tread device. Notifications appear the first time your device acquires satellites and when your device approaches a location with motorcycle safety rules. -
Page 131: Searching For Helmet Laws
Title Searching for Helmet Laws Identifier GUID-1C47A96C-8937-4538-9CCC-3833AA8F58C8 Language EN-US Description Version Revision Changes Status Released Last Modified 14/01/2016 11:26:07 Author mckelvey Searching for Helmet Laws You can search for helmet laws by state or province. 1 Select > Helmet Guide. 2 Select a state or province. -
Page 132: Settings
Title Settings (title only) Identifier GUID-E4C34885-774F-4AE5-BE74-4D59CEC56BDD Language EN-US Description Title only. Version Revision Changes Remove prodct name variable. Status Released Last Modified 15/02/2019 11:04:36 Author petersenj Settings Title Map and Vehicle Settings Identifier GUID-03FA87A3-97E0-46F6-AD48-969C74DCD76B Language EN-US Description Version Revision Changes Updated path for newer Android devices. -
Page 133: Enabling Maps
Last Modified 29/01/2020 17:18:49 Author mall Enabling Maps You can enable map products installed on your device. TIP: To purchase additional map products, go to http://buy.garmin.com. 1 Select > Map Display > myMaps. 2 Select a map. Title Navigation Settings... -
Page 134: Calculation Mode Settings
Title Route Preferences Identifier GUID-7BF12901-BB97-400F-B14A-74DAE9D4CF95 Language EN-US Description Version Revision Changes Adding a condition to Shorter Distance Status Released Last Modified 29/01/2020 16:00:23 Author hizerdanielle Calculation Mode Settings Select > Navigation > Calculation Mode. The route calculation is based on road speeds and vehicle acceleration data for a given route. Faster Time: Calculates routes that are faster to drive but can be longer in distance. -
Page 135: Bluetooth Settings
Title Bluetooth Settings Identifier GUID-18037E97-801B-44AB-9906-E4C358C08C3D Language EN-US Description Version Revision Changes No English change. Versioned to fix BG, CZ, EL, FR, NO, PL, PT, RO. Status Released Last Modified 03/12/2020 14:55:46 Author pullins Bluetooth Settings Select > Wireless Networks. Bluetooth: Enables Bluetooth wireless technology. Search for Devices: Searches for nearby Bluetooth devices. -
Page 136: Driver Assistance Settings
Title Driver Assistance Settings Identifier GUID-2B51CCBC-DFC1-49A9-B5CF-FD38603C39DC Language EN-US Description Version Revision Changes Status Released Last Modified 25/11/2020 10:34:16 Author hizerdanielle Driver Assistance Settings Select > Driver Assistance. Rider Alerts: Allows you to enable or disable alerts for upcoming zones or road conditions (Rider Awareness Features and Alerts, page 121). -
Page 137: Traffic Settings
Title Traffic Settings Identifier GUID-EFC7A885-2733-4E2F-9923-624CD4CD6429 Language EN-US Description Version Revision Changes Versioned for Fleet 7x0 path. There are spacing issues in the ZH-CN and ZH-TW. Status Released Last Modified 19/12/2018 15:39:48 Author petersenj Traffic Settings From the main menu, select >... -
Page 138: Setting The Time
Title Setting the Time Identifier GUID-76083F08-00BD-41F3-9531-3414E8E1B2B9 Language EN-US Description Version Revision Changes Changed "from the status bar" to "from the main menu" QA’d EN, AF, AR, BG, CS, DA, DE, EL, EN-GB, ES, ET, FI, FR, HR, HU, IT, KO, ZH-CN, ZH-TW, SL, SK, LT, LV, NO, PL, PT, RO, RU, SV, TR Status Released Last Modified... -
Page 139: Device And Privacy Settings
Title Device and Privacy Settings Identifier GUID-712C4066-633B-458D-B7F8-3048088C9EBF Language EN-US Description Version Revision Changes Changing reference to Where I've Been under Travel History to Trip History. Status Released Last Modified 29/01/2020 15:52:51 Author hizerdanielle Device and Privacy Settings Select > Device. About: Displays the software version number, the unit ID number, and information on several other software features. -
Page 140: Device Information
Title Device Information Identifier GUID-95E6980D-690A-495F-9303-4F2F7E59ED9E Language EN-US Description Title and warning only. No index entries. Version Revision Changes Removed "Delta" from topic title. Status Released Last Modified 22/04/2017 22:13:20 Author jhenson Device Information Title Viewing E-Label Regulatory Information (PND) Identifier GUID-FB45F6CA-1C85-4030-9C08-6A0AC4AC78E8 Language EN-US... -
Page 141: Tread Specifications
From 160.175 to 160.5750 MHz @ 22 dBm Wireless frequencies (Australia) From 151.15 to 152.15 MHz @ 17.3 dBm The device withstands incidental exposure to water of up to 1 m for up to 30 min. For more information, go to www.garmin.com/waterrating. Device Information... -
Page 142: Charging The Device
• Connect the device to an optional power adapter accessory, such as a wall power adapter. You can purchase an approved Garmin AC-DC adapter suitable for home or office use from a Garmin dealer or www.garmin.com. The device may charge slowly when connected to a third-party adapter. -
Page 143: Map And Software Updates
• You can connect the device to a Wi‑Fi network to update directly on the device (recommended). This option allows you to update your device conveniently without connecting it to a computer. • You can connect the device to a computer and update it using the Garmin Express application (garmin.com /express). -
Page 144: Updating Maps And Software Using A Wi-Fi Network
TIP: If a map update is interrupted or canceled before it completes, your device may be missing map data. To repair missing map data, you must update the maps again using either Wi‑Fi or Garmin Express. Device Maintenance... -
Page 145: Product Updates
Removed "Mobile" from GCM and added ph var Status Released Last Modified 20/12/2021 11:52:50 Author mcdanielm Product Updates On your computer, install Garmin Express (www.garmin.com/express). This provides easy access to these services for Garmin devices: • Software updates • Map updates • Product registration Device Maintenance... - Page 146 Updating Maps and Software with Garmin Express You can use the Garmin Express application to download and install the latest map and software updates for your device. 1 If you do not have the Garmin Express application installed on your computer, go to garmin.com/express...
-
Page 147: Device Care
(Installing a Memory Card for Maps and Data, page 161). 8 Follow the on-screen instructions during the update process to finish installing updates. For example, during the update process, the Garmin Express application may instruct you to disconnect and reconnect your device. Title About Device Care... -
Page 148: Cleaning The Touchscreen
• Remove the device and mount from sight when not in use. • Remove the residue left on the windshield by the suction cup. • Do not keep your unit in the glove compartment. • Register your device using the Garmin Express software (garmin.com/express). Title Restarting the Device... -
Page 149: Removing The Device From The Mount
Title Removing the Device from the Mount (Clip mounts) Identifier GUID-7C6937F2-09BD-4507-9704-A592C03BE771 Language EN-US Description Version 3.1.1 Revision Changes The top of the device needs to be tilted downwards for this mount. Status Released Last Modified 25/11/2020 10:41:08 Author hizerdanielle Removing the Device from the Mount 1 Press the release tab or button on the mount. -
Page 150: My Battery Does Not Stay Charged For Very Long
Identifier GUID-B3F0A4ED-AA4C-4FC1-A4A8-39556E02F21F Language EN-US Description Version Revision Changes Change Smartphone Link to Garmin Drive using a variable. This topic has spacing issues in KO, ZH-CN and ZH-TW. Status Released Last Modified 17/03/2020 13:54:21 Author petersenj My device does not connect to my phone •... -
Page 151: My Device Does Not Appear As A Removable Drive On My Computer
Title My device does not appear as a removable drive Identifier GUID-B7DC540A-8430-430F-8E4E-6C70EFBBE062 Language EN-US Description Version Revision Changes Changed text to make the topic more generic since we do not officially support older versions of Windows. Status Released Last Modified 14/07/2016 14:14:50 Author mall... -
Page 152: My Device Does Not Appear As Either A Portable Device Or A Removable Drive Or Volume On My Computer
NOTE: If you have several network drives mapped on your computer, Windows may have trouble assigning drive letters to your Garmin drives. For information about assigning drive letters, see the help file for your operating system. -
Page 153: Appendix
NO, PL, PT, RO, RU, SV, TR Status Released Last Modified 05/08/2012 15:27:17 Author hackman Appendix Title Mounting Your Device in an Automobile (Tread) Identifier GUID-2E5A1245-D486-43F9-B4A6-706EB2FDCECC Language EN-US Description Version Revision Changes Updating the title to differentiate between the Radio and Base editions... - Page 154 2 Align the ball on the suction cup with the double-socket arm. 3 Tighten the knob slightly. 4 Remove the clear plastic from the suction cup. 5 Clean and dry your windshield and the suction cup with a lint-free cloth. 6 Press the suction cup to the windshield, and flip the lever back toward the windshield.
-
Page 155: Mounting Your Tread Base Edition In An Automobile
Identifier GUID-0E6D9179-C128-4D5F-A8BF-695C7FC21F09 Language EN-US Description Version 7.1.1 Revision Changes Updating the title for use in Tread and changing the image variable. Status Released Last Modified 15/12/2021 13:41:44 Author hizerdanielle Mounting Your Tread Base Edition in an Automobile NOTICE Before mounting the device, check the local laws pertaining to windshield mounting. -
Page 156: Garmin Powerswitch
Incorrectly wiring the power cable can result in damage to the vehicle or the battery and can cause bodily injury. You can use a connected Garmin PowerSwitch device to control lights, fans, and more from your Tread device. Title... -
Page 157: Mounting The Device
Avoid wires, gauges, air bags, air bag covers, HVAC, and other items when drilling pilot holes and attaching the mount to the vehicle. Garmin is not responsible for any damages or consequences arising from the installation. 1 Place the mount on the selected location. -
Page 158: Opening The Front Cover
Title Opening the Front Cover Identifier GUID-0E136B7B-FB4D-4EDC-8763-65807365F237 Language EN-US Description Version Revision Changes Status Released Last Modified 27/07/2020 15:19:00 Author mall Opening the Front Cover You must open the front cover to make electrical connections. 1 Lift the front cover latch and rotate it counter-clockwise. -
Page 159: Connecting Accessories
Accessory requirements: • Verify the amperage rating of each accessory before wiring it to the Garmin PowerSwitch device. The device supports accessories up to 30 A for each channel and a maximum of 100 A for the entire system. - Page 160 NOTICE Do not connect the accessory ground wires to the ground terminal (GND) on the Garmin PowerSwitch device. Failure to heed this notice could result in personal or property damage, or negatively impact device functionality.
-
Page 161: Connecting A Control Input
Connecting a Control Input You can connect to the control terminals to enable the Garmin PowerSwitch device to turn on customizable outputs. For example, you can connect your vehicle ignition switch to a control input terminal to turn on accessories automatically each time you start your vehicle. -
Page 162: Connecting The Device To Vehicle Power
Title Connecting the Device to Vehicle Power Identifier GUID-CBDBB56A-EE3C-4E77-A110-DEBDC21E24A8 Language EN-US Description Version Revision Changes No English change. Versioned to fix HR and HU. Status Released Last Modified 15/01/2021 11:43:23 Author pullins Connecting the Device to Vehicle Power Before you can connect the device to vehicle power, you must remove the warning tag from the +12V terminal on the device. -
Page 163: Pairing With A Garmin Navigation Device
Maximum system output 100 A Current draw with all outputs off 3 mA Water rating IEC 60529 IPX7 The device withstands incidental exposure to water of up to 1 m for up to 30 min. For more information, go to www.garmin.com/waterrating. Appendix... -
Page 164: My Garmin Powerswitch Will Not Stay Connected
• Verify the Garmin PowerSwitch device is receiving power. • Verify that your vehicle's battery is supplying at least 12 V of power. The Garmin PowerSwitch device turns off automatically to preserve your vehicle's battery if it is receiving less than 12 V. -
Page 165: Pairing The Camera With A Garmin Navigation Device
The camera remains in pairing mode for two minutes. If pairing mode expires, you can remove and reinstall the batteries. 3 Bring the compatible Garmin navigation device outside your vehicle and within 1.5 m (5 ft.) of the camera, and turn on the navigation device. - Page 166 TIP: It can be helpful to position the vehicle in the center of a parking stall, and then pull forward into the next stall. This allows you to use the parking stall lines at the rear of the vehicle as reference points for alignment. 2 From the paired Garmin navigation device, select > Wireless Cameras.
-
Page 167: Installing A Memory Card For Maps And Data
Garmin mapping software. The device supports microSD memory cards from 4 to 256 GB. 1 Locate the map and data memory card slot on your device (Device Overview, page 2 Pull up the weather cap from the microSD card slot. -
Page 168: Data Management
About Memory Cards You can purchase memory cards from an electronics supplier, or purchase pre-loaded Garmin mapping software (www.garmin.com). Memory cards can be used to store files such as maps and custom POIs. Title Connecting the Device to Your Computer... -
Page 169: Transferring Gpx Files From Your Computer
2 On your computer, open the file browser. 3 Select a file. 4 Select Edit > Copy. 5 Browse to a folder on the device. NOTE: For a removable drive or volume, you should not place files in the Garmin folder. 6 Select Edit > Paste. Appendix... -
Page 170: Disconnecting The Usb Cable
Adding BaseCamp Data to Garmin Explore ™ You can export your BaseCamp data files and import them to Garmin Explore for use with your Tread device. 1 Export your data from BaseCamp: • If you are using an Apple computer, see Exporting Data from BaseCamp with an Apple Computer, page 165. - Page 171 Title Exporting Data from BaseCamp - zumo Identifier GUID-6F8BBA08-011B-49BB-9B84-827FD48E7AA5 Language EN-US Description Version Revision Changes Status Released Last Modified 02/01/2020 17:19:05 Author tillmonmartha Exporting Data from BaseCamp with a PC 1 Select an option: • To export all BaseCamp data stored on your computer, select My Collection, and select File > Export > Export 'My Collection'.
-
Page 172: Viewing Gps Signal Status
Adding a conditioned device exception note for color display Status Released Last Modified 26/08/2019 09:37:05 Author tillmonmartha Purchasing Additional Maps 1 Go to your device product page at garmin.com. 2 Click the Maps tab. 3 Follow the on-screen instructions. Appendix... -
Page 173: Index
21, 87, 96, 103 backup camera. See cameras Garmin Connect 74 settings 127 barometer 26 Garmin Explore 104 next turn 87 battery Garmin Express, updating software 139, notifications 75–79, 124 charging 136 maximizing 144 going home 98 problems 144 GPS 3, 166 on-screen buttons 5 Bluetooth 129 group ride 27–32 owner's manual 51... - Page 174 42 TracBack 58 tracks 22, 23 traffic 47, 99, 100, 131 alternate route 92 incidents 48, 100 map 48, 100 searching for delays 48, 100 transportation modes 8 travel history 133 Tread, connecting 76 trim ring 18 trip information 45 resetting 46 viewing 46 Tripadvisor 114, 115 troubleshooting 143–146, 158 turn list 88 unit ID 133 ahead 42–44 customizing 43...
- Page 176 January 2022 GUID-16B1D74D-857B-4FFB-8DE2-A0960FE0D090 v5...
Need help?
Do you have a question about the TREAD and is the answer not in the manual?
Questions and answers
How do you take t off adventure route . It has been frustrating and useless on a trip. Had to unplug it it and use our gladiator gps , because it wanted to take us on every freaking side road . Unplugged it and threw it in the back seat.
To remove an adventure route on a Garmin TREAD, use the cancel option while viewing the route. This can be done by selecting the current route and choosing "Cancel" to stop navigation and remove the route.
This answer is automatically generated