NETGEAR WAX214 - WiFi 6 AX1800 PoE Access Point Installation Guide
- User manual (152 pages) ,
- User manual (135 pages) ,
- Installation manual (2 pages)
Advertisement
- 1 Package contents
- 2 Overview
- 3 Step 1. Connect the WAX214
- 4 Step 2. Join the management WiFi network
- 5 Step 3. Log in to the local browser UI
- 6 Step 4. Connect to the Internet and update the firmware
- 7 Mounting options
- 8 Mount to a solid wall
- 9 Mount to a T-bar
- 10 Mount to a solid ceiling
- 11 Support and Community
- 12 Regulatory and Legal
- 13 Videos
- 14 Documents / Resources
Package contents

Note: As an option, you can power up your WAX214 by connecting it to a PoE or PoE+ switch.
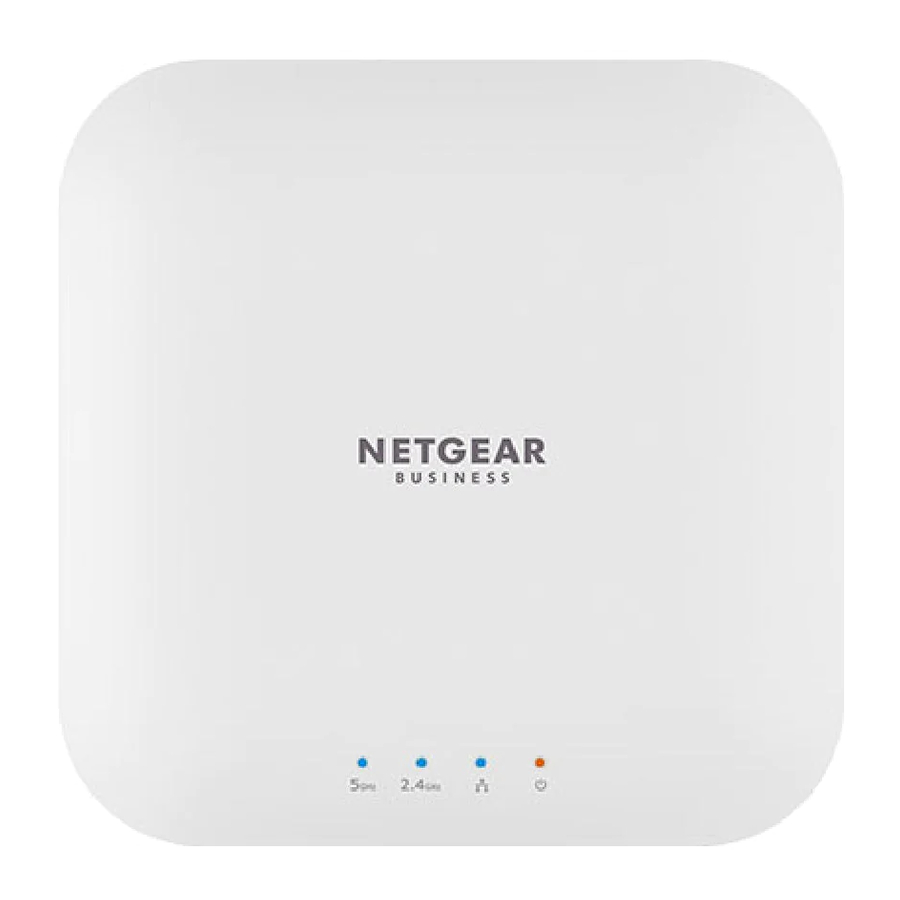
Overview

- 5 GHz WLAN LED
- 4 GHz WLAN LED
- LAN LED
- Power LED
- Reset button
- LAN/PoE port
- DC power connector
Step 1. Connect the WAX214
Power up the WAX214 access point (AP) by connecting the LAN/PoE port to a PoE switch that supplies 802.3af PoE power and 1 Gbps Ethernet speed.
The following figure shows the AP connected to a NETGEAR GS310TP switch.

Terms of Use
This device must be professionally installed. It is the installer's responsibility to follow local country regulations including operations within legal frequency channels, output power and DFS requirements. Vendor or Reseller or Distributor is not responsible for illegal wireless operations. Please see Device's Terms and Conditions for more details.

During installation and setup, the AP's LEDs can light in these colors:
| Power |

|
Solid amber. The AP is powered on. |
| LAN |

|
Solid blue. The LAN port detects a link with a powered‑on device. |

|
Blinking blue. The LAN port is transmitting or receiving data. | |
| 2.4 GHz WLAN |
|
Solid blue. The 2.4 GHz radio is operating without clients. |
|
|
Blinking blue. The 2.4 GHz radio is transmitting or receiving data. | |
| 5 GHz WLAN |
|
Solid blue. The 5 GHz radio is operating without clients. |
|
|
Blinking blue. The 5 GHz radio is transmitting or receiving data. |
Step 2. Join the management WiFi network
When you power up your new WAX214, the management WiFi network (SSID) becomes active. We recommend that you use a WiFi‑enabled computer to connect to the management SSID for set up.
Note: For security reasons, the management SSID turns off when inactive for 15 minutes. If this happens during setup, press the Reset button for 20 seconds to reset the device to default settings.
- On your WiFi‑enabled computer (or other WiFi client device), open the software utility that manages WiFi connections.
The utility scans for all WiFi networks in your area. - Find and select your WAX214's management SSID.
The default name of the management SSID is printed on the WAX214's label. The SSID uses the format "WAX214XXXXXX‑CONFIG‑ONLY," where XXXXXX is customized to every device (based on the last six digits of the MAC address). - Enter the default password (network key) printed on the WAX214's label.
Your WiFi‑enabled computer joins the WAX214's management SSID.
Step 3. Log in to the local browser UI
- Launch a web browser and enter https://www.aplogin.net (which is the same as https://192.168.0.100) in the address field.
The login page for the setup process displays.
Your browser might display a security warning, which you can dismiss. For more information, see https://kb.netgear.com/000062980/. - Set a new local device password and, for the main SSID (WiFi network 1, which is the only SSID enabled by default), assign an SSID name and a WiFi passphrase.
We recommend that you write down the password and passphrase. - Accept NETGEAR's terms and conditions.
- Click the Apply button.
Your settings are saved. - Repeat Step 1 of these login steps to log in to the local browser UI using your new local device password.
You can now view and manage the WAX214 configuration settings.
Step 4. Connect to the Internet and update the firmware
Before using your AP, we recommend that you update to the latest WAX214 firmware.
- On your WiFi‑enabled computer, open the software utility that manages WiFi connections.
The utility scans for all WiFi networks in your area. - Find and select your WAX214's main SSID and type the WiFi passphrase.
You can now connect to the Internet.
Note: If you cannot connect to the Internet, see the user manual at netgear.com/support/download for more information. - Visit netgear.com/support/download and enter the model number to see if new firmware is available for your device.
If new firmware is available, download the firmware file to your computer. - Launch a web browser and enter https://192.168.0.100 in the address field.
- Under System Manager, select Firmware to view the current firmware version.
- In the Firmware Upgrade section, click the Choose File button, and browse to the firmware file on your computer.
- Click the Upload button. The page displays the upgrade progress.
![]()
To avoid corrupting the firmware, do not interrupt the upgrade. For example, do not close the browser, click a link, or load a new page. Do not power off the AP. - When the upgrade finishes, reconnect to the main SSID.
The login page displays.
Your WAX214 is now ready for use.

Mounting options
You can mount the access point (AP) to a solid surface (a wall or a ceiling), or to a ceiling with a 15/16 in. (23.8 mm) T-bar, or you can install the AP freestanding on a flat surface.
We recommend that you use a flat Ethernet cable so that the cable fits in the narrow space between the AP and the surface on which it is mounted or placed.
Mount to a solid wall
The bottom of the AP includes two holes that let you mount the AP on two screws inserted in a wall.

- Mark the wall where you want to insert the provided anchors and screws, which must be 3.875 in. (98.5 mm) apart, and insert the anchors and screws.
![]()
Leave about 0.25 in. (6 mm) of each screw protruding from the wall so that you can insert the screws into the holes on the bottom of the AP. - Line up the holes on the bottom of the AP with the screws in the wall and mount the AP to the wall.


Mount to a T-bar
- Slide the 15/16 in. (23.8 mm) bracket between the guides on the bottom of the AP until it locks in place.
The locking tab must be at the front of the AP.

- Hold the AP upside down.
Note: If you can reach behind the T‑bar, hold the T‑bar with one hand and the AP with your other hand. - Align the rectangular protruding part of the bracket with the T‑bar.
- Hook the bracket onto one side of the T‑bar.
- Hook the bracket onto the other side of the T‑bar until the bracket locks onto the T‑bar.


Mount to a solid ceiling
- Using the anchors and screws provided, attach the 15/16 in. (23.8 mm) bracket with the screw holes to the ceiling.
The rectangular protruding part of the bracket must be facing the ceiling.

- Hold the AP upside down with the front of the AP facing the bracket. Then, line up the guides on the bottom of the AP with the bracket.

- Slide the AP into the bracket until it locks in place. The locking tab must be at the front of the AP.

Note: To unlock the AP, push the locking tab toward the ceiling and slide the AP out of the bracket.


Support and Community
Visit netgear.com/support to get your questions answered and access the latest downloads.
You can also check out our NETGEAR Community for helpful advice at community.netgear.com.
Regulatory and Legal
For regulatory compliance information including the EU Declaration of Conformity, visit https://www.netgear.com/about/regulatory/.
See the regulatory compliance document before connecting the power supply.
For NETGEAR's Privacy Policy, visit https://www.netgear.com/about/privacy-policy.
By using this device, you are agreeing to NETGEAR's Terms and Conditions at https://www.netgear.com/about/terms-and-conditions. If you do not agree, return the device to your place of purchase within your return period.
Do not use this device outdoors. The PoE source is intended for intra building connection only.
Applicable to 6 GHz devices only: Only use the device indoors. The operation of 6 GHz devices is prohibited on oil platforms, cars, trains, boats, and aircraft, except that operation of this device is permitted in large aircraft while flying above 10,000 feet. Operation of transmitters in the 5.925‑7.125 GHz band is prohibited for control of or communications with unmanned aircraft systems.

JULY 2021
NETGEAR, Inc.
350 East Plumeria Drive
San Jose, CA 95134, USA
NETGEAR INTERNATIONAL LTD
Floor 1, Building 3,
University Technology Centre
Curraheen Road, Cork,
T12EF21, Ireland
© NETGEAR, Inc., NETGEAR and the NETGEAR Logo are trademarks of NETGEAR, Inc. Any non‑NETGEAR trademarks are used for reference purposes only.

VideosNetgear WAX214 - Review and Configuration Video
Documents / Resources
References
Access Point Login
What do I do if I my browser displays a security message? | Answer | NETGEAR Support
Download Center | Support | NETGEAR
NETGEAR Support | NETGEAR
English - NETGEAR Communities
Regulatory | NETGEAR
NETGEAR Privacy Policy | NETGEAR
NETGEAR Terms and Conditions | NETGEAR
Download manual
Here you can download full pdf version of manual, it may contain additional safety instructions, warranty information, FCC rules, etc.
Download NETGEAR WAX214 - WiFi 6 AX1800 PoE Access Point Installation Guide
Advertisement


Need help?
Do you have a question about the WAX214 and is the answer not in the manual?
Questions and answers