NETGEAR WAC510 Manual
- User manual (232 pages) ,
- Installation manual (2 pages) ,
- Installation (2 pages)
Advertisement
Package Contents
Unpack the box and verify the contents:
- NETGEAR® AC WiFi Business Access Point (WAC510)
- Installation guide
- Ceiling and wall installation kit
- Mounting installation guide
Set Up the Access Point
The following table shows the different setup options that are available to you and the requirements for the access point (AP).
| Setup Option | Connect Over | Power Source | Mode | Extra Requirements | Setup Information |
| AP to Ethernet PoE Switch | WAN port | PoE | AP mode | None | See this guide |
| AP to Ethernet non-PoE Switch | WAN port | Power adapter | AP mode | Order a power adapter | See the user manual |
| AP to DSL or cable Internet modem | WAN port | Power adapter | Router mode | Order a power adapter Change to Router mode | See the user manual |
 Note: For more information about the various setup options, see the NETGEAR AC WiFi Business Access Point (WAC510) User Manual.
Before mounting the access point in a high location, first set up, configure, and test the access point to verify WiFi network connectivity.
To set up the access point with a PoE switch:
Connect an Ethernet cable from the yellow WAN port on the access point to a Power over Ethernet (PoE) switch.
The WAN port on the access point also functions as a PoE port. In this setup, the access point does not require a power adapter.

Note: Cable not included.
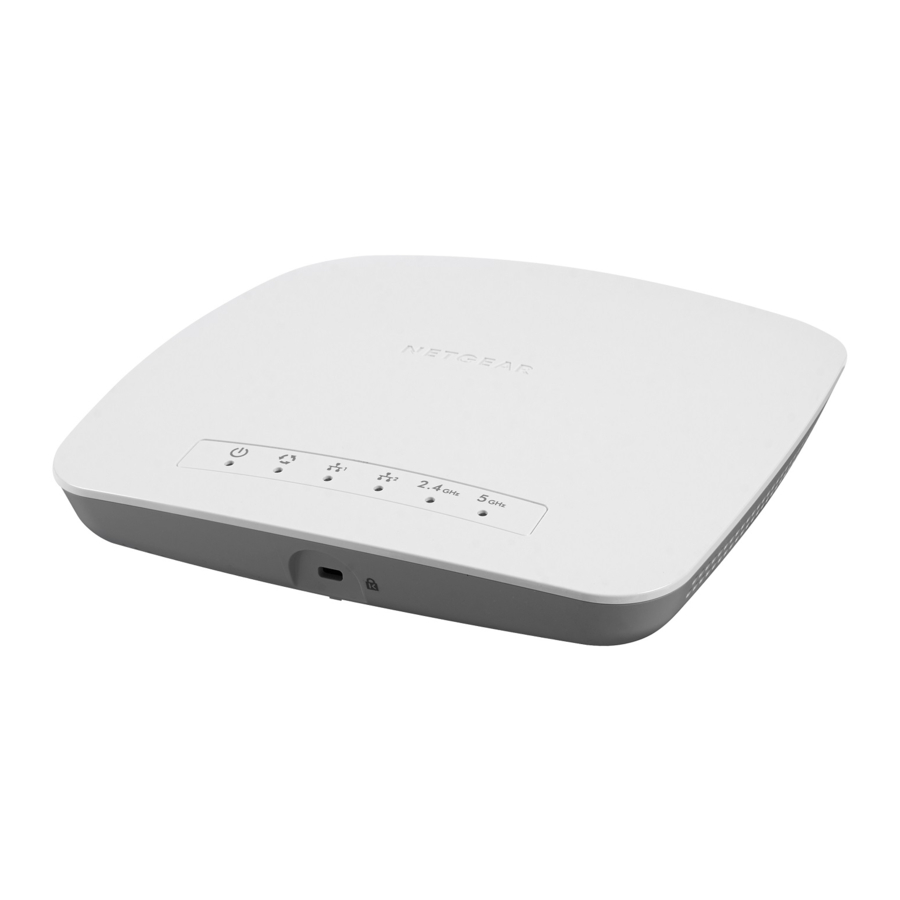
The following table shows the LED behavior on the access point.
| LED | Description |
 Power LED |
|
 Activity LED |
|
 WAN LED |
|
 LAN LED |
|
 2.4G WLAN LED |
|
 5G WLAN LED |
|
Configure the Access Point
Choose one of the following methods to configure the access point:
- Method 1: Use the NETGEAR Insight app. On your iOS or Android mobile device, go to the app store.
![]()
Search for NETGEAR Insight, and download the app.
![www.apple.com]()
![play.google.com]()
Open the NETGEAR Insight app and log in to your existing NETGEAR account or create a new account to log in with. Then, follow the prompts in the NETGEAR Insight app to discover and register the access point on the network so that you can configure and manage the access point. - Method 2: Log in over WiFi. From your computer or mobile device, connect over WiFi to the access point's default SSID.

The default SSID is on the access point label on the bottom of the access point and is shown in the format NETGEARxxxxxx-SETUP. The default password is sharedsecret.
Open a web browser. In the address bar, enter www.routerlogin.net (or www.aplogin.net). The Day Zero Easy Setup page displays so that you can configure the basic settings, including the country of operation. After you save these basic settings, the Day Zero Easy Setup page no longer displays when you log in. - Method 3: Log in over Ethernet. Open a web browser from a computer that is connected to the same Ethernet subnet as the access point or to the access point's LAN port directly through an Ethernet cable.
In the address bar, enter the IP address of the access point.


Note: If the access point is connected to a network that includes a DHCP server (or router that functions as a DHCP server), determine the IP address by using an IP network scanner. Otherwise, the default IP address of the access point is 192.168.0.100. If you use an Ethernet cable from your computer to the access point's LAN port and the access point functions with its default IP address, make sure that the IP address of your computer is in the 192.168.0.x subnet.
The Day Zero Easy Setup page displays so that you can configure the basic settings, including the country of operation. After you save these basic settings, the Day Zero Easy Setup page no longer displays when you log in.
Deploy the Access Point
The best location for the access point is elevated, such as mounted on a wall or ceiling, at the center of the WiFi coverage area, and within line of sight of all mobile devices.
For information about mounting the access point, see the NETGEAR AC WiFi Business Access Point (WAC510) Ceiling and Wall Installation Guide.
To deploy the access point:
- Disconnect the access point and position it where you will deploy it.
- Reconnect the access point. See Set Up the Access Point.
- Using a WiFi device, verify connectivity by connecting to the access point and using a browser to connect to the Internet.
Troubleshooting Tips
The following table provides some tips for correcting simple problems that you might encounter. For more troubleshooting information, see the NETGEAR AC WiFi Business Access Point (WAC510) User Manual.
| Problem | Cause | Possible Solution | |||
| No LEDs are lit on the AP. | The AP is not receiving power. |
| |||
| The Power LED alternates green and amber. | The AP is receiving insufficient PoE power. |
| |||
| The WAN or LAN port LEDs are off. | A hardware connection problem exists. |
| |||
| The WLAN LEDs are off. | The WiFi connection does not work. |
| |||
| You cannot connect to the AP from a browser. | Multiple possible causes. |
| |||
| You cannot access the Internet or the LAN from a WiFi device. | A configuration problem exists. |
|
Support
You can visit www.netgear.com/support to register your product, get help, access the latest downloads and join our community. We recommend that you use only official NETGEAR support resources.
Documents / Resources
References
![www.apple.com]() App Store - Apple
App Store - Apple![play.google.com]() Google Play
Google Play![www.routerlogin.net]() Router Login & Setup | NETGEAR
Router Login & Setup | NETGEARAccess Point Login
NETGEAR Support | NETGEAR

Download manual
Here you can download full pdf version of manual, it may contain additional safety instructions, warranty information, FCC rules, etc.
Advertisement


Need help?
Do you have a question about the WAC510 and is the answer not in the manual?
Questions and answers