Advertisement
Quick Links
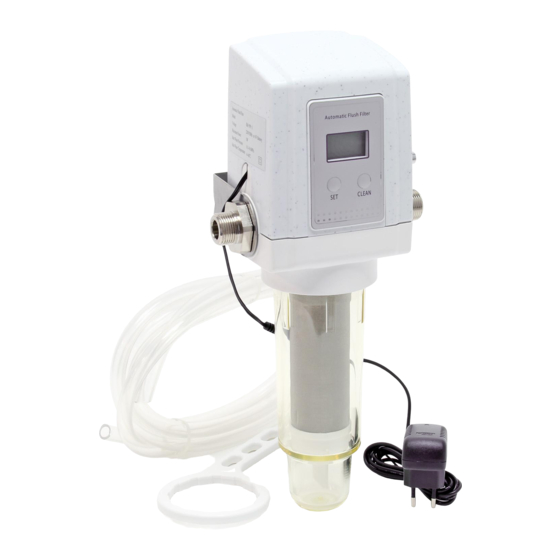
User's Manual
Automatic Sediment Filter
52365
Illustration similar, may vary depending on model
Read and follow the operating instructions and safety information before using for the first time.
Technical changes reserved!
Illustrations, functional steps, and technical data may deviate insignificantly due to continuous further
developments.
Updating the documentation
If you have suggestions for improvement or have found any irregularities, please contact us.
Advertisement

Subscribe to Our Youtube Channel
Related Manuals for WilTec NatureWater NW-PF-1


Summary of Contents for WilTec NatureWater NW-PF-1
- Page 1 User’s Manual Automatic Sediment Filter 52365 Illustration similar, may vary depending on model Read and follow the operating instructions and safety information before using for the first time. Technical changes reserved! Illustrations, functional steps, and technical data may deviate insignificantly due to continuous further developments.
- Page 2 The information contained in this document may alter at any time without prior notice. No part of this document may be copied or otherwise duplicated without prior written consent. All rights reserved. WilTec Wildanger Technik GmbH cannot be held liable for any possible mistakes in this operating man- ual, nor in the diagrams and illustrations shown.
- Page 3 Introduction Thank you for choosing to purchase this quality product. To minimise the risk of injury, we ask you to always take some basic safety precautions when using this product. Please read this operating manual carefully and make sure that you understand it. Keep these operation instructions in a safe place.
- Page 4 Technical specifications Connections 33.89 IT (G1″) / 26.16 ET (G¾″) Operating pressure (bar) 2–7 Permeability of the filter (µm) 40–80 Temperature range (℃) 5–49 Size (㎜) 133 × 105 × 381 Mounting The automatic sediment filter must be connected to the tap-water source of your house (behind the water level indicator) to be able to clean the entire supply of drinking water.
- Page 5 Proceeding The automatic sediment filter must be connected to the tap-water source of your house. It filters out the sediment particles found in the water, is able to clean itself automatically and on a regular basis, and empties out the dirt that it has collected. Attention! This product is used to reduce the quantity of sand, gravel, hard dirt, and other sediments in the water.
- Page 6 Inverting function of the control panel The side labelled IN of the automatic sediment filter must be the inlet. You can open the upper cover of the filter to determine the correct installation position of the inlet and outlet with the help of the IN and OUT symbols.
- Page 7 Installation requirements Installation standard All installation procedures should answer to the pertinent provisions of the national and local authorities. Air-gap requirement It is better to install the filter near the floor drain, the drain of the washer, and the vertical drain pipe, as the wastewater must be able to flow off correctly from the washer.
- Page 8 onnecting clamp Drain pipe Attention! Make sure to fix the drain pipe correctly and to check if the pipe shakes when water is drained, as the flow rate is approx. 34 ℓ ⁄ under a high water pressure. The pipe must be properly fixed if not connected to the floor grid. Place the pipe outlet in the centre of the floor grid and fix it correctly.
- Page 9 № Name 4 cm air gap Washbasin Drain pipe Notes on installation Drain pipe installation Do the following steps before permitting water to enter the system: hoose a drain pipe with an appropriate length and connect it to the drain. Fix it with a standard pipe saddle.
- Page 10 № Name № Name over Pipe saddle Drain opening Slot Battery compartment Power-supply unit The power-supply unit can replace the batteries concerning in terms of power supply. Note! Do not use other power-supply units than the one included in the scope of delivery. To install the power-supply unit, do the following steps: Remove the cover.
- Page 11 № Name/explanation № Name/explanation Plug the plug into the power connection of Standard power-supply unit the card. Power supply Put through the slot. Setting the electronic control Keys • • LEAN Factory settings • Flush cycle: 7 days • Flush duration: 60 s LCD background lighting When pressing one of the keys, the L D background lighting is lit.
- Page 12 Starting flushing by hand Make sure that the drain pipe has been fixed and does not have any leakage before commis- sioning the device. 2. With the “Work” mode activated, press the LEAN key and pass to the flush mode. “Flush” is shown on the screen, two “0”...
- Page 13 8. The days of flushing cycle and flushing seconds are not deleted when the battery is replaced or the power supply interrupted. Automatic Flush Filter Automatic Flush Filter Automatic Flush Filter Work LEAN Day Setting Day Setting Work Automatic Flush Filter Automatic Flush Filter Automatic Flush Filter Work...
-
Page 14: Installing The Filter Cartridge
Low battery indication This status can only be seen in case you use the device with batteries. 2. The low battery status and “EE” are shown on the screen; at that moment, the batteries must be replaced. 3. In the low battery status, the timer is stopped and the system does not respond to any pressing of a key. - Page 15 10. As soon as there is a constant water flow out of the cock, close it again. 11. Make sure that no water leaks off the housing. Replacing the siliphos filter In case there is no longer a sufficient quantity of siliphos, the limescale prevention effect is impaired. Buy a new siliphos filter.
- Page 16 Installation pictures With central drain pipe With siliphos filter The central drain pipe is found inside the siliphos filter. № Name № Name Housing cover Housing cover entral drain pipe Siliphos filter ruciform mounting bracket Small stainless-steel net O-ring O-ring Housing Housing O-ring...
- Page 17 German law related to electrical and electronic equipment and appliances. All WilTec electric devices that fall under the WEEE directive are labelled with the symbol of a crossed- out wheeled rubbish bin. This symbol indicates that this electric device must not be disposed of with the domestic waste.
Need help?
Do you have a question about the NatureWater NW-PF-1 and is the answer not in the manual?
Questions and answers