Table of Contents
Advertisement
Quick Links
TABLE OF CONTENTS
*****************
• SAFETY INSTRUCTIONS. . . . . . . . . . . 2
• INTRODUCTION . . . . . . . . . . . . . . . . . . 4
• ASSEMBLY . . . . . . . . . . . . . . . . . . . . . . 6
• OPERATION . . . . . . . . . . . . . . . . . . . . 12
• STORAGE . . . . . . . . . . . . . . . . . . . . . . 16
• MAINTENANCE. . . . . . . . . . . . . . . . . . 18
• REPAIR PARTS . . . . . . . . . . . . . . . . . 20
!
the user must read and
understand the owner's
manual before using this
product.
SAVE THIS MANUAL
FOR FUTURE REFERENCE
Part No. SP7080
Call Us 1
st
For any questions about:
• Operation
• Warranty
(See back cover)
• Technical Assistance
• Repair Parts
Please have your Model Number and
Serial Number on hand when calling.
1-800-474-3443
Wet/Dry Vacs
WET/DRY VAC PARTS
& ACCESSORIES
Visit us at www.TestEquipmentDepot.com
OWNER'S MANUAL
MANUAL DEL USUARIO
MODE D'EMPLOI
14 U.S. GALLON / 53 Liter
CART WET/DRY VAC
RT14000
99 Washington Street
Melrose, MA 02176
Phone 781-665-1400
Toll Free 1-800-517-8431
Advertisement
Table of Contents

Related Manuals for Emerson RIDGID RT140


Summary of Contents for Emerson RIDGID RT140
-
Page 1: Table Of Contents
OWNER’S MANUAL MANUAL DEL USUARIO MODE D’EMPLOI 14 U.S. GALLON / 53 Liter CART WET/DRY VAC RT14000 Call Us 1 For any questions about: • Operation • Warranty (See back cover) • Technical Assistance • Repair Parts Please have your Model Number and Serial Number on hand when calling. -
Page 2: Safety Instructions
IMPORTANT SAFETY INSTRUCTIONS Safety is a combination of using common • Do not vacuum drywall dust, cold sense, staying alert, and knowing how your fireplace ash, or other fine dusts with Wet/Dry Vacuum Cleaner (“Vac”) works. standard filter. These may pass through the filter and be exhausted back into the Safety Signal Words air. - Page 3 IMPORTANT SAFETY INSTRUCTIONS pose fire and shock hazards. To reduce the risk of these hazards, be sure the CAUTION: • To reduce the risk of hearing damage, cord is in good condition and that liquid does not contact the connection. Do not wear ear protectors when using for use an extension cord with conductors extended hours or in a noisy area.
-
Page 4: Introduction
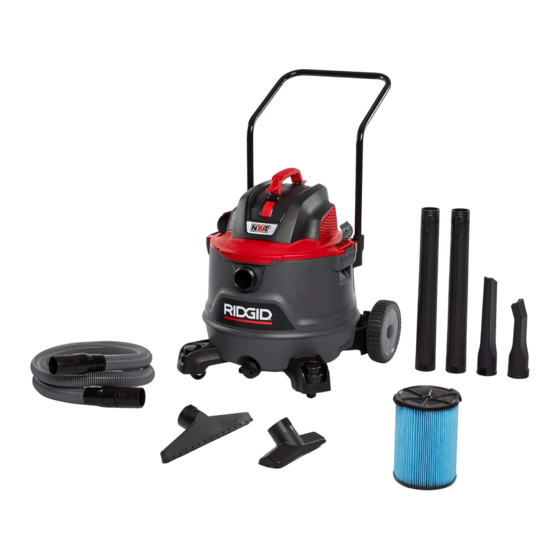
INTRODUCTION This Cart Wet/Dry Vac is intended for Read this Owner’s Manual to familiarize house-hold use. It may be used for yourself with the product features and vacuuming wet or dry media and may be to understand the specific usage of your used as a blower. - Page 5 INTRODUCTION Tools Required Recommended: Phillips Screwdriver Hammer Mallet 5/8” (16mm) Socket Unpacking This Product Requires Assembly. Check all parts from carton against the Carton Contents Parts list. If any parts are damaged or missing contact 1-800-4-RIDGID (US and Canada), or by email at info@ridgidvacs.com.
-
Page 6: Assembly
ASSEMBLY Front Caster/Caster Foot Front Caster Foot w/Storage (2) Assembly NOTE: Remove Powerhead Assembly Caster Foot from Dust Drum prior to assembly of the Post Hole Caster Feet and Casters (See Attaching/ Removing Powerhead Assembly to Dust Drum section, if needed). 1. - Page 7 ASSEMBLY 4. Locate the Axle and one Cap Nut. 7. Reposition the Dust Drum so the Place the Cap Nut on one end of the already assembled Wheel is against Axle and tap gently with hammer until the floor. fully seated. 8.
- Page 8 ASSEMBLY Wet/Dry Vac Assembly: Attaching/Removing Powerhead Assembly to Accessory Caddy Installation Dust Drum 1. Position the Accessory Caddy on the 1. Place Powerhead Assembly on top of back of the Dust Drum and align the Dust Drum with the Extended Lip of Locking Tabs.
- Page 9 ASSEMBLY Carry Handle/Cord Wrap Hose Storage Clips Assembly Assembly 1. Locate the two (2) Hose Storage Clips 1. Locate the Carry Handle/Cord Wrap and four (4) #10 x 3/4” (19mm) Pan and the two (2) #10 x 3/4” (19mm) Pan Head Screws in the loose parts.
- Page 10 ASSEMBLY REMOVE: Installing/Removing Cart Push Handle 1. To Install Handle: Slide the Cart Push Handle into the two Handle Holders found on the rear of the Dust Drum. 2. Press down evenly on the Cart Push Handle until both sides are fully seated in the Handle Holders.
- Page 11 ASSEMBLY 2. To Remove Hose: Rotate the end of Locking Accessories the Professional Locking Hose in either 1. To Connect Accessory: Your direction to release the Hose Latch RIDGID Wet/Dry Vac includes Locking from the Inlet Ridges. Press the Hose Accessories to prevent the Accessories Release Button and pull the Hose end from falling off when in use.
-
Page 12: Operation
OPERATION WARNING: To reduce the risk of fire, explosion, or damage to Vac: • Do not leave Vac running while unattended - you may fail to notice important signs indicating abnormal operation such as loss of suction, debris/liquid exiting the exhaust, or abnormal motor noises. Immediately stop using Vac if you notice these signs. - Page 13 OPERATION Vacuuming Dry Materials Emptying the Dust Drum 1. The Filter must always be correctly WARNING: To reduce the risk installed to avoid leaks and possible of injury from accidental starting, Vac damage. unplug power cord before emptying 2. To maintain peak performance when the drum.
- Page 14 OPERATION Moving the Wet/Dry Vac Blowing Feature Should it become necessary to pick Your Vac features a Blowing Port. It can the Vac up to move it, the Handles blow sawdust and other debris. Follow the on each side of the Dust Drum or the steps below to use your Vac as a Blower.
- Page 15 OPERATION INSERT Remove Hose: HOSE 1. Rotate Hose End in either direction to Blower Port disengage Blower Port Ridges. Ridges 2. Press the Hose Release Button and pull the Hose End straight out of the Blower Port. Hose Release REMOVE Button HOSE Blower Port...
-
Page 16: Storage
ACCESSORY & HOSE STORAGE Accessory Storage Cord Storage To store the Cord, wrap it around the 1. The Extension Wands and other Powerhead Carry Handle / Cord Wrap Accessories can be stored by placing beneath the two Tabs. Secure the Cord them over the Posts on the Two Caster using the Cord Clip on the Plug. - Page 17 ACCESSORY & HOSE STORAGE Hose Storage The Professional Locking Hose may be stored around the Powerhead Assembly Powerhead Professional Assembly Locking Hose by tucking it between the Motor Housing and Hose Storage Clips. CAUTION: Do not operate vacuum while the hose is still wrapped around the powerhead assembly in the storage position.
-
Page 18: Maintenance
MAINTENANCE NOTE: Failure to properly seat the Filter bottom Gasket and Integrated Filter Plate to the Filter Cage could result in debris WARNING: To reduce the risk bypassing the Filter. of injury from accidental starting, unplug power cord before changing or cleaning filter. - Page 19 MAINTENANCE Cleaning A Dry Filter Cleaning A Wet Filter 1. Some removal of dry debris can be After Filter is removed, run water through accomplished without removing the the Filter from a hose or spigot. Take care Filter from the Vac. Slap your hand on that water pressure from the hose is not top of the Lid while the Vac is turned strong enough to damage Filter.
-
Page 20: Repair Parts
This product has a 90 day Satisfaction Guarantee Policy as well as a Limited Lifetime Warranty. 99 Washington Street Melrose, MA 02176 Phone 781-665-1400 Toll Free 1-800-517-8431 © 2018 Emerson Part No. SP7080 Visit us at www.TestEquipmentDepot.com Form No. SP7080...
Need help?
Do you have a question about the RIDGID RT140 and is the answer not in the manual?
Questions and answers