Table of Contents
Advertisement
Quick Links
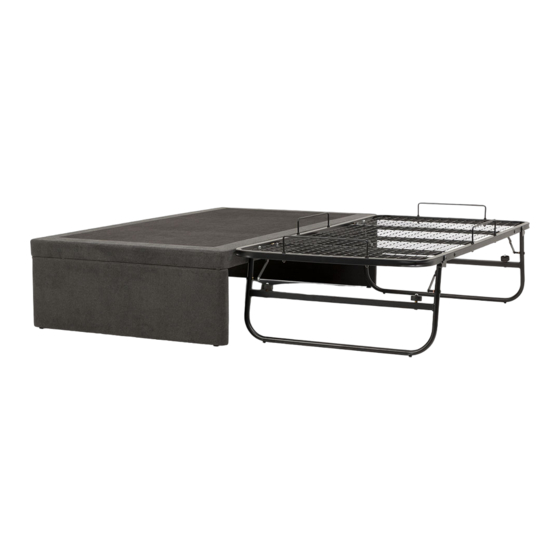
A-UPHOLSTERED BED
X 1PCS
F-MATTRESS STOPPER
X 4PCS
K-FLANGE NUTS
X 8PCS
1 - ATTACHING ADJUSTABLE TO THE BED STAND
CAREFULLY UNPACK ALL ITEMS FROM THE CARTONS.
You will need a standard screw driver
Step 1 - Screw the adjustable glider (H) to the Bed Stand Bottom B & C.
SERENE TRUNDLE BED
MODEL :
B-HEADBOARD PANEL
X 1PCS
G-SIX HOLE LINKAGE
PLATE X 4PCS
L-ALLEN KEY M6
X 1PCS
Step 1
KING SINGLE
PART LIST
C-FOOTBOARD PANEL
X 1PCS
H-ADJUSTABLE GLIDER
X 4PCS
M - STARBOLT X 4PCS
2 - ATTACHING BOLT TO SIX-HOLE PLATE
Step 2 - Choose which side of the wooden bed base you would like to have
the bed against the wall. Attach bolt(I) to six hole plate (G).
Repeat the same step to other side.
I
D-METAL BASE X 1PCS
E-CORNER BRACKET
X 2PCS
I-M6 X 20MM
X 32PCS
Step 2
J-SPRING WASHER
X 8PCS
Advertisement
Table of Contents

Related Manuals for Target SERENE TRUNDLE BED


Summary of Contents for Target SERENE TRUNDLE BED
- Page 1 SERENE TRUNDLE BED MODEL : KING SINGLE PART LIST A-UPHOLSTERED BED B-HEADBOARD PANEL D-METAL BASE X 1PCS C-FOOTBOARD PANEL E-CORNER BRACKET X 1PCS X 1PCS X 2PCS X 1PCS J-SPRING WASHER F-MATTRESS STOPPER H-ADJUSTABLE GLIDER G-SIX HOLE LINKAGE I-M6 X 20MM...
- Page 2 3 - ATTACHING BOLT TO CORNER BRACKET 4 - TURN THE BED Step 3 - Connect Corner brackets(E) with bolt(I) and spring washer (K) on the Step 4- Then flip the trundle. side that is going to be placed against the wall (as illutrate) Repeat the same step to other side.
- Page 3 ASSEMBLY IS COMPLETED OPTIONAL Insert the star bolt into the Optional Headboard Panel & Headboard Panel (B). OPTIONAL HEADBOARD...
Need help?
Do you have a question about the SERENE TRUNDLE BED and is the answer not in the manual?
Questions and answers