Table of Contents
Advertisement
Quick Links
Advertisement
Table of Contents

Related Manuals for LEYBOLD Phoenix Mobilis


Summary of Contents for LEYBOLD Phoenix Mobilis
- Page 1 Phoenix Mobilis Operating instructions 300956073_C0...
- Page 2 Copyright notice ©Leybold GmbH. All rights reserved. Trademark credit Leybold and the Leybold logo are trademarks of Leybold GmbH, Bonner Strasse 498, D-50968 Cologne. Disclaimer The content of this manual may change from time to time without notice. We accept no liability for any errors that may appear in this manual nor do we make any expressed or implied warranties regarding the content.
-
Page 3: Table Of Contents
5.2 Phoenix Mobilis running screen....5.3 Use of Phoenix Mobilis......14 5.4 Phoenix Mobilis keypad. - Page 4 10.1 Calibration........28 300956073_C0 - 03/2021 - © Leybold...
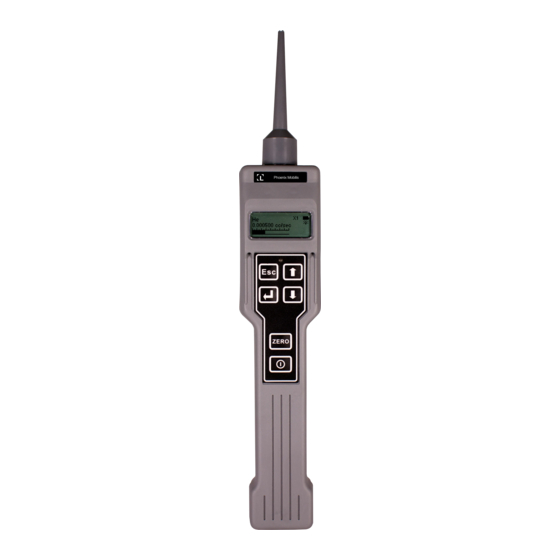
- Page 5 Figure 1. The Phoenix Mobilis........8...
-
Page 6: Safety And Compliance
“Trained personnel” for the operation of this equipment are ▪ skilled workers with knowledge in the fields of mechanics, electrical engineering, pollution abatement and vacuum technology and ▪ personnel specially trained for the operation of vacuum pumps. 300956073_C0 - 03/2021 - © Leybold... -
Page 7: Safety Symbols
An appropriate safety instruction must be followed or caution to a potential hazard exists. Warning - Risk of explosion There is a risk of explosion when you do the task. Warning - WEEE symbol Indicates that the equipment must be disposed of carefully. 300956073_C0 - 03/2021 - © Leybold... -
Page 8: Description
This manual provides installation, operation and maintenance instructions for the Phoenix Mobilis. You must use the Phoenix Mobilis as specified in this manual. The units used throughout this manual conform to the SI international system of units of measurement. -
Page 9: Applications
Description 2.2 Applications You can use the Phoenix Mobilis on many types of applications, including: ▪ Quality assurance testing on manufactured component seals. ▪ Pneumatic applications, such as leak testing of pipeline joints, gaskets and so forth. Detection of leaks from: ▪... -
Page 10: Technical Data
3.2.2 Gas detection The Phoenix Mobilis can detect any gas or vapour which has a different thermal conductivity to the ambient air in which it was made to zero. The larger the difference the greater the sensitivity, the Phoenix Mobilis is not... - Page 11 Technical data The Phoenix Mobilis is supplied with a list of calibration factors for common gases (refer to Table: Smallest detectable leak level). It comes with 5 generic 'gas groups' with a variation in sensitivities which can be used as a...
-
Page 12: Installation
If the storage case or other item is damaged, notify your supplier and the carrier immediately. Give the supplier and the carrier the information that follows: ▪ item number serial number stamped on the rear case of the Phoenix Mobilis ▪ order number ▪ ▪... -
Page 13: Operation
WARNING: EXPLOSION HAZARD Risk of injury. Do not use the Phoenix Mobilis in potentially explosive atmospheres. The Phoenix Mobilis is not internally safe. Do not use the Phoenix Mobilis in safety critical applications. Make sure that the batteries are installed as per the procedure detailed in Replace or install batteries on page 21. -
Page 14: Use Of Phoenix Mobilis
'x100' range as this is the most sensitive. Adjust the sensitivity with the up and down keys if required. Hold the Phoenix Mobilis at 45° to the object under test and draw the probe across the test area at a rate of approximately 25 mm per second. When a leak is detected, the bar graph will fill, the reading will increase and the frequency of the LED flasher will increase. -
Page 15: Phoenix Mobilis Keypad
Human breath contains moisture and carbon dioxide which may also affect the readings of the instruments. 5.4 Phoenix Mobilis keypad The Phoenix Mobilis is operated using a 6 button tactile keypad as shown in Figure: Phoenix Mobilis keypad layout. - Page 16 Note: The unit automatically switches off if no key presses are detected for approximately 10 minutes. Pressing the esc key switches the Phoenix Mobilis between the running screen and the main menu. Once in the main menu screen, pressing the up and down buttons scroll between the different instrument functions.
-
Page 17: Figure 6. Phoenix Mobilis Menu Structure
Gas selection Display Function Contrast adjusts the contrast of the Phoenix Mobilis LCD display. Significant variations in ambient temperature conditions may cause the display to appear too dark or dim. When selected a number appears indicating the contrast as a percentage; use the up or down keys to adjust the display contrast to the desired level. - Page 18 When you use the Phoenix Mobilis in peak hold mode, press the enter key to clear the held reading. The reading held on the screen will be logged when the enter key is pressed.
-
Page 19: Probe Options
CAUTION: OVER TIGHTENING Risk of damage to the equipment damage. Only use the box spanner supplied with the Phoenix Mobilis to tighten the probes. Other tools may result in over tightening of the nut and permanent damage to the instrument. -
Page 20: Figure 7. Remove The Probe Cover
With probe cover With probe cover Short probe Short probe Figure 8. Change between short and long probes Short probe Short probe Box spanner over short probe Box spanner over short probe Probe assembly Probe assembly 300956073_C0 - 03/2021 - © Leybold... -
Page 21: Maintenance
The Phoenix Mobilis is supplied with two calibration settings, factory and custom. The factory calibration setting cannot be changed. The custom calibration allows the user to calibrate the Phoenix Mobilis at the local atmospheric pressure which may offer an improvement over the factory calibration. -
Page 22: Custom Calibration (Concentration Units)
Read the instructions below before calibrating the Phoenix Mobilis. The following procedure should be followed if the Phoenix Mobilis has been set to concentrations (ppm or mg/m Table 6 Calibration of the Phoenix Mobilis (concentration units) -
Page 23: Custom Calibration (Cc/Sec Leak Rate Units)
6.4 Custom calibration (cc/sec leak rate units) CAUTION: CALIBRATION ERROR Risk of error in data. Do not breathe on the probe. The Phoenix Mobilis can detect changes in humidity and carbon dioxide and significant errors in the calibration will result. - Page 24 Maintenance Display Function ▪ Make sure that the Phoenix Mobilis is in clean air and press enter key. ▪ The Instrument will take a few seconds to zero and then the ready screen will appear. ▪ Fully insert the probe into the sample bag and press the enter key.
-
Page 25: Storage
If you store the unit for a long time, we recommend that you remove the batteries in order to reduce the risk of damage due to battery leakage. Reinstall the Phoenix Mobilis in its storage case and store it in cool and dry conditions until required for use as described in Table: Technical data. -
Page 26: Disposal
Electrical and Electronic Equipment, 2002/ 96/EC. We offer European customers a recycling service for the Phoenix Mobilis at the end of the product's life. Contact us for advice on how to return the Phoenix Mobilis for recycling. 300956073_C0 - 03/2021 - © Leybold... -
Page 27: Service
Order spare parts and accessories from our nearest company or distributor. When ordering, state for each part required: ▪ Serial number stamped on the rear of your Phoenix Mobilis Item number and description of part ▪ 9.1 Return the equipment or components for service... -
Page 28: Spares And Accessories
Spares and accessories 10 Spares and accessories Table 8 Phoenix Mobilis spares and accessories Spare Item Number Long probe D14128802 Short probe D14128801 Replacement battery holder D14130802 Nozzle D14130800 10.1 Calibration Contact your supplier for details of the calibration service available, which includes the issue of a traceable certificate to National Standards. - Page 29 Spares and accessories 300956073_C0 - 03/2021 - © Leybold...
- Page 30 Leybold GmbH Bonner Strasse 498 50968 Cologne GERMANY +49-(0)221-347-0 info@leybold.com Pioneering products. Passionately applied. www.leybold.com...
Need help?
Do you have a question about the Phoenix Mobilis and is the answer not in the manual?
Questions and answers