
Related Manuals for GYS PTI.G


Summary of Contents for GYS PTI.G
- Page 1 2-17 / 17-39 / 105-120 GYSPOT INVERTER 2-17 / 40-60 / 105-120 PTI.G - 400 V 2-17 / 61-82 / 105-120 2-17 / 83-104 / 105-120 www.gys.fr 73502_V2_04/03/2022...
- Page 2 GYSPOT INVERTER PTI.G DIMENSIONS / ABMESSUNGEN / DIMENSIONES 1225 MONTAGE / ASSEMBLY / MONTAJE M5x12 (x6) 5 N·m...
- Page 3 GYSPOT INVERTER PTI.G MONTAGE SUPPORT PINCE EN G / ASSEMBLY OF G CLAMP SUPPORT / MONTAGE HALTERUNG «G» C-ZANGE / MONTAJE DEL SOPORTE DE PINZA EN G M5x18 (x4) 8 N·m (x4) M5x18 (x4) 8 N·m (x4) M5x12 (x4) 8 N·m...
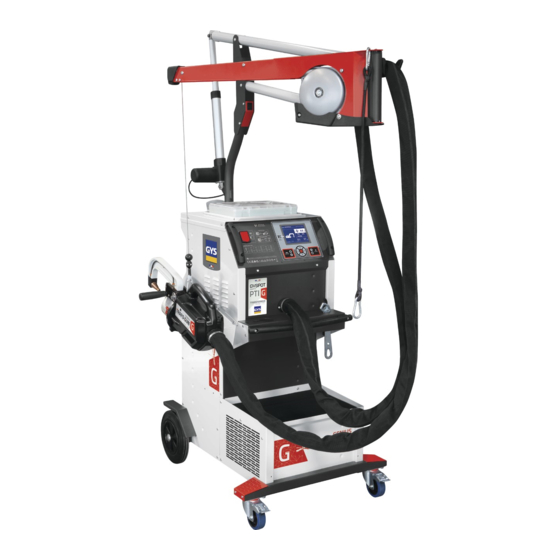
- Page 4 GYSPOT INVERTER PTI.G MONTAGE POTENCE / ASSEMBLY OF OVERHANGING ARM / MONTAGE AUSLEGER / ENSAMBLAJE DEL SOPORTE L’usage de la potence est strictement réservé à soulager le poids de la pince de soudage. Elle ne doit jamais être utilisé pour du levage ou autre application, sous peine de renversement de l’ensemble chariot potence.
- Page 5 GYSPOT INVERTER PTI.G M8x16 20 N.m (x2) M5x12 4 N.m (x2) M8 x 16 - 20 N.m M5 x 12 - 4 N.m Mettre l’équilibreur dans son logement. Put the balancer in its housing. Legen Sie den Balancer in sein Gehäuse.
- Page 6 GYSPOT INVERTER PTI.G M8x16 20 N·m (x4) M5x12 0.5 N.m (x1) Rondelle M8 Rondelle M8 (x2) Rondelle M5 (x1) Rondelle M8 Rondelle M5 M5 x 12 - 0.5 N.m Tirer le câble de l’équilibreur pour le faire passer dans la poulie et l’encoche.
- Page 7 GYSPOT INVERTER PTI.G M8x16 20 N·m (x4) M5x12 (x2) 4 N.m M5 x 12 - 4 N.m...
- Page 8 GYSPOT INVERTER PTI.G Montage du palier pivot bas (fourni avec la potence). Mounting of the low pivot bearing (supplied with the stem). M8x20 (x2) 20 N·m Montage des niedrigen Schwenklagers (mit dem Vorbau mitgeliefert).
- Page 9 GYSPOT INVERTER PTI.G Enclencher le frein des 2 roues avants du générateur. Engage the brake on one of the 2 front wheels of the generator. Betätigen Sie die Bremse an einem der 2 Vorderräder des Generators.
- Page 10 GYSPOT INVERTER PTI.G Ne pas sous évaluer le poids de la potence (17.4 kg) ! Do not underestimate the weight of the overhanging arm (17.4 kg)! Das Gewicht des Ausleger nicht unterschätzen (17.4 kg)! Pour faciliter le montage/démontage de la potence sur le générateur, 2 personnes sont requises.
- Page 11 GYSPOT INVERTER PTI.G...
- Page 12 GYSPOT INVERTER PTI.G Faire pivoter la potence jusqu’à ce que la vis se loge dans l’empreinte. Swivel the bracket until the screw fits into the recess. Den Schaft schwenken, bis die Schraube in der Aussparung sitzt.
- Page 13 GYSPOT INVERTER PTI.G Verrouiller la potence en fixant le support. Lock the gallows by fixing the bracket. M5x12 (x2) 4 N·m Verriegeln Sie den Schaft durch Sichern der Halterung.
- Page 14 GYSPOT INVERTER PTI.G Brancher le connecteur du vérin sur le chariot. Appuyer sur le bouton pour mettre la potence en position basse. Connect the cylinder connector to the carriage. Press the button to put the stem in the down position.
- Page 15 GYSPOT INVERTER PTI.G 8 N·m Régler la dureté du tronçon mobile en serrant l’écrou à l’aide de la clé fournie. Adjust the hardness of the moving part by tighte- ning the nut with the key provided. Stellen Sie die Härte des beweglichen Teils ein, indem Sie die Mutter mit dem mitgelieferten Schlüssel anziehen.
- Page 16 GYSPOT INVERTER PTI.G Pour régler la tension du câble de l’équilibreur, l’utilisateur doit impérativement mettre la pince en charge sur le câble. To adjust the tension of the balancer cable, the user must load the clamp on the cable. Um die Spannung des Balancerkabels einzustellen, muss der Benutzer die Klemme unter Last auf das Kabel setzen.
- Page 17 GYSPOT INVERTER PTI.G FIG-1 FIG-2...
- Page 18 In the event of problems or uncertainties, please consult a qualified person to handle the installation properly. The instructions cover the material in the condition it was delivered. It is the responsibility of the user to analyse the risks taken when not following the instructions published by GYS.
-
Page 19: Electrical Safety
GYSPOT INVERTER PTI.G FIRE AND EXPLOSION RISKS Protect the entire welding area. Flammable materials must be moved to a minimum safe distance of 11 meters. A fire extinguisher must be readily available near the welding operations. Be careful of weld spatter and sparks, even through cracks. If not careful then this could potentially lead to a fire or an explosion. -
Page 20: Equipment Installation
GYSPOT INVERTER PTI.G RECOMMENDATIONS FOR WELDING AREA ASSESSMENT AND WELDING Miscellaneous The user is responsible for the correct installation and usage of the welding material based on the instructions supplied by the manufacturer. If electromagnetic disturbances are detected, it is the user’s responsibility to resolve the situation with the manufacturer’s technical assistance. In some cases, this corrective action may be as simple as earthing the welding circuit. -
Page 21: Maintenance Recommendations
GYSPOT INVERTER PTI.G The manufacturer does not accept any liability in relation to damages caused to objects or harm caused to persons as the result of incorrect and/or dangerous use of the machine. MAINTENANCE / RECOMMENDATIONS • The operators must have received suitable training in order to use the machine at its maximum potential and weld correctly. -
Page 22: Accessories And Options
GYSPOT INVERTER PTI.G INSTALLATION – PRODUCT OPERATION Only qualified personnel authorised by the manufacturer should perform the installation of the welding equipment. During the installation, the operator must ensure that the machine is disconnected from the mains. Connecting generators in serial or in parallel is forbidden. -
Page 23: Power Supply
The equipment is not protected against the regular overvoltage waves emitted by the power generator. It is therefore not recommended to connect them on this type of power supply. REFILL OF THE COOLING LIQUID TANK The cooling liquid recommended by GYS must be used: 5 l: ref. 062511 • 10 l : ref. 052246... -
Page 24: Starting The Machine
GYSPOT INVERTER PTI.G The use of other cooling liquids, especially standard automotive liquid, can lead, through electrolysis, to the accumulation of solid deposits in the coo- ling system, reducing the cooling, and may even lead to system block. Any damage to the machine caused by the use of another coolant is excluded from the warranty. - Page 25 2 seconds to return to the AUTO mode. For the GYSPOT PTI.G, always ensure to be in that mode to stop the pump when changing the arms. The electrode retracts into the clamp. The red indicator on the button (FIG 2 - 12) lights up when the pump stops.
-
Page 26: Normal Mode
GYSPOT INVERTER PTI.G In order to use this mode, do a blank spot weld (without any sheet/panel between the electrodes),as prompted on the display. Push the button (FIG 2 -11). The message «Do a spot without a load» is displayed on the screen. Push the button again to calibrate. Once the calibration is done, the machine shows all the settings to zero, and is ready to weld. -
Page 27: Energy Mode
GYSPOT INVERTER PTI.G The ENERGY mode is optional and can be set using the «Settings» menu. ENERGY mode This mode is used to control the energy transmitted during the weld. This mode is not designed to be used during repairs but for the benefit of manufacturers and quality control organisations conducting tests. -
Page 28: Error Management
GYSPOT INVERTER PTI.G Remove the arm from the clamp and fix, in its place, the gun cable. Connect the control cable to the jack plug. Check that the screw connecting the shoe to the cable lug is tight. - Fix the earth pad firmly and as close to the weld as possible. - Page 29 GYSPOT INVERTER PTI.G Low battery The message «Battery low» is displayed when the machine is switched on and it indicates that the battery on the command board is low. This battery is used to record the date and time when the machine is switched off.
- Page 30 GYSPOT INVERTER PTI.G Line Display right Comment Display left column Type of defect In the event of a blocking fault column Page CHECK n°1 Name of the product PTI-400 PASS No blocking Product serial number SN xx.xx.xxxxxx.xxxxxx PASS or FAIL No blocking CONTROL SOFT Vxx.
-
Page 31: Recording Features
Saving a report allows you to retrieve the data of a series of spot made with using the clamp, and to save them on the memory card so that they can be retrieved from a PC for example. GYS provides a software called GYSPOT to read the SD card and edit the logs on a PC. - Page 32 • The page number is indicated at the top left.. • All repair orders are stored in the file called catalog.GYS. • This file contains the total number of repair orders, the name of each repair order and the name of each user. There is a maximum of 100 repair...
- Page 33 GYSPOT INVERTER PTI.G User programs Saving the settings allows you to define a user program in order to easily find its settings for future use. 20 memory slots are available. Each of them contains the following settings: tool, arm, welding power, welding time and pressure.
- Page 34 GYSPOT INVERTER PTI.G MECHANICAL OVER-OPENING OF THE ARM To open the arm and gain easier access to the bodywork, activate the over-opening by pressing the clamp button (FIG 2 -10). Press the button (FIG 2 -10) The latch sticks out on the open lock side The lever must be open (~90°) at the stop on the latch.
- Page 35 - The other files are reserved for the spot set by the manufacturers. It is possible to import manufacturer files downloaded from our website (http:// www.gys-welding.com). It is not possible to add, modify or delete a spot parameter taken from a manufacturer file.
- Page 36 GYSPOT INVERTER PTI.G Then double-click in the second column to select a manufacturer file previously downloaded from our website. The list of spots set by the manufacturer is displayed in the second list. Select a configured point to view the chronogram and configured parameters.
-
Page 37: Safety And Maintenance
GYSPOT INVERTER PTI.G SAFETY AND MAINTENANCE User training People operating this machine must receive suitable training in order to get the most out of the machine capabilities and carry out good quality repairs (examples: car body work training). Preparation of the parts to be assembled It is essential to clean and accost the area to be welded. -
Page 38: Warranty
GYSPOT INVERTER PTI.G Check the tightness of the chuck, the star Incorrect tightening of the chuck. holder chuck, and the condition of the sheathing. Abnormal heating of the gun Replace the sheathing in order for the air Gun sheathing loose. - Page 39 GYSPOT INVERTER PTI.G SPÉCIFICATIONS TECHNIQUES / TECHNICAL SPECIFICATIONS / TECHNISCHE DATEN / ESPECIFICACIONES TÉCNICAS PTI.G 400 V Caractéristiques électriques / Electrical specifications / Elektrische Daten / Caracteristicas electricas Tension nominal d’alimentation / Nominal supply voltage / Eingangsspannung / Tensión nominal de alimentación 3 ~ 400 V ±...
- Page 40 GYSPOT INVERTER PTI.G PIÈCES DE RECHANGE / SPARE PARTS / ERSATZTEILE / PIEZAS DE RECAMBIO 14 21...
- Page 41 GYSPOT INVERTER PTI.G Clamp 63137 Resistance surélevée bobinée 47 ohms 5W / Raised coil resistance 47 ohms 5W / Erhöhter Spulenwiderstand 47 Ohm 55050 5W / Resistencia de la bobina elevada 47 ohmios 5W 55057 Circuit mesure température primaire transfo PTI-G / Primary temperature measuring circuit PTI-G transformer / Pri- märtemperatur-Messkreis PTI-G-Transformator / Circuito de medición de la temperatura del primario Transformador...
- Page 42 GYSPOT INVERTER PTI.G Tuyau anti-étincelles / Anti-spark hose / Funkengeschützte Leitung / Conducto anti-chispas 93801 Électrodes 4 positions / 4-position electrodes / Elektroden 4 Positionen / Electrodos de 4 posiciones 90148 Socle bras équipé / Equipped arm base / Ausgestatteter Arm-Einschubsockel / Base de brazo equipad 94183 2 électrodes pour bras accès difficile / 2 electrodes for difficult access arm / 2 Elektroden für schwer zugänglichen Arm / 2...
- Page 43 GYSPOT INVERTER PTI.G Allonge vissée / Screwed extension / Verschraubte Verlängerung / Extensión atornillada 90284 Joints 12x2 / Seals 12x2 / Gelenk 12x2 / Juntas 12x2 55121 Caps type A13 / Kappen Typ A13 / Gorras tipo A13 77027 Raccord Ø6 double / Connectior Ø6 double / Ø6 Doppelanschluss / Conexión doble de Ø6 71456 Raccord Ø6 simple / Connector Ø6 simple / Stecker Ø6 einfach / Conector Ø6 simple...
- Page 44 94183 OPTION KIT (067226) Cable pistolet PTI.G / Gun cable PTI.G / Pistolenkabel PTI.G / Cable de la pistola PTI.G A0071 Switch pistolet 0.1A 125VAC / Pistol switch 0.1A 125VAC / Pistolenschalter 0,1A 125VAC / Interruptor de pistola 0,1A 77053 125VAC Ecrou pour mandrin gyspot / Nut for gyspot chuck / Mutter für Gyspot-Futter / Tuerca para mandril gyspot...
- Page 45 GYSPOT INVERTER PTI.G Ventilateur 24 V / Fan 24 V / 24 V Lüfter / Ventilador de 24 V 51021 x 2 Bouchon de remplissage Ø40 / Filling plug Ø40 / Einfüllstopfen Ø40 / Tapón de llenado Ø40 71299 Roue pivotante / Rotating wheel / Lenkrolle / Rueda giratoria 71362 x 2 Pompe Centrifuge Brushless 10Lit/mn - 24VDC - 80W / Brushless Centrifugal Pump 10Lit/mn - 24VDC - 80W / Bürsten-...
- Page 46 GYSPOT INVERTER PTI.G Circuit carte SD / SD card circuit / SD-Karten-Schaltung / Circuito de la tarjeta SD 97028C Nappe 10pts 40cm / Tablecloth 10pts 40cm / Tischtuch 10pts 40cm / Mantel 10pts 40cm 53095 Clavier / Keyboard / Tastatur / Teclado...
- Page 47 GYSPOT INVERTER PTI.G SCHÉMAS ÉLECTRIQUE / CIRCUIT DIAGRAM / SCHALTPLÄNE / ESQUEMAS ELÉCTRICOS...
- Page 48 GYSPOT INVERTER PTI.G SCHÉMA FAISCEAUX / CABLE ASSEMBLY SCHEMATICS / SCHLAUCHPAKET SCHALTPLAN / ESQUEMA CABLEADO...
- Page 49 GYSPOT INVERTER PTI.G SCHÉMA PNEUMATIQUE / PNEUMATIC SCHEMATICS / PNEUMATISCHER SCHALTPLAN / ESQUEMA NEUMÁTICO NETWORK PRESSURE SENSOR 92060 71729 71797 71741 71824 G PLIERS PRESSURE SENSOR SCHÉMA HYDRAULIQUE / HYDRAULIC SCHEMATICS / HYDRAULISCHER SCHALTPLAN / ESQUEMA HIDRÁULICO BLUE 71876 70993...
- Page 50 GYSPOT INVERTER PTI.G ICONOS / SYMBOLS / ZEICHENERKLÄRUNG / ICONOS - Attention ! Lire le manuel d’instruction avant utilisation. - Warning ! Read the instructions manual before use. - Внимание! Прочтите инструкцию перед использованием - ¡Cuidado! Lea el manual de instrucciones antes de su uso.
- Page 51 GYSPOT INVERTER PTI.G - Matériel conforme aux normes Marocaines. La déclaration C )مCMIM) de conformité est disponible sur notre site (voir à la page de couverture). - Equipment in conformity with Moroccan standards. The declaration C )مCMIM) of conformity is available on our website (see cover page).
- Page 52 SAS GYS 1, rue de la Croix des Landes CS 54159 53941 SAINT-BERTHEVIN Cedex FRANCE...
Need help?
Do you have a question about the PTI.G and is the answer not in the manual?
Questions and answers