Table of Contents
Advertisement
Quick Links
Advertisement
Table of Contents

Subscribe to Our Youtube Channel
Related Manuals for Ikelite DS160 II Strobe


Summary of Contents for Ikelite DS160 II Strobe
- Page 1 DS160 II Strobe Product Numbers 40160US • 40160EU • 40160AU • 40160UK • 40160X...
-
Page 2: About This Product
About this Product Thank you for your purchase of Ikelite equipment. Please read this instruction manual completely before attempting to operate or dive with this product. Please visit ikelite.com to register your product to receive information on any updates, notices, or recalls pertaining to your equipment. -
Page 3: Important Notices
Important Notices DO NOT lubricate or remove the battery pack o-ring. » DO NOT use lubricants, cleaners, or any chemical on the » o-ring or battery pack. The battery pack is NOT waterproof when removed from the » strobe front. NEVER use, ship, or travel with a water damaged battery pack. -
Page 4: Table Of Contents
Contents About this Product Included in the Box Important Notices Getting to Know Your Strobe Setting Up Your Strobe Removing the Battery Pack Attaching the Battery Pack Using the Diffuser Attaching the Diffuser Choosing an Arm System Attaching a Sync Connector Using Your Strobe Checking Battery Level Turning the Strobe On... -
Page 6: Getting To Know Your Strobe
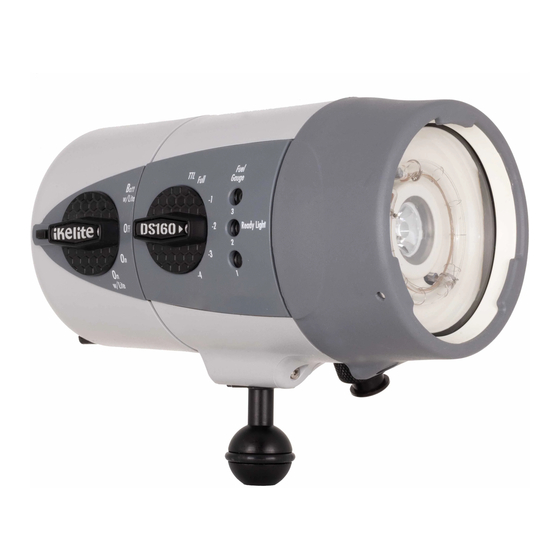
Getting to Know Your Strobe Shroud Flashtube Battery Pack Reflector DS161 Video Light DS160 Modeling Light Mount Bulkhead... - Page 7 Toggle Lock BACK Mount Power Exposure Switch Switch Fuel Switch Gauge Fuel Lock Gauge Full Batt w/Lite Ready Light Ready Light w/Lite SIDE...
-
Page 8: Setting Up Your Strobe
Setting Up Your Strobe Removing the Battery Pack The battery pack is NOT waterproof when detached from the » strobe front. Do not remove or lubricate the battery pack o-ring. » 1. Turn the Power Switch to the OFF position and place the strobe face down on a flat surface. -
Page 9: Using The Diffuser
2. Check that the o-ring is in place and that the sealing surfaces are clean. It is not necessary to lubricate the o-ring. 3. Place the toggle lock in the open position by sliding out, flipping up, and rotating 90 degrees counter-clockwise. 4. -
Page 10: Choosing An Arm System
• Although not necessary, you may apply a small amount of Ikelite silicone lubricant to the screw prior to attaching the strobe mount to avoid seizing up with long term use. DO NOT apply Loc-tite or any other thread locking product as this may cause damage to the strobe’s plastic components. -
Page 11: Attaching A Sync Connector
1. Remove the bulkhead cap. 2. Lightly lubricate the connector o-ring. Use only Ikelite silicone lubricant to eliminate the possibility of swelling due to incompatible compounds. 3. Line up the pins and receptacles and insert the sync cord plug into the bulkhead. -
Page 12: Using Your Strobe
Using Your Strobe Checking Battery Level When the switch is rotated to the Batt w/Lite position, the Fuel Gauge will indicate approximate remaining battery level. Each LED represents approximately 25% of the battery capacity. Fuel Gauge 75-100% 50-75% 25-50% 0-25% The Fuel Gauge does not indicate remaining battery life when the strobe is in the Off, On, or On w/Lite positions. -
Page 13: Using The Exposure Switch
In this position the LEDs marked 1 / 2 / 3 indicate the approximate remaining battery level. The flash does not fire in this mode. The modeling light stays on. This switch position is designated “Batt” on older battery packs. The operation is the same. -
Page 14: Positioning The Strobe
• In ON or ON W/LITE power setting, the strobe will automatically adjust the flash duration based on signals received from the camera or trigger device. Use only with compatible systems and accessories; refer to your housing instruction manuals for information on TTL compatibility with this strobe. -
Page 15: Maintenance
• The Ready Light LED doubles as a confidence signal. The LED will momentarily glow green after the strobe fires if the strobe has received a TTL quench signal. • If the Ready Light does not glow red, check that the battery pack is fully charged and the strobe power switch is set to the ON or ON W/LITE position. -
Page 16: Learning About Underwater Photography
6. Attach the battery pack cover to the battery pack. 7. Store the strobe front and battery pack in a cool, dry place. Learning about Underwater Photography Visit http://www.ikelite.com/photoschool or scan the QR code: Troubleshooting Water enters the battery pack. - Page 17 Photos are under-exposed (too dark). • Adjust strobe exposure setting. • Adjust aperture (larger), shutter speed (slower), or ISO (lower) setting. • Move strobe(s) closer to your subject and check aiming. Strobe will not fire when using sync cord. • Make sure the strobe is turned on.
-
Page 18: Limited Warranty
(1) year from the original date of purchase. Defective products should be returned to Ikelite postage paid. Ikelite will, at its sole discretion, repair or replace such products, and will return to customer postage paid. -
Page 19: Contact Us
If you have any questions about your product or need advice on getting the images you want, please get in touch with us and we’ll do everything we can to help you capture your unique perspective. Ikelite Underwater Systems 50 W 33rd St Indianapolis, IN 46208 USA +1 (317) 923-4523 ikelite@ikelite.com...
Need help?
Do you have a question about the DS160 II Strobe and is the answer not in the manual?
Questions and answers