Advertisement
Quick Links
ASSEMBLY INSTRUCTION FOR ACME FURNITURE
Thank you for purchasing the quality product. Be sure to check all packing material carefully for small parts which
may have come loose inside the carton during shipment. Separate, identify and count all parts and metal hardware.
Compare with all parts are present. If any part(s) are missing or damaged, please contact your local furniture dealer.
For efficient and speedy service, please indicate the model number and code letter of part(s) needed.
***Do not fully tighten screws until fully assembled.***
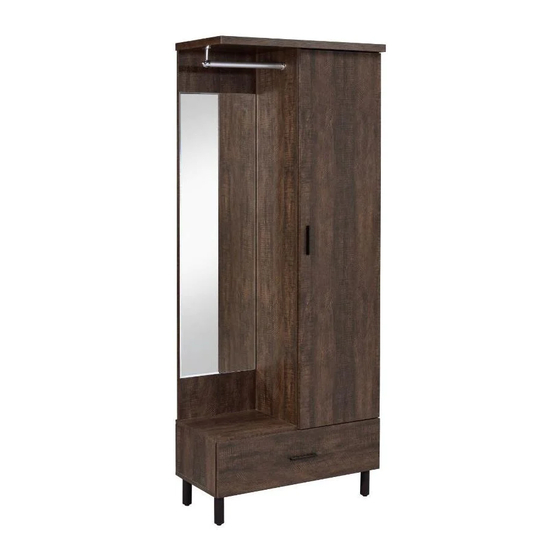
MODEL#97791
HALL TREE
DIMENSIONS
Width - 29.92"
Depth - 15.55"
Height - 75.67"
Advertisement

Subscribe to Our Youtube Channel
Related Manuals for Acme Furniture HALL TREE 97791


Summary of Contents for Acme Furniture HALL TREE 97791
- Page 1 ASSEMBLY INSTRUCTION FOR ACME FURNITURE MODEL#97791 Thank you for purchasing the quality product. Be sure to check all packing material carefully for small parts which may have come loose inside the carton during shipment. Separate, identify and count all parts and metal hardware.
-
Page 2: Parts List
97791 PARTS LIST Bottom Active layer Drawer Left Door Right side Drawer Right Right back Middle Bottom back Drawer back Left back Drawer head Drawer bottom Middle top Drawer support Foot Left side Fixed layer Iron tube... -
Page 3: Hardware List
HARDWARE LIST Cam bolt 7*35*12.5mm Handle screw M4*19mm Hinge Cam lock 15*12mm ø26mm*3/8 Hinge screw Dowel 8*30mm 6#*1/2" Fixative plate Wood screw 8#*1-1/4" Coarse screw 7*11*50mm Wood screw 3*19mm Slide rail 17*310mm Bolt 2*25mm Coat rod #6*1/2" Wood screw Fixing screw M4*12mm Wood screw 3*12mm... - Page 4 HARDWARE LIST Adjustable leveler 24mm*1/4*12mm Vent cap 60mm*66mm*3mm Wall mounted strap 25*152mm Wood screw 4*16mm Wall anchor 1-1/8" Wood screw 8#*1" Glue Allen wrench Attention Some number parts listed on the instruction sheet may not be in parts bag as they may already be assembled. Carefully check parts and packing materials prior to ordering replacements.
- Page 5 ASSEMBLY INSTRUCTIONS Step 1. Push runner to see screw holes on the other end. 2nd Hole Screw Hole hole usage...
- Page 6 ASSEMBLY INSTRUCTIONS Step 2. 180°...
- Page 7 ASSEMBLY INSTRUCTIONS Step 3. 180°...
- Page 8 ASSEMBLY INSTRUCTIONS Step 4. Insert in as arrow direction to specify...
- Page 9 ASSEMBLY INSTRUCTIONS Step 5. Finished side...
- Page 10 ASSEMBLY INSTRUCTIONS Step 6.
- Page 11 ASSEMBLY INSTRUCTIONS Step 7.
- Page 12 ASSEMBLY INSTRUCTIONS Step 8.
- Page 13 ASSEMBLY INSTRUCTIONS Step 9.
- Page 14 ASSEMBLY INSTRUCTIONS Step 10. hole usage...
- Page 15 ASSEMBLY INSTRUCTIONS Step 11. Extend the two outer slides of the runners so that they could align with the sides of the drawer. Make sure the pre-drilled holes from the drawer align with the screw holes of the outer slides. Secure two screws from the inside of the drawer using a Phillips screwdriver to tighten them to the...
- Page 16 ASSEMBLY INSTRUCTIONS Step 12. Wall For safety,please use the strap to secure the uniton the wall. ASSEMBLY IS COMPLETED. Make sure the product is rested on a flat surface and does not feel loose or wobbly. If it does, double check that the bolts/screws are secured and properly tightened.
Need help?
Do you have a question about the HALL TREE 97791 and is the answer not in the manual?
Questions and answers