Table of Contents
Advertisement
Quick Links
Advertisement
Table of Contents

Related Manuals for Timeguard TuyaSmart FSTWIFITUTGV


Summary of Contents for Timeguard TuyaSmart FSTWIFITUTGV
- Page 1 IP66 Wi-Fi Controlled Fused Spur Timeswitch Model: FSTWIFITUTGV TuyaSmart Edition...
-
Page 2: General Information
1. General Information These instructions should be read carefully and retained for further reference and maintenance. Timeguard reserve the right to alter these instructions at any time. Note: Up to date instructions will always be available for download at www.timeguard.com 2. - Page 3 • Switch Rating: 13 A Resistive (3kW) 1000W Incandescent, Halogen lighting 500W Fluorescent, LED lighting. 100W Compact Fluorescent lighting • Operating Modes: ON or OFF, Timed, Countdown • Output Light: • Multiple Device Support: Yes • Dimensions (H x W x D): 160mm x 115mm x 90mm Note: Not suitable for use with Discharge Lighting.
-
Page 4: Operating Modes
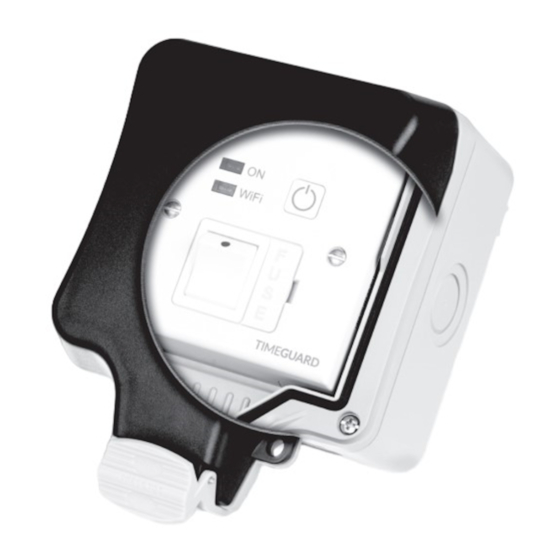
FSTWIFITUTGV MAC address and ID Wi-Fi number label Important: Do not remove this label from the side of the product. 4. Operating Modes Timer: Schedule ON/OFF periods as required. Programes can be set individually for each day, or for every day of the week. Programs can be run either as a one off event, or a weekly repeat on days of your choice. -
Page 5: Installation
6. Installation 6.1 Ensure the mains supply is switched off and the circuit supply fuses are removed or the circuit breaker is turned off. 6.2 Using a Phillips screwdriver, separate the faceplate from the back box by removing the four tapped screws located in each corner. - Page 6 6.4 Drill the wall using a 4mm Ø drill bit making sure not to infringe or compromise any gas, water pipes or cables. Insert the rawl plugs into the holes. Secure the back box to the wall and seal the screw holes of the back box using the rubber plugs provided.
-
Page 7: Connection Diagram
Note: during the installtion process, a suitable location should be selected to mitigate any Wi-Fi interference. Should the FSTWIFITUTGV and the wireless access point be located in an oversatureated area, where multiple devices and wireless equipmnent such as neighbouring Wi-Fi access points overlap, the device’s connection may not perform as required. - Page 8 8. Downloading App & Registration Note: the mobile or tablet device must be connected to a 2.4GHz band on the router. Pairing on the 5GHz band will result in paring timing out or being unsuccessful. Refer to your ISP (Internet Service Provider) on separating the bands if required. 8.1 Ensure your phone or tablet is connected to your local Wi-Fi network.
- Page 9 8.3 Tap ‘Agree’ to accept the privacy policy. 8.4 Choose your region by selecting your ‘Country Code’. Enter your email address and phone number and click ‘Get Verification Code’. 8.5 Enter the verification code sent to the email address or phone number that you provided.
- Page 10 9.5 Once the pairing process is complete, you can rename the device as required or press ‘Done’ to finalise paring. Note: if the pairing process was not successful, follow the bullet points from ‘Section 9’ to try again ensuring that the conditions for pairing have been met from the notes section.
-
Page 11: Year Guarantee
Note: if you have any concerns that the intended application of this product does not meet your requirements, please contact Timeguard directly prior to purchase or installtion. 3 Year Guarantee In the unlikely event of this product becoming faulty due... - Page 12 If you experience problems, do not immediately return the unit to the store. Email the Timeguard Customer Helpline: HELPLINE helpline@timeguard.com or call the helpdesk on 020 8450 0515 Qualified Customer Support Coordinators will be online to assist in resolving your query.
Need help?
Do you have a question about the TuyaSmart FSTWIFITUTGV and is the answer not in the manual?
Questions and answers