Table of Contents
Advertisement
Quick Links
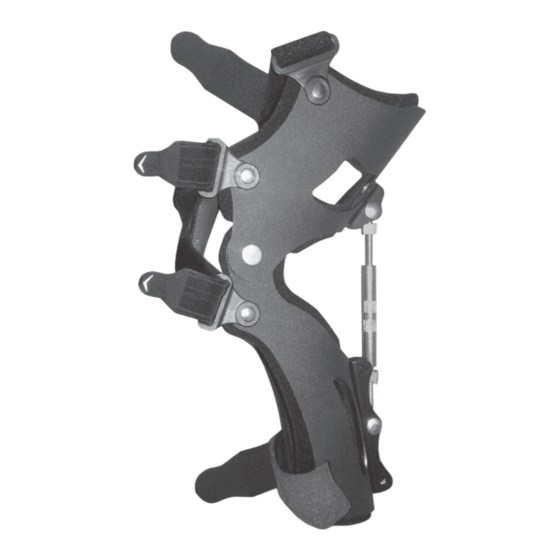
2. PL: Za pomocą kluczyka (2) przełóż śruby mocujące w odpowiedni otwór i ustaw zakres kąta zgięcia
lub wyprostu określony przez lekarza prowadzącego.
EN: Using the key (2), insert the mounting screws into the appropriate hole and set the appropriate range
of the motion determined by the doctor or physiotherapist.
(I)
0°- 40°
1. PL: Rozepnij paski w ortezie (1).
EN: Unfasten the straps of the brace (1).
(2)
(I)
40°- 64°
KOD KATALOGOWY
NAZWA HANDLOWA
MODEL
CODE
TRADE NAME
MODEL
(II)
(II)
MS-L-01
ORTEZA ŁOKCIA
ORTEZA ŁOKCIA MS-L-01
MS-L-01
ELBOW ORTHOSIS
ELBOW ORTHOSIS MS-L-01
(1)
(III)
64°- 90°
© Reh4Mat 09/2021
(III)
Advertisement
Table of Contents

Related Manuals for REH4MAT MS-L-01


Summary of Contents for REH4MAT MS-L-01
- Page 1 KOD KATALOGOWY MS-L-01 NAZWA HANDLOWA ORTEZA ŁOKCIA MODEL ORTEZA ŁOKCIA MS-L-01 CODE MS-L-01 TRADE NAME ELBOW ORTHOSIS MODEL ELBOW ORTHOSIS MS-L-01 1. PL: Rozepnij paski w ortezie (1). EN: Unfasten the straps of the brace (1). (II) (III) 2. PL: Za pomocą kluczyka (2) przełóż śruby mocujące w odpowiedni otwór i ustaw zakres kąta zgięcia lub wyprostu określony przez lekarza prowadzącego.
- Page 2 EN: Put your arm in the brace (6), so that the elbow is placed on the silicone pad (7). 6. PL: Zapnij taśmę ramienia (8) i przedramienia (9) na rzep. EN: Fasten the arm (8) and forearm (9) straps with Velcro. © Reh4Mat 09/2021...
- Page 3 (10) PL: UWAGA! Jeżeli istnieje potrzeba, skoryguj ustawienie kąta według punktu 3 i 4. EN: ATTENTION! If necessary, correct the angle according to steps 3 and 4. 8. PL: Gotowy wyrób. EN: Product is ready to use. © Reh4Mat 09/2021...
Need help?
Do you have a question about the MS-L-01 and is the answer not in the manual?
Questions and answers