
Related Manuals for ExoSlide Ender 3


Summary of Contents for ExoSlide Ender 3
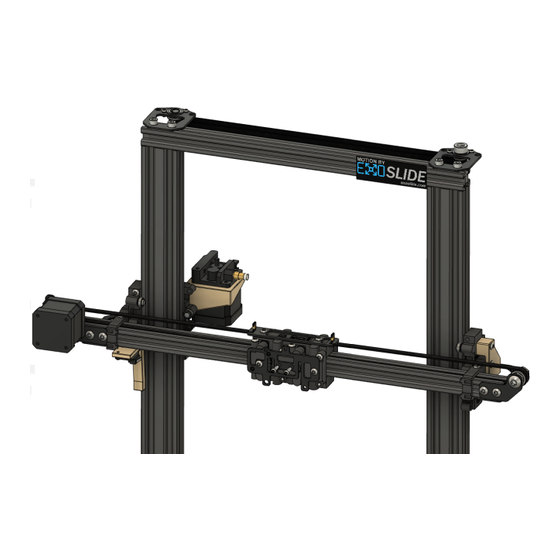
- Page 1 Build Guide - Ender 3 / CR10 / CR10S XZ ExoSlide Motion Kit 1/19/20 www.exoslide.com...
- Page 2 Note: the Ender 3, CR10, and CR10S XZ kits are very similar, but with the following differences: Ender 3 CR10 CR10S 2020 Extrusion 440mm 510mm 510mm TR8 Lead screw 400mm 500mm Z GT2 Pulleys Z GT2 Closed Belt 640mm 760mm 0.
- Page 3 M5 T nut, 2x Re-use: End-stop, M3x6 bolts 5. Left Side ExoSlide Assembly: Parts Needed: ExoSlide 20S, 1x ExoSlide 40S, 1x M4x30 bolt, 2x M4x50 bolt, 2x Notes: -Orient the slides as shown, with the 20mm slide having the ExoSlide logo facing up.
- Page 4 Extruder Bracket Assembly, 1x Support Bracket Assembly R, 1x Support Bracket Assembly L, 1x End-Stop Assembly, 1x Left Side ExoSlide Assembly, 1x ExoBracket, 2x M4x14 bolt, 4x Notes: -The left side ExoBracket should be placed 32mm from the end of the extrusion (this does not need to be exact, 30mm is ok, and you can use a 30mm bolt to gauge).
- Page 5 Re-use: Lead screw(s), Z motor coupling(s) Notes: -Slide the single Exoslide/ExoBracket positioned so the inside face is 1mm from the extrusion. -Install the left and right Z support assemblies. -Re-install the Z motor coupling(s). -Install the lead screws (on Ender3/CR10, the non-motor side rod will be loose for now).
- Page 6 -Level the Z brackets, and tighten the Z pulley grub screws 11. Z Motor Mount, Ender3/CR10 (skip for CR10S): Parts Needed: Printed motor bracket, 1x Ender 3 CR10 Notes: -Ensure bracket slides smoothly along the extrusion. The bracket only stops motor rotation...
- Page 7 12. Z motor Mount, CR10S (skip for Ender3/CR10): Parts Needed: Printed motor spacer, 2x 13. Idler Bracket Assembly: Parts Needed: Idler bracket, 1x M5x8 bolt, 2x M5 T nut, 2x M8 jam nut, 1x M8 washer, 1x Re-use: M8 bolt, large nut, bearings 14.
- Page 8 Ender3 / CR10/ CR10S XZ ExoSlide Motion Kit, BOM: All Kits: ExoSlide 20P, 4x ExoSlide 20S, 2x ExoSlide 40S, 1x ExoBracket 20, 2x Aluminum motor bracket, 1x Aluminum idler bracket, 1x Aluminum gantry bracket, 1x ...
Need help?
Do you have a question about the Ender 3 and is the answer not in the manual?
Questions and answers