Advertisement
Quick Links
Advertisement

Related Manuals for ExoSlide CR10


Summary of Contents for ExoSlide CR10
- Page 1 Build Guide – CR10S / CR10S Pro / CR10S Pro V2 12/13/20 www.exoslide.com...
- Page 2 760mm Z bearing top bracket Note: -The CR10 kit can be used to convert a dual Z motor CR10S to single tied together Z to stop power off leveling issues. 0. Prep: -If you have a CR10S Pro / Pro V2, print out the hotend and filament sensor brackets first (STLs on the product page under documents).
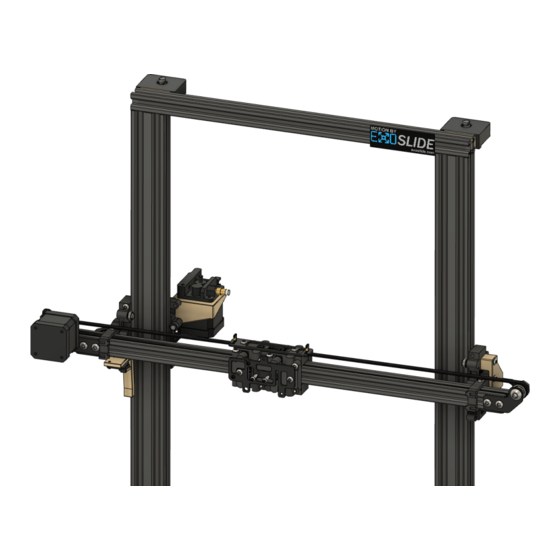
- Page 3 -Orient the front ExoSlide with the logo on the left side if using the stock Creality hotend. -Orient the front ExoSlide with the logo on the right side if using the MicroSwiss DD extruder (Ender 5 version) 3. Right Side ExoSlide Assembly:...
- Page 4 M4x14 bolt, 2x M4x18 bolt, 2x M4x30 bolt, 2x M4x50 bolt, 2x Notes: -Orient the slides as shown, with the 20mm ExoSlide having the ExoSlide logo facing up. 5. Gantry Assembly: Parts Needed: X Motor Bracket Assembly, 1x X Carriage Assembly, 1x...
- Page 5 -The right side ExoBracket should be flush with the extrusion for now. It will get positioned in a following step. 6. Gantry Install: Parts Needed: Gantry assembly, 1x Front View Note: -Slide the right side ExoSlide assembly until the ExoSlide inner face is 1mm from the 2040 extrusion face (the same spacing as the left side).
- Page 6 7. Z Nut Supports: Parts Needed: Z support brackets, 2x M5x8 bolt, 4x M5 T nut, 4x Re-use: TR8 lead screw nuts M3x6 bolt, 4x 8. Z Motion Assembly: Parts Needed: Z nut supports, 2x Printed Z motor spacer, 2x M4x25 bolt, 4x Re-use: Lead screws,...
- Page 7 Back View Notes: -Install the Z motor mount spacers. -Install the left and right Z support assemblies. -Re-install the Z motor couplings. -Re-Install the lead screws...
- Page 8 9. Top Z Bearings: Parts Needed: Printed Z bearing spacer, 2x M4x25 bolts, 2x Re-use: Z bearing retainer, 2x Back View 10. Idler Bracket Assembly: Parts Needed: Idler bracket, 1x M5x8 bolt, 2x M5 T nut, 2x M8 jam nut, 1x M8 washer, 1x Re-use: M8 bolt, large nut, bearings...
- Page 9 Used with ExoSlide Y kit Used with stock Y V wheels Note: -Use the shorter end-stop printed part when only installing the ExoSlide XZ kit (and not the ExoSlide Y kit as well) 12. Extruder Bracket Assembly: Parts Needed: Printed extruder bracket, 1x...
- Page 10 CR10S Pro / Pro V2 only 14. CR10S Pro / Pro V2 Filament Run-out Bracket: Parts Needed: Printed filament sensor bracket (STLs on the product page under documents), 1x M4x14 bolt, 2x Re-use: Filament sensor, PCB, bolts CR10S Pro / Pro V2 only 15.
- Page 11 CR10S Pro Capacitive / Inductive probe mount CR10S Pro V2 BL Touch mount CR10S Pro CR10S Pro V2...
- Page 12 CR10S XZ ExoSlide Motion Kit, BOM: ExoSlide 20P, 4x ExoSlide 20S, 2x ExoSlide 40S, 1x ExoBracket 20, 2x Metal motor bracket, 1x Metal idler bracket, 1x Metal gantry bracket, 1x Metal hotend bracket, 1x ...
Need help?
Do you have a question about the CR10 and is the answer not in the manual?
Questions and answers