Table of Contents
Advertisement
Advertisement
Table of Contents

Related Manuals for La Crosse Technology WS-7025U


Summary of Contents for La Crosse Technology WS-7025U
- Page 1 WS-7025U Wireless 433 MHz Radio-controlled Weather Station Instruction Manual...
-
Page 3: Table Of Contents
Topic Inventory of Contents/Additional Equipment About WWVB Quick Set-Up Guide Detailed Set-Up Guide Battery Installation Program Mode Function Keys 12/24 Hour Time Setting Time Zone Setting Daylight Saving Time Setting Time Setting (WWVB & Manual) Setting Day, Date and Year Selecting °F or °C Setting the LCD Contrast Features... -
Page 4: Inventory Of Contents/Additional Equipment
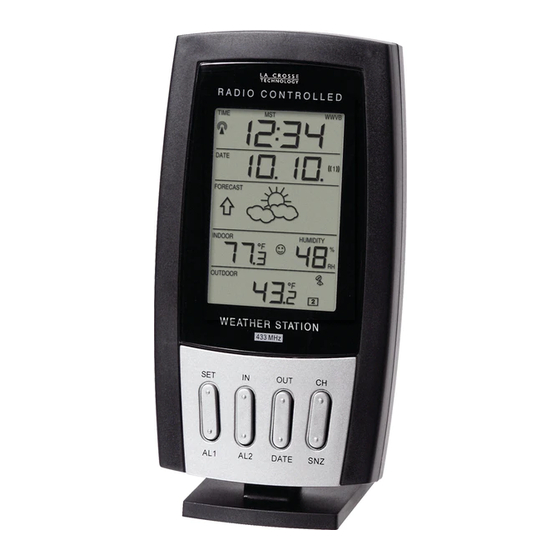
INVENTORY OF CONTENTS 1. The Weather Station (Figure 1). 2. One TX3U Remote Control Sender with mounting bracket (Figure 2). 3. Three each, ½” Philips screws. 4. One strip double-sided adhesive tape. 5. Instruction Manual and Warranty Card. Time LCD Date LCD Forecast LCD Indoor LCD... -
Page 5: Quick Set-Up Guide
continually measuring every second, of every day, to an accuracy of ten billionths of a second per day. These physicists have created an international standard measuring a second as 9,192,631,770 vibrations of a Cesium-133 atom in a vacuum. QUICK SET-UP GUIDE 1. -
Page 6: Weather Station
to fall away from the unit. Place the screw partially back into its hole and angle it slightly—so the threads grab the battery cover. With the screw, pull the battery cover off. 3. Observing the correct polarity install 2 AAA batteries. The batteries will fit tightly (to avoid start-up problems make sure they do not spring free). -
Page 7: Program Mode
PROGRAM MODE Programming Note: If 30 seconds are allowed to pass or either the IN or the OUT button is pressed during programming modes, the unit will set the last information entered—the display will stop flashing and return to normal time-date readings. If you don’t leave the program mode during the programming of sections III through VIII, you can advance to step 3 of the next program setting. -
Page 8: Daylight Saving Time Setting
the top of the TIME LCD. Observe the chart below, showing the corresponding abbreviations, time zones, and codes. TIME ZONES EST; CST; MST; PST; ALA; HAW; Note: There are more time zones represented by numbers than there are represented by 3 letter abbreviations. If you live in North America you need only be concerned with the ones in the chart above. -
Page 9: Time Setting (Wwvb & Manual)
V. TIME There are two methods by which the time can be set: A) Automatically via WWVB reception or B) Manually. A. WWVB (Remote Control Time) This method requires you to do nothing except wait for the signal to be received and to select a time zone. Reception usually takes approximately 6-10 minutes during optimal conditions. -
Page 10: Setting Day, Date And Year
6. Press the SET button to confirm the minutes and to advance to the Day, Date, and Year setting mode. Note: In 12h mode, “PM” will appear to the left of the time during PM hours. If the time is not within the PM hours, nothing will be displayed. -
Page 11: Selecting °F Or °C
10. Press the SET button to confirm and to advance to the °F or °C setting mode. VII. SELECTING °F OR °C 1. Press and hold the SET button for 3 seconds, or until “12h” or “24h” flashes in the DATE LCD. 2. -
Page 12: Back Light
FEATURES OF THE WS-7025U WWVB Tower Icon (indicates time reception) Weather Tendency Arrow I. BACK LIGHT The WS-7026U has a backlight that can be activated by pressing any of the eight function buttons. After a button has been pressed the backlight will come on for five seconds before automatically shutting off. -
Page 13: Weather Icons
A. WEATHER ICONS There are 3 possible weather icons that will be displayed in the FORECAST LCD: Sunny—indicates that the weather is expected to improve (not that the weather will be sunny). Sun with Clouds—indicates that the weather is expected to be fair (not that the weather will be sunny with clouds). -
Page 14: Indoor Temperature, Humidity & Comfort
OUTDOOR LCD. (This feature is explained in further detail in section VI—Adding Outdoor Remote Control Senders). V. MINIMUM AND MAXIMUM TEMPERATURE RECORDS The WS-7025U keeps a record of the MINIMUM and MAXIMUM temperature and the time and date of their occurrence—for both the indoor and outdoor modes. -
Page 15: Alarm Function
3. While “MAX” is still displayed press the IN button again to return to the current data display. By waiting 20 seconds during either the minimum or the maximum readings the unit will automatically return to current data readings. B. VIEWING THE OUTDOOR TEMPERATURE RECORDS 1. -
Page 16: Additional Remote Control Sending Units
VII. ADDING OUTDOOR REMOTE CONTROL SENDERS (OPTIONAL) The WS-7025U is able to receive signals from 3 different Remote Control Senders. The Remote Control Sender model(s) that you choose will come with their own set of instructions. Follow these instructions for a complete guide to setting up. -
Page 17: Set-Up Of Multiple Units
Remote Control Sender units with the WS-7025U. These extra sensors can be purchased through the same dealer as this unit, or by contacting La Crosse Technology directly. temperature only and the TX3UP will monitor the temperature via a probe for use in pools, spas, etc. - Page 18 the button twice) will display the same data for the maximum recordings. 3. To reset the Minimum/Maximum readings, it is necessary to select which Remote Control Sender you wish to reset. Press and hold the OUT button for 5 seconds, the records for the selected Remote Control Sender unit will be reset.
-
Page 19: (Set-Up, Viewing & Operation) Mounting
MOUNTING Note: Before permanently mounting ensure that the Indoor Temperature Station is able to receive WWVB signals from the desired location. Also, extreme and sudden changes in temperature will decrease the accuracy of the weather station and changes in elevation will result with inaccurate weather forecasting for the next 12 to 24 hours. -
Page 20: Wall Mounting
1) With a nonabrasive solution, clean and dry the back of the mounting bracket and the mounting surface to ensure a secure hold. The mounting surface should be smooth and flat. 2) Remove the protective strip from one side of the tape. -
Page 21: Troubleshooting
3) Remove batteries for five minutes, reinsert and leave the unit alone overnight without pressing buttons. 4) If there are still problems, contact La Crosse Technology. Problem: Hour is incorrect (minute and date are correct). Solution: Be sure correct time zone and daylight saving time are selected. -
Page 22: Maintenance And Care Instructions
They may mark the displays and casings. • Do not submerge in water. • Immediately remove all low powered batteries to avoid leakage and damage. • Opening the casings invalidates the warranty. Do not try to repair the unit. Contact La Crosse Technology for repairs. -
Page 23: Specifications
SPECIFICATIONS Temperature measuring range: Indoor: Outdoor: Indoor relative humidity measuring range: Indoor temperature checking interval: Indoor humidity checking interval: Outdoor temperature checking interval (Remote Control Sender): Outdoor temperature reception (Weather Station): Transmission Range: Power Supply: Weather Station: Temperature Sensor: Battery life cycle: Recommended battery type: Dimensions (L x W x H) Weather Station (without... -
Page 24: Warranty Information
La Crosse Technology, Ltd or La Crosse Technology, Ltd’s authorized service center. La Crosse Technology, Ltd will repair or replace this product, at our option and at no charge as stipulated herein, with new or reconditioned parts or products if found to be defective during the limited warranty period specified above. - Page 25 TO THE FOLLOWING TWO CONDITIONS: THIS DEVICE MAY NOT CAUSE HARMFUL INTERFERENCE, AND THIS DEVICE MUST ACCEPT INTERFERENCE RECEIVED, INCLUDING INTERFERENCE THAT MAY CAUSE UNDESIRED OPERATION. La Crosse Technology 2809 Losey Blvd. S. La Crosse, WI 54601 Phone: 608.782.1610 Fax: 608.796.1020 e-mail: support@lacrossetechnology.com...
Need help?
Do you have a question about the WS-7025U and is the answer not in the manual?
Questions and answers