Table of Contents
Advertisement
Quick Links
Advertisement
Table of Contents

Subscribe to Our Youtube Channel
Summary of Contents for Quha Zono X
- Page 1 USER MANUAL English Enabling Independent Life...
-
Page 2: Table Of Contents
Warranty Wearing the mouse Product disposal Using the mouse European compliance Summary of power on/off switch functions Industry Canada compliancce LED indicator FCC compliance Quha Zono X setup software Copyrights and trademarks Quha Zono X User Manual version 1.0 2022-08-29... -
Page 3: Quha Zono X Mouse
Quha Zono X mouse Welcome to the Quha Zono X mouse. This user manual will guide you through the functions and features of your device. Please read these instructions carefully before you start using your Quha Zono X mouse. The Quha Zono X computer mouse is intended to be used for computer... -
Page 4: Compatibilty And Requirements
Compatibility and requirements Quha Zono X is compatible with computers and mobile devices that support ® Bluetooth Low Energy wireless technology. Ensure that your device is ® Bluetooth enabled. The mouse requires separate dwell software or a switch for mouse clicks and dragging (selections). -
Page 5: Product Overview
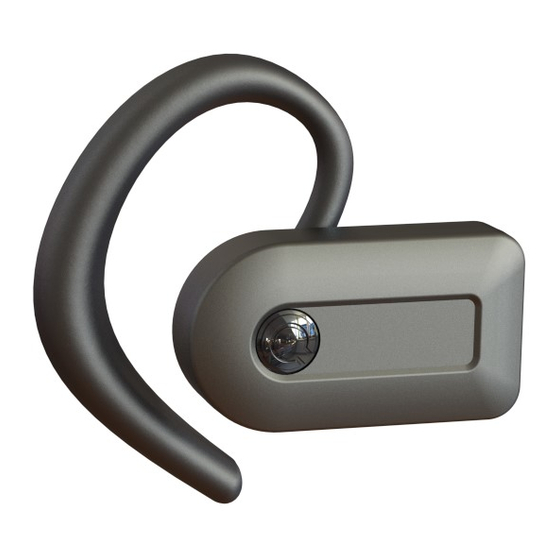
5. Serial number Ear clip: 6. Ear hook 7. Magnetic holder for the Quha Zono X mouse 8. Ear tip holder and replaceable ear tip Eyeglass clip: Clip for attaching the Quha Zono X mouse to your eyeglasses... - Page 6 • Notifications that help you perform gestures (see p. 18) The buzzer is turned on by default. You can turn it off in the Quha Zono X set-up software (see p.14). We recommend keeping the buzzer on when you first learn how to use the mouse.
-
Page 7: Charging The Battery
Charging the battery The Quha Zono X mouse has a rechargeable battery that needs to be charged before the first use. To charge the battery 1. Connect the charging dock to the USB port of a computer or to a separate USB charger using the provided USB-C cable. -
Page 8: Bluetooth Pairing
Bluetooth device. Follow the instructions on your device. 2. To turn your Quha Zono X mouse on, press the power switch for 1 second. The LED will flash turquoise once. It will then start flashing blue and red alternately, indicating that the mouse is in pairing mode and discoverable. - Page 9 The LED will start flashing blue and red alternately once the mouse enters pairing mode. 3. To pair, select “Zono X” when it appears in the list of available devices on the screen. Follow any additional on-screen instructions. Once the mouse is connected to the new device, the LED will flash green every 5 seconds.
-
Page 10: Turning The Mouse On And Off
Turning the mouse on and off NOTE! When you turn the mouse on for the first time, it will go into Bluetooth pairing mode automatically, so that it’s ready to connect to the first computer or mobile device (See p. 8). To turn the mouse on, press the power switch for 1 second. -
Page 11: Wearing The Mouse
Wearing the mouse Using the ear clip 1. Attach one of the included ear tips to the ear tip holder. Handle the ear tip carefully when you attach or detach it to avoid tearing it. Do not wear the ear clip without an ear tip, as doing so may irritate your ear. 2. -
Page 12: Using The Mouse
You can adjust the mouse features according to your needs with the Quha Zono X setup software (see p. 14). As Quha Zono X is a recognized as a standard Bluetooth mouse, you can also use your device’s mouse settings. -
Page 13: Led Indicator
LED indicator Color LED indicator Status Device Status Green Flashes slowly Battery is charging. Green Solid Battery is fully charged. Green Flashes every 5 seconds Mouse has been turned on, and it is connected and in normal usage mode. Turquoise Flashes turquoise once Power switch has been pressed for 1 second. -
Page 14: Quha Zono X Setup Software
Quha Zono X icon on your computer desktop/ mobile device screen. Double click the icon to start the application. You can use the software when your Quha Zono X mouse is turned on and connected to your device. If the application shows a “Zono X not found”... - Page 15 Horizontal and vertical sensitivity / speed With the sensitivity sliders you can adjust the amount of head movement required to move the mouse cursor on the screen. You can adjust horizontal and vertical sensitivity separately, which is useful for users whose head movement is more limited in one of the directions.
- Page 16 Gestures on/off You can turn gestures on and off. Learn more about gestures on p. 18. Double-click assistant The double-click assistant helps you perform a double-click more easily. It stops the cursor for a short time period after the first click, making it easier to click the second time without moving the cursor between the clicks.
- Page 17 22). The high power mode may be the best choice in some situations for tasks requiring constant precise cursor control or if there are obstacles between the Zono X mouse and the computer. In other situations the best battery life mode will provide sufficiently smooth cursor movement and you may prefer to extend battery life.
-
Page 18: Gestures
Gestures are turned on by default. You can turn them on and off with the Quha Zono X setup software. To activate a gesture action, you need to turn your head right and left or up and down a certain number of times. - Page 19 and you can now scroll the window with head movements. To end scrolling, make the exit gesture. Center To activate: hold still 1 s - move right - left - up - down Centering moves the pointer in the central area of the screen, making it easier for you to move your head into a more comfortable position before you start moving the cursor again.
-
Page 20: Troubleshooting
3. The mouse functions now without cursor drift Why are gestures not working? Make sure that gestures are turned on in the Quha Zono X setup software. You may also need to practice the head movements a little to learn how to perform the gestures. - Page 21 What if can’t/don’t want to use the gestures and I find it difficult to center the cursor? Readjusting the mouse by pushing the mouse cursor off screen is a standard way of repositioning the mouse cursor. If you notice your head is not in a comfortable posi- tion when the cursor is in the middle of the screen, turn your head so that the cursor moves to the edge of the screen and beyond.
-
Page 22: Technical Information
Technical Information Quha Zono X mouse Measurements: Length 44 mm / 1.7 inches, width 25 mm / 1.0 inches, thickness 13 mm / 0.5 inches, weight 12 g / 0.4 ounces Operating Temperature: +10 °C - +35 °C / +50 °F - +95 °F Storage temperature: +0 °C - +45 °C / +32 °F - +113 °F... -
Page 23: Safety
The mouse device and the charging dock include sensitive electronic components and are not user serviceable. Device service and battery replacement may only be done by a Quha certified service point. The mouse cannot be used while its battery is being charged. -
Page 24: Contraindications
Any modifications not approved by Quha could void the user’s authority to operate the device. Contraindications The device should not be used by persons with a spine or neck injury that prevents them from moving their head safely, or moving their head for long periods could cause harm to them. -
Page 25: Product Disposal
Product Disposal When the device has reached its end of life it should be recycled as electric and electronic waste. European Compliance The manufacturer of this product conforms that this product complies with the European Union regulations for safety, health, environmental and consumer protection. Industry Canada Compliance This device complies with Industry Canada licence-exempt RSS standard(s). -
Page 26: Fcc Compliance
FCC Compliance This device complies with Part 15 of the FCC Rules. Operation is subject to the fol- lowing two conditions: (1) this device may not cause harmful interference, and (2) this device must accept any interference received, including interference that may cause undesired operation. -
Page 27: Copyrights And Trademarks
Other trademarks and trade names are those of their respective owners. © 2022 Quha oy. Quha oy is not responsible for possible errors in this user manual. Quha oy reserves the right to revise the content of this user manual. - Page 28 Quha oy Pirkkalaistie 1 37100 Nokia Finland info@quha.com www.quha.com...
Need help?
Do you have a question about the Zono X and is the answer not in the manual?
Questions and answers