SubDude Audio PINWOOFER Instructions Manual
Hide thumbs
Also See for PINWOOFER:
- Instructions manual (15 pages) ,
- Installation instructions manual (14 pages) ,
- Manual (9 pages)
Advertisement
Quick Links
Copyright © 2019-2023 SubDude Audio LLC, Idaho, USA. All
Rights Reserved. Reproduction, transmission or
redistribution of this document or its contents without
written permission is prohibited.
Take your time, follow the instructions, relax, and enjoy yourself!
WARNINGS: Perform installation with your pinball machine turned off and unplugged from AC power.
Advertisement

Related Manuals for SubDude Audio PINWOOFER


Summary of Contents for SubDude Audio PINWOOFER
- Page 1 Copyright © 2019-2023 SubDude Audio LLC, Idaho, USA. All Rights Reserved. Reproduction, transmission or redistribution of this document or its contents without written permission is prohibited. Take your time, follow the instructions, relax, and enjoy yourself! WARNINGS: Perform installation with your pinball machine turned off and unplugged from AC power.
- Page 2 PinWoofer KOP and GTP BBU Amplifier Instructions...
-
Page 3: Kit Components
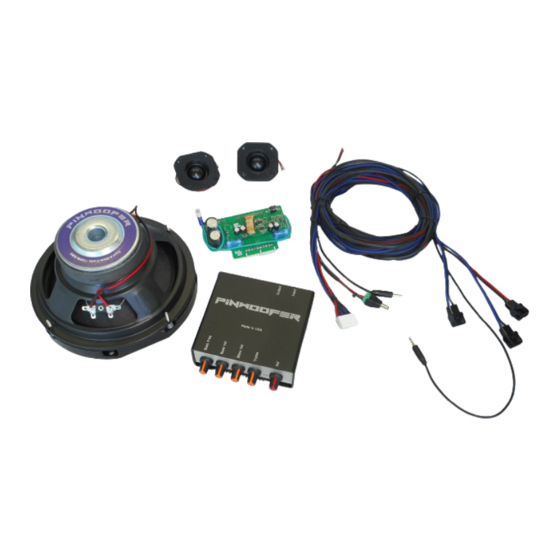
Kit Components Shown to the right are the kit • components: 1. PinWoofer BBU Board 2. 3ft 3.5mm Male to Male TRS Cable 3. 3ft Power Cable 4. 12ft 3.5mm TRS Male Stereo to RCA Male Stereo Subwoofer Cable 5. Adhesive Double Sticky Mounting Pad. - Page 4 BBU Overview • The PinWoofer BBU (Bass Boost Unit) is used with a PinWoofer Amplifier. It enables fine control of Bass Volume and • Bass Frequency Cutoff and provides a line out to your external subwoofer. • The first time you use the BBU, please rotate...
- Page 5 Amplifier Identification This document covers BBU installation on • one of two possible amplifier models. Identify your amplifier as shown to the • right. Section 1: PinWoofer KOP • Section 2: PinWoofer GTP •...
- Page 6 Section 1 KOP Amplifier •...
- Page 7 Starting PinWoofer KOP Amplifier Connections Shown to the right are: • 1. Harness Power Cable Connection. 2. Harness Audio Cable Connection.
- Page 8 KOP BBU Connections 1. Disconnect the PinWoofer Harness Power Cable from the PinWoofer Amplifier and plug it into the BBU Power Jack “Vin”. 2. Connect the New 3ft Power Cable to the “Vout” Jack on the BBU. 3. Plug the other end of the New 3ft Power Cable into the 5.5mm amplifier power...
- Page 9 Section 2 GTP Amplifier •...
- Page 10 Starting PinWoofer GTP Amplifier Connections Shown to the right are: • 1. Harness Power Cable Connection. 2. Harness Audio Cable Connection.
- Page 11 GTP BBU Connections 1. Disconnect the PinWoofer Harness Power Cable from the PinWoofer Amplifier and plug it into the BBU Power Jack “Vin”. 2. Connect the New 3ft Power Cable to the “Vout” Jack on the BBU. 3. Plug the other end of the New 3ft Power Cable into the 5.5mm amplifier power...
-
Page 12: Subwoofer Connection
Subwoofer Connection Route the 12ft SUB_OUT cable out the back • of the cabinet (through a ventilation hole) and plug into your subwoofer. After initial setup, it is recommended that • you run the external subwoofer volume between half and maximum. It is also recommended that you run the bass cutoff frequency (LOW PASS / Hz) between half and maximum. - Page 13 Use Model Example Shown is one example of how you might • place your BBU into your machine. Keep in mind that there is power to your • BBU so care should be taken to secure it to an interior surface using the supplied double sticky tape, similar to what is shown.
- Page 14 GTP Use Model Example Shown is one example of how you might • place your BBU into your machine using the GTP Amplifier. Keep in mind that there is power to your • BBU so care should be taken to secure it to an interior surface using the supplied double sticky tape, similar to what is shown.
- Page 15 Your PinWoofer BBU is now ready for use.
Need help?
Do you have a question about the PINWOOFER and is the answer not in the manual?
Questions and answers