Advertisement
Available languages
Available languages
Quick Links
Installation assistance available at:
www.rockfordfosgate.com/rftech
HIDE-AWAY DIGITAL
MEDIA RECEIVER
PMX-8BB
Serial Number:
Date of Purchase:
600 South Rockford Drive • Tempe, Arizona 85281 United States
Direct: (480) 967-3565 • Toll Free: (800) 669-9899
R O C K F O R D F O S G A T E . C O M
Installation & Operation
Advertisement

Related Manuals for Rockford Fosgate PUNCH PMX-8BB


Summary of Contents for Rockford Fosgate PUNCH PMX-8BB
- Page 1 Installation assistance available at: www.rockfordfosgate.com/rftech HIDE-AWAY DIGITAL MEDIA RECEIVER PMX-8BB Serial Number: Date of Purchase: 600 South Rockford Drive • Tempe, Arizona 85281 United States Direct: (480) 967-3565 • Toll Free: (800) 669-9899 R O C K F O R D F O S G A T E . C O M Installation &...
- Page 2 Dear Customer, If, after reading your manual, you still have questions regarding this product, we recommend that you see your Rockford Fosgate dealer. If you Congratulations on your purchase of the world’s finest brand of need further assistance, you can call us direct at 1-800-669-9899. Be sure audio products.
- Page 3 PMX16C or the PMX25C. CEA 2006 Power ratings on Rockford Fosgate source units conform to CEA-2006 industry standards. These guide- lines mean your source unit’s output power ratings are REAL POWER numbers, not inflated marketing ratings.
- Page 4 Dimensions 6.9” (175mm) 2.2” (56mm) 8.3” (210mm) Fig. 1...
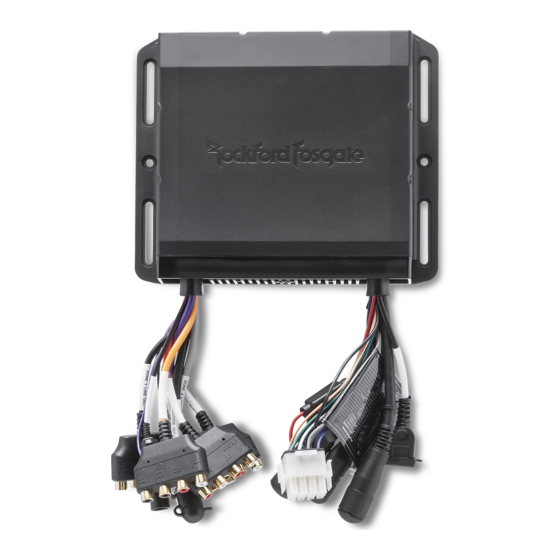
- Page 5 Wiring Diagram 12 PIN MOLEX FUSE CONNECTOR LINE OUT LEFT ZONE1 LINE OUT RIGHT ZONE 1 LINE OUT SUB-W OUT 1 BLACK SUB-W OUT 2 BLACK SIRIUSXM INPUT LINE OUT LEFT ZONE2 LINE OUT RIGHT BLACK ZONE 2 LINE OUT SUB-W OUT 1 GREY SWI INPUT...
- Page 6 Wiring Diagram LINE OUT LEFT ZONE1 LINE OUT RIGHT ZONE 1 LINE OUT SUB-W OUT 1 BLACK SUB-W OUT 2 BLACK SIRIUSXM INPUT LINE OUT LEFT ZONE2 LINE OUT RIGHT BLACK ZONE 2 LINE OUT SUB-W OUT 1 GREY SWI INPUT SUB-W OUT 2 AUX IN LINE OUT LEFT...
- Page 7 Wiring Diagram PIN NO. WIRE COLOR WIRE DEFINITION GREEN SPEAKER REAR LEFT (+) GREEN/BLACK SPEAKER REAR LEFT (-) ORIENTATION ORANGE/WHITE ILLUMINATION WHITE SPEAKER FRONT LEFT (+) WHITE/BLACK SPEAKER FRONT LEFT (-) ACC (+12V) GREY SPEAKER FRONT RIGHT (+) GREY/BLACK SPEAKER FRONT RIGHT (-) SECTION A-A SECTION B-B BLUE/WHITE...
- Page 8 Installation / Mounting Mounting Contents • Source Unit To mount the unit, you will need to find a flat surface with adequate sup- port material that provides a secure mounting location. • 13-pin Extension Cable (PMX10C) 1. Once you have determined a mounting location, you will need to mount the unit vertically with the wire harnesses facing down.
- Page 9 Settings 7 BAND EQ Short press the encoder button to access the 7 BAND EQ settings. Use the rotary encoder to scroll through the EQ settings. (FLAT > ROCK > CLASSIC > ACOUSTIC > DANCE > ELECTRONIC > HIP-HOP > CUSTOM) When setting up the CUSTOM EQ, short press the encoder button to set the first frequency.
- Page 10 Settings BEEP ADJUSTING THE SCREEN BRIGHTNESS Short press the encoder button to access the BEEP options. Rotate the Short press the SCREEN BRIGHTNESS button to adjust the brightness encoder button to turn system beep ON/ OFF. level. There are two brightness levels. TUNER REGION SELECTING A SOURCE TO PLAY To adjust, short press the encoder button to access.
- Page 11 Short press the encoder button to access the LOCAL options. Once NOTE: When using a USB extension cable, it must be a Rockford Fosgate selected, use the rotary encoder to select ON or OFF. The local option powered extension cable.
- Page 12 Operation ® Pandora AUX1 / AUX2 Operation This feature allows you to control the Pandora ® app from the source unit After your device is plugged into the source unit, this feature allows you directly (Android users will have to use Bluetooth only, iOS users can to play music from your device.
- Page 13 Operation PRESETS Short press the encoder button to access the PRESETS list. Using this feature allows you to see what PRESETS are saved on the unit. ADD PRESETS Short press the encoder button on the ADD PRESETS option. You will need to be on both the channel and PRESET group you want to add first (SXM1>SXM2>SXM3).
- Page 14 Troubleshooting Symptom / Advisory Diagnosis Remedy Basic Blown fuse Check fuse of the unit, replace with correct rating. If connected following the instructions, the unit will not Vehicle’s ignition is off operate with ignition off. Source unit does not turn on. Voltage applied to Red wire is not Check battery, connections and fuses and repair or replace between 10.5 &...
- Page 15 Troubleshooting Verify that your vehicle is outdoors with a clear view of the sky. Verify that the SiriusXM magnetic mount antenna is mounted on a metal surface on the outside of the vehicle. The SiriusXM Connect Tuner is having Move the SiriusXM antenna away from any obstructions. No Signal difficulty receiving the SiriusXM satel- Inspect the antenna cable for damage and kinks.
- Page 16 Français Caractéristiques de conception (Fig. 1) le câblage électrique lors de toute opération sur un véhicule. 7. Ne jamais acheminer les fils sous le véhicule. Acheminer les fils à Encodeur rotatif l’intérieur du véhicule fournit la meilleure protection. Ce bouton sert à ajuster le volume principal, les volumes de zones, la 8.
- Page 17 Français le bouton d’encodeur pour régler la prochaine lettre. Répéter jusqu’à ce Faire tourner le bouton d’encodeur pour régler le niveau de gain. (-3 dB > que la ZONE ait été renommée. Appuyer brièvement sur le bouton MENU -2 dB > -1 dB > 0 dB > +1 dB > +2 dB > +3 dB) pour quitter et revenir d’un niveau en arrière.
- Page 18 Français REMARQUE: La réinitialisation des paramètres SYSTEM réinitialise égale- séparés parmi lesquels choisir. Utiliser le bouton d’encodeur rotatif pour ment toutes les données utilisateur SiriusXM. faire défiler les groupes de TUNER et appuyer brièvement pour sélection- ner le groupe. Fonctionnement de base AUTO STORE (SAUVEGARDE AUTOMATIQUE) REMARQUE: La réinitialisation des paramètres SYSTEM réinitialise égale- ment toutes les données utilisateur SiriusXM.
- Page 19 REMARQUE: Lors de l’utilisation d’un câble d’extension USB, il doit s’agir l’OPTION CREATE FROM ARTIST (CRÉER À PARTIR DE L’ARTISTE) pour d’un câble d’extension Rockford Fosgate. La distance maximale pour le pouvoir créer une station à partir de l’artiste que l’on écoute actuelle- câble est de 10 mètres (33 pieds).
- Page 20 Français sont requis. Pour de plus amples renseignements, consultez www. SYNTONISATION DIRECTE siriusxm.com Appuyer brièvement sur le bouton d’encodeur sur l’option SYNTONISA- TION DIRECTE pour sélectionner cette fonction. Cette fonction permet ACTIVATION DE VOTRE ABONNEMENT SiriusXM de syntoniser directement une chaîne si on connaît déjà le numéro de la Après l’installation du SiriusXM Connect Tuner et de l’antenne, activer chaîne.
- Page 21 Français Symptôme/Avertissement Diagnostic Solution De base Vérifier le fusible de l'unité, remplacer avec le calibre Fusible grillé approprié. Si connectée selon les instructions, l'unité ne fonctionnera L'allumage du véhicule est désactivé pas avec l'allumage désactivé. L'unité source ne se met pas en Vérifier la batterie, les connexions et les fusibles, et réparer La tension appliqué...
- Page 22 Français SiriusXM Vérifier que le câble de l’antenne est connecté au SiriusXM Connect Tuner Inspecter le câble d’antenne pour tout dommage ou toute La radio a détecté une défaillance pliure éventuels. Remplacer l’antenne si le câble est endom- avec l'antenne SiriusXM. Le câble de Vérifier l'antenne magé.
- Page 23 Español Características de diseño (Fig. 1) hidráulicas, tuberías de vacío o cableado eléctrico al trabajar en cualquier vehículo. Codificador giratorio 7. Nunca tienda cables abajo del vehículo. Tender los cables adentro del Esta perilla es para ajustar el volumen principal, volúmenes de zona, vehículo proporciona la mejor protección.
- Page 24 Español codificador para configurar la primera letra del nombre nuevo. Una vez ac- AMPLIFICADOR INTERNO tivado, haga girar el codificador para ajustar letras. Presione brevemente Presione brevemente el botón para acceder a las opciones de AMPLI- de nuevo el botón del codificador para ajustar la letra siguiente. Repita FICADOR INTERNO.
- Page 25 Español PARA ENCENDER Y APAGAR (ON/OFF) LA UNIDAD. las predeterminaciones 1-6. Seleccione el siguiente grupo PRESET y repita para llenar el próximo. Presione prolongadamente el botón SRC (encendido) para encender la unidad o para apagarla (ON u OFF). LOCAL AJUSTE DEL VOLUMEN Presione brevemente el botón codificador para acceder a las opciones de LOCAL.
- Page 26 BOOKMARK (ARTIST>TRACK). Seleccione la NOTA: Cuando use un cable de extensión USB, debe ser un cable de opción que desea usar para bookmarking (marcar). extensión alimentado por Rockford Fosgate. La distancia máxima para el STATIONS MANAGE cable es de 10 metros (33 pies).
- Page 27 Español identificación de la radio está impresa en la parte inferior del sintonizador codificador en PARENTAL CONTROLS para seleccionar. Se le pedirá que SiriusXM Connect y en su embalaje. Usted necesitará este número para ingrese un código para activarlo. Ingrese “1111” como su código. Una activar su subscripción.
- Page 28 Español Síntoma / Asesoramiento Diagnóstico Acción correctiva Básica Compruebe el fusible de la unidad cambie por uno con la Fusible quemado calificación correcta. Si conecta siguiendo las instrucciones, la unidad no funcio- La ignición del vehículo está apagada nará con la ignición apagada. Compruebe la batería, las conexiones y los fusibles, y repare o No se enciende la unidad fuente El voltaje aplicado al alambre rojo no...
- Page 29 Español SiriusXM Revise todas las conexiones y repárelas como sea necesario. Inspeccione si el cable de antena tiene daños o está retor- No tiene antena o está desconectada El sintonizador no sintoniza cido. Cambie la antena si el cable está dañado. o hay una conexión abierta en el cable ninguna estación Los productos SiriusXM están disponibles en su comercio...
- Page 30 Deutsch Design-Elemente (Fig. 1) 7. Kabel nie unter dem Fahrzeug verlegen. Verlegen der Kabel im Fahrzeug bietet den besten Schutz. Drehgeber 8. Verlegen der Kabel über oder durch scharfe Kanten vermeiden. Mit diesem Knopf werden Hauptlautstärke, Zonenlautstärke, Gummi- oder Plastik-Dichtungshülsen verwenden, um Kabel zu schützen, Menünavigation und Anpassungen der Einstellungen eingestellt.
- Page 31 Deutsch Um ZONE umzubenennen, den Drehgeber-Knopf kurz drücken, um den Zum Einstellen des Levels der Gerät-Eingangsverstärkung durch die ersten Buchstaben des neuen Namens einzugeben. Nach der Aktivierung Eingänge (FM TUNER>AM TUNER>WB TUNER>USB>AUX>BLUETOOT den Drehgeber drehen, um die Buchstaben einzustellen. Den Drehgeber- H>PANDORA) zum Gerät blättern, das eingestellt werden soll, und den Knopf erneut kurz drücken, um den nächsten Buchstaben einzustellen.
- Page 32 Deutsch Drehgeber-Knopf drehen, um YES/NO (Ja/Nein) auszuwählen. YES setzt getrennte Gruppen Tuner-Voreinstellungen zur Auswahl zu haben. Mit dem das Gerät auf die Werkseinstellungen zurück. Drehgeber-Knopf durch die TUNER-Gruppen blättern und kurz drücken, um die Gruppe auszuwählen. SYSTEM – Den Drehgeber-Knopf kurz drücken, um diese einzustellen. Den Drehgeber-Knopf drehen, um YES/NO (Ja/Nein) auszuwählen.
- Page 33 Sender auf dem Gerät entfernen. Nach der Auswahl mit dem HINWEIS: Bei Verwendung eines USB-Verlängerungslabels muss es sich Drehgeber die PRESET-Nummer (1-6) des Senders wählen, der entfernt um ein Rockford Fosgate-Netzkable handein. Der maximale Abstand für werden soll. das Kabel beträgt 33Füß (10 Meter).
- Page 34 Deutsch das Neuste im Sport, Nachrichten, Talkshows, Comedy-Serien und CATEGORY (Kategorie) Unterhaltung. Willkommen in der Welt des Satellitenradios. Ein SiriusXM Zur Auswahl dieser Funktion den Drehgeber-Knopf auf der Option Connect Tuner und Abonnement sind erforderlich. Weitere Informationen CATEGORY kurz drücken. Diese Funktion ermöglicht den Suchlauf der erhalten Sie unter www.siriusxm.com.
- Page 35 Deutsch Symptom / Beschreibung Diagnose Lösung Grund Die Sicherung des Geräts prüfen und ggf mit der richtigen Sicherung durchgebrannt Stärke ersetzen. Falls nach den Anleitungen angeschlossen wird das Gerät bei Zündung des Fahrzeugs ist ausgestellt. ausgeschalteter Zündung nicht funktionieren. Source-Gerät kann nicht einge- Batterie, Anschlüsse und Sicherungen überprüfen und Die auf den roten Draht angelegte Span- schaltet werden.
- Page 36 Deutsch SiriusXM Prüfen, dass das Antennenkabel am SiriusXM Connect Tuner angeschlossen ist. Das Radio hat einen Fehler bei der Das Antennenkabel auf Schäden und Knickstellen unter- SiriusXM-Antenne festgestellt. Das suchen. Die Antenne ersetzen, wenn das Kabel beschädigt Antenne prüfen Antennenkabel kann getrennt oder ist.
- Page 37 Italiano Caratteristiche del design idrauliche, le linee da vuoto o i cavi elettrici quando si lavora su qualsiasi veicolo. Encoder rotativo 7. Mai passare i cavi sotto il veicolo. Si ottiene la protezione migliore La manopola regola il volume principale, i volumi delle zone, lo sposta- facendo scorrere i cavi all’interno del veicolo.
- Page 38 Italiano RENAME (Rinomina) brevemente il pulsante dell’encoder per accedere alle impostazioni del gua- dagno. Ruotare il pulsante dell’encoder per impostare il livello di guadagno. Per rinominare ZONE, premere brevemente il pulsante dell’encoder e (-3dB > -2dB > -1dB > 0dB > +1dB > +2dB > +3dB) digitare la prima lettera del nuovo nome.
- Page 39 Italiano ando YES l’unità verrà reimpostata alle impostazioni predefinite. AUTO STORE. Bisogna essere sul gruppo PRESET che si desidera regolare prima (FM1>FM2>FM3). Questa funzione salva automaticamente i pre- NOTA: Ripristino delle impostazioni sistema sarà anche ripristinare i dati definiti sull’unità. Si ferma quando i predefiniti 1-6 sono impostati. Selezi- utente SiriusXM.
- Page 40 NOTA: Se si utilizza un cavo di prolunga USB, deve essere un cavo di Per creare stazioni premere brevemente il pulsante dell’encoder per visu- prolunga alimentato Rockford Fosgate. La distanza massima per il cavo è di alizzare le opzioni STATION MANAGE (CREATE FROM ARTIST> CREATE 33 piedi (10 metri).
- Page 41 Italiano riferimento. CANALI>CAMBIA IL MIO CODICE). Usare la manopola dell’encoder rotativo per scorrere attraverso le opzioni e premere brevemente per Nota: SiriusXM Radio ID non include le lettere I, O, S o F. selezionare. Negli USA è possibile attivare online o chiamando il servizio SiriusXM Listener Care: LOCK CHANNELS (BLOCCA CANALI) •...
- Page 42 Italiano Sintomo / Descrizione Diagnosi Soluzione Di base Controllare il fusibile sull'unità, cambiarlo con la portata Fusibile bruciato corretta. Se collegata seguendo le istruzioni, l'unità non funzionerà con L'accensione del veicolo è spenta l'accensione spenta. L'unità di fonte non si accende. La tensione applicata al cavo rosso non Controllare la batteria, i collegamenti e i fusibili e riparare o è...
- Page 43 Italiano SiriusXM Verificare che il cavo dell’antenna sia collegato a SiriusXM Connect Tuner. La radio ha rilevato un guasto Ispezionare il cavo dell’antenna per verificare eventuali Controllare l’antenna dell’antenna SiriusXM. Il cavo danni e attorcigliamenti. Sostituire l’antenna se il cavo è dell’antenna potrebbe danneggiato.
- Page 44 This warranty applies only to Rockford Fosgate products sold to consumers by authorized Rockford Fosgate dealers in the United States of America. Products purchased by consumers from an Authorized Rockford Fosgate Dealer in another country are covered only by that country’s Distributor and not by Rockford Corporation.
- Page 45 FCC STATEMENT 1. This device complies with Part 15 of the FCC Rules. Operation is subject to the following two conditions: (1) This device may not cause harmful interference,and (2) This device must accept any interference received, including interference that may cause undesired operation. 2.
Need help?
Do you have a question about the PUNCH PMX-8BB and is the answer not in the manual?
Questions and answers