
Related Manuals for Kuppersbusch EKWE320S


Summary of Contents for Kuppersbusch EKWE320S
-
Page 1: Installation Instructions
Installation instructions Important - Save for the local electrical inspector’s use. EKWE / EKWH... -
Page 2: Table Of Contents
For your information... Be sure to read the information in this manual carefully before you install the honeycombs. Please keep this manual in a safe place and pass it on to future owners for their information and safety. The following symbols are used in this operating manual: The warning triangle will alert you about possible health risks or things that can cause potential damage to your appliance. -
Page 3: Safety Instructions
Safety instructions General Installation conditions Installation instructions - EKWE/EKWH - USA • Turn off the power source before installing the honeycomb cooktop. • Do not operate the appliance until it has been properly installed within cabinetry or into an opening in the countertop! •... -
Page 4: Dimensions And Distances
If cabinet storage is to be provided, the risk can be reduced by installing a range hood that projects horizontally a minimum of 5 inches beyond the bottom of the cabinets. -
Page 5: An Overview Of The Honeycomb Dimensions
An overview of the honeycomb dimensions Cooking unit EKWH 320.14 / 320.18 / 320.18 Z Glass ceramic panel Silicon bonding compound Metal support View from bottom Control unit EKWE 320.W / S Glass ceramic panel Silicon bonding compound Metal support View from Metal base panel bottom... -
Page 6: Installing The Honeycombs/Honeycomb Cooking Units
Installing the honeycombs/honeycomb cooking units Instructions for installing the honeycombs Cover Please note that the Küppersbusch Honeycomb Cooktops are recommended only for installation into stone and certain solid surface worktops which have a heat resistance in excess of (160 °C / 320 °F). •... -
Page 7: Measuring And Marking Out The Worktop Cut-Outs
Measuring and marking out the worktop cut-outs Measuring the cut-out Correct: Allow an extra 1-3 mm for the silicon seal Incorrect: Allow an extra 1-3 mm round each honeycomb Installation instructions - EKWE/EKWH - USA Dimensioned drawings on CD-ROM Dimensioned drawings of lay-out options for the honeycombs are available from Küppersbusch. -
Page 8: Marking Out The Cut-Out
Marking out the cut-out * Only permissible for worktops with a depth of at least 650 mm (25-9/16"). Cut-out in worktops made of solid surface Bottom pan cut-out Trimming the cut-out for the honeycombs – Draw the installation dimensions in accordance with your calculations. –... -
Page 9: Cut-Out In Stone Worktops
Cut-out in stone worktops Cutting out the installation area and the openings Replacing the piece cut out into the worktop Installation instructions - EKWE/EKWH - USA The cut-out can be made as for worktops made of solid surface. (Trimming the cut-out for the honeycomb cooking zones) See “Cutout in worktops made of solid surface”. - Page 10 Inserting and adhering the honeycombs Clamps Notes • In order to avoid any damage to the worktop or the honeycomb cooktop, it is essential to permanently glue the worktop to the honeycomb units so that the system is absolutely watertight. •...
-
Page 11: Electrical Connection
Electrical connection Installation instructions - EKWE/EKWH - USA When installing the power module, a minimum distance to the ground of 300 mm (11-13/16") is to be observed in accordance with the drawing on page 6. • Observe all guidelines and regulations from your local electric company. •... -
Page 12: Connecting The Honeycomb Cooking Units To The
Connecting the honeycomb cooking units to the control honeycomb and to the power module Any superfluous cable must be pulled out from the installation area beneath the honeycomb cooktop. Only the EKWH 320.14, EKWH 320.18 and EKWH 320.18Z honeycomb cooking units may be connected to the EKWE 320 control honeycomb. A dangerous situation may otherwise arise. -
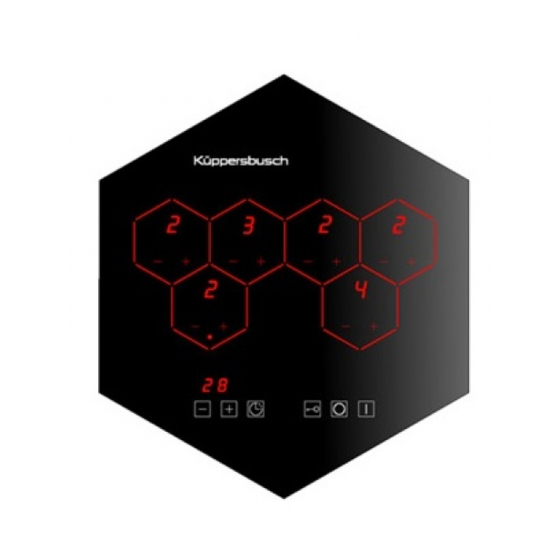
Page 13: Programming The Control Honeycomb In Accordance With The Cooking Zone Layout
Programming the control honeycomb in accordance with the cooking zone layout Installation instructions - EKWE/EKWH - USA Since the control honeycombs can be used for any kind of honeycomb layout, the control honeycomb has to be informed on which cooking zones have actually been installed and on the final layout. - Page 14 – Place a metal pan on the respective cooking zone for a short time. The honeycomb touch control on the control honeycomb stops flashing and a number is indicated on the LED display. The next honeycomb touch control on the control honeycomb will start flashing.
- Page 15 Installation instructions - EKWE/EKWH - USA...
- Page 16 ÜPPERSBUSCH 4920 West Cypress Street, Tampa, Florida 33607 Telephone: 813-288-8890 Fax: 813-288-8604 Customer Care line: 1 - 800 - 459 - 0844 www.kuppersbuschusa.com TEKA USA, I ÜPPERSBUSCH IS A BRAND OF...
Need help?
Do you have a question about the EKWE320S and is the answer not in the manual?
Questions and answers