Table of Contents
Advertisement
Available languages
Available languages
Quick Links
FR
02-07 / 08-17 / 68-80
02-07 / 18-27 / 68-80
EN
02-07 / 28-37 / 68-80
DE
02-07 / 38-47 / 68-80
NL
02-07 / 48-57 / 68-80
IT
PL
02-07 / 58-67 / 68-80
73502
V1
25/10/2022
MIG/MAG welding machine
Schweissgerät für MIG/MAG
Equipo de soldadura MIG/MAG
Сварочный аппарат МИГ/МАГ
Dispositivo saldatura MIG/MAG
Find more languages of user manuals
E1 / E2 / E3
GYS AUTO
Générateur MIG/MAG
MIG/MAG lasapparaat
www.gys.fr
Advertisement
Table of Contents

Related Manuals for GYS E1


Summary of Contents for GYS E1
- Page 1 E1 / E2 / E3 02-07 / 08-17 / 68-80 GYS AUTO 02-07 / 18-27 / 68-80 02-07 / 28-37 / 68-80 Générateur MIG/MAG MIG/MAG welding machine 02-07 / 38-47 / 68-80 Schweissgerät für MIG/MAG Equipo de soldadura MIG/MAG 02-07 / 48-57 / 68-80 Сварочный...
-
Page 2: Manuel D'utilisation
Manuel d’utilisation E1 - E2 - E3 GYS AUTO Notice originale E1 : E2 : E3 : M6x12 (x8) M6 (x8) E2 / E3 M6x12 (x4) M8x12 (x8) M6x12 (x3) - Page 3 Manuel d’utilisation E1 - E2 - E3 GYS AUTO Notice originale M4x10 (x6) M6x12 (x3) E2 / E3 SUPPORT BOUTEILLE / BOTTLE SUPPORT / FLASCHENHALTER / PORTABOTELLAS / FLESSENHOU- DER / PORTABOTTIGLIE E2 / E3 1 x 4 m 1 x 4 m...
- Page 4 Manuel d’utilisation E1 - E2 - E3 GYS AUTO Notice originale POTENCE SEULE / BALANCING ARM ONLY / AUSLEGER / SOPORTE SOLO / КРОНШТЕЙН / STEUN ALLEEN / BRACCIO DI SOSTEGNO SINGOLO | 077300 M6x12 M6x40 M6x40 x 25 E2 / E3 Matière :...
- Page 5 PROCÉDURE DE MISE À JOUR / UPDATE PROCEDURE Clé USB non fournie / USB key not included. Logiciel de mise à jour disponible sur le site GYS, partie S.A.V. / Update software available on the GYS website, After sales section. M5x10...
- Page 6 Manuel d’utilisation E1 - E2 - E3 GYS AUTO Notice originale RACCORD GAZ / GAS FITTINGS / GASANSCHLUSS / CONEXIÓN DE GAS / ГАЗОВОЕ СОЕДИНЕНИЕ / GAS AANSLUITING / COLLEGAMENTO GAS Couper le tuyau de gaz en 4 (Longueur au choix) / Cut the gas pipe into 4 (any length) / Gasrohr in 4 (beliebige Länge) schneiden...
- Page 7 Manuel d’utilisation E1 - E2 - E3 GYS AUTO Notice originale...
- Page 8 Manuel d’utilisation E1 - E2 - E3 GYS AUTO Notice originale AVERTISSEMENTS - RÈGLES DE SÉCURITÉ CONSIGNE GÉNÉRALE Ces instructions doivent être lues et bien comprises avant toute opération. Toute modification ou maintenance non indiquée dans le manuel ne doit pas être entreprise.
-
Page 9: Sécurité Électrique
Manuel d’utilisation E1 - E2 - E3 GYS AUTO Notice originale Les bouteilles doivent être entreposées dans des locaux ouverts ou bien aérés. Elles doivent être en position verticale et maintenues à un support ou sur un chariot. Le soudage doit être proscrit à proximité de graisse ou de peinture. - Page 10 Manuel d’utilisation E1 - E2 - E3 GYS AUTO Notice originale • ne jamais enrouler les câbles de soudage autour du corps; • ne pas positionner le corps entre les câbles de soudage. Tenir les deux câbles de soudage sur le même côté du corps;...
-
Page 11: Installation Du Matériel
Manuel d’utilisation E1 - E2 - E3 GYS AUTO Notice originale Ne jamais soulever une bouteille de gaz et la source de courant de soudage en même temps. Leurs normes de transport sont distinctes. Il est préférable d’enlever la bobine de fil avant tout levage ou transport de la source de courant de soudage. -
Page 12: Alimentation-Mise En Marche
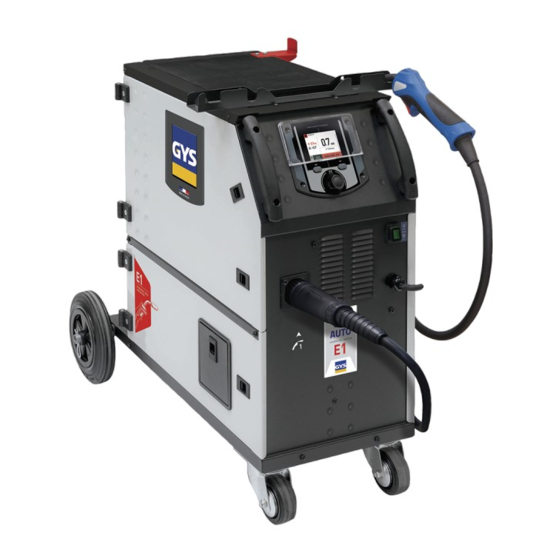
Manuel d’utilisation E1 - E2 - E3 GYS AUTO Notice originale Connecteur gaz (torche 1) Connecteur Euro (torche 1) Connecteur gaz (torche 2) Connecteur Euro (torche 2) Support bobine Ø 200 mm (torche 1) Passe cloison gaz Support bobine Ø 200/300 mm (torche 2) Câble secteur (6.25 m) - Page 13 - Mettre en place les galets moteur adaptés à votre utilisation et revisser les vis de maintien. Les galets fournis sont des galets double gorge : - acier Ø 0.6/0.8 (E1 + E2 + E3) - acier Ø 0.8/1.0 (E3) - aluminium Ø...
-
Page 14: Raccordement Gaz
Ce matériel peut souder du fil acier et acier inoxydable de Ø 0.6 à 1.0 mm (I-A). E1 / E2 : L’appareil est livré d’origine avec des galets Ø 0.6/0.8 pour acier ou acier inoxydable. E3 : L’appareil est livré d’origine avec des galets Ø 0.6/0.8 et Ø 0.8/1.0 pour acier ou acier inoxydable. - Page 15 L’accès à certains paramètres de soudage dépend du mode d’affichage sélectionné : Paramètres/Mode d’affichage : Easy ou Expert. Se reporter à la notice IHM. PROCÉDÉS DE SOUDAGE Pour plus d’informations sur les synergies GYS et les procédés de soudage, scannez le QR code : 3 MODES DE SOUDAGE (EASY) • Soudage (en continu) •...
- Page 16 Manuel d’utilisation E1 - E2 - E3 GYS AUTO Notice originale Durée de maintien de la protection gazeuse après extinction de l’arc. Il permet de protéger la pièce ainsi que Post gaz l’électrode contre les oxydations. Self Amortit plus ou moins le courant de soudage. À régler en fonction de la position de soudage.
-
Page 17: Conditions De Garantie
Manuel d’utilisation E1 - E2 - E3 GYS AUTO Notice originale Tension d’arc trop basse ou trop haute. Voir paramètres de soudage. Contrôler et positionner la pince de masse au Particules d’étincelage très importantes. Mauvaise prise de masse. plus proche de la zone à souder. -
Page 18: Protecting Yourself And Others
Operating manual Translation of the original E1 - E2 - E3 GYS AUTO instructions WARNINGS - SAFETY INSTRUCTIONS GENERAL INSTRUCTIONS These instructions must be read and fully understood before use. Do not undertake any alterations or maintenance work that is not directly specified in this manual. -
Page 19: Gas Cylinders
Operating manual Translation of the original E1 - E2 - E3 GYS AUTO instructions Cylinders should be stored in open or well-ventilated areas. They should be stored in an upright position and kept on a stand or trolley. Welding should not be carried out near grease or paint. - Page 20 Operating manual Translation of the original E1 - E2 - E3 GYS AUTO instructions Pacemaker users should consult a doctor before using this equipment. Exposure to electromagnetic fields during welding may have other health effects that are not yet known.
-
Page 21: Setting Up The Equipment
Operating manual Translation of the original E1 - E2 - E3 GYS AUTO instructions SETTING UP THE EQUIPMENT • Place the welding power source on a floor with a maximum inclination of 10°. • Provide sufficient space to ventilate the welding power source and access the controls. -
Page 22: Human-Machine Interface (Hmi)
Operating manual Translation of the original E1 - E2 - E3 GYS AUTO instructions Gas connector (torch 1) Euro connector (torch 1) Gas connector (torch 2) Euro connector (torch 2) Reel support Ø 200 mm (torch 1) Bulkhead connector for gas Reel support Ø... -
Page 23: Loading The Filler Wire
This machine can weld steel and stainless steel wire from Ø 0.6 to 1.0 mm (I-A). E1 / E2 : The unit is supplied with Ø 0.6/0.8 rollers for steel or stainless steel as standard. E3 : The unit is supplied with Ø 0.6/0.8 and Ø 0.8/1.0 rollers for steel or stainless steel as standard. -
Page 24: Gas Supply
Operating manual Translation of the original E1 - E2 - E3 GYS AUTO instructions SEMI-AUTOMATIC ALUMINIUM WELDING (MIG MODE) This machine can weld aluminium wire from Ø 0.8 to 1.2 mm (I-B) (Ø 1.2 mm, non-intensive welding). E2 / E3 : The unit is supplied as standard with Ø 0.8/1.0 rollers for aluminium. - Page 25 Access to some of the welding parameters depends on the selected display mode: Settings/Display mode: Easy or Expert. Refer to the HMI ma- nual. WELDING PROCESSES For more information on GYS pre-installed user settings and welding processes, scan the QR code: 3 WELDING MODES (EASY) • Welding (continuous) •...
- Page 26 Operating manual Translation of the original E1 - E2 - E3 GYS AUTO instructions GAS FLOW CONTROL In the main screen, a long press on button N°1 allows you to adjust the gas flow on the manometer without unwinding the supply wire. Once started, the proceedure is illustrated with an animation on the screen.
-
Page 27: Warranty Conditions
Operating manual Translation of the original E1 - E2 - E3 GYS AUTO instructions DRIVE ROLLERS (B) OPTIONAL Part Number (x2) Diameter Steel Aluminium ø 0.6/0.8 042087 ø 0.8/1.0 042360 042377 ø 1.0/1.2 040915 WARRANTY CONDITIONS The warranty covers any defects or manufacturing faults for two years from the date of purchase (parts and labour). -
Page 28: Allgemeiner Hinweis
Betriebsanleitung Übersetzung der E1 - E2 - E3 GYS AUTO Originalbetriebsanleitung WARNUNGEN - SICHERHEITSREGELN ALLGEMEINER HINWEIS Die Missachtung dieser Bedienungsanleitung kann zu schweren Personen- und Sachschäden führen. Nehmen Sie keine Wartungsarbeiten oder Veränderungen an dem Gerät vor, die nicht in der Anlei- tung genannt werden. - Page 29 Betriebsanleitung Übersetzung der E1 - E2 - E3 GYS AUTO Originalbetriebsanleitung Achtung: Das Schweißen in kleinen Räumen erfordert eine Überwachung des Sicherheitsabstands. Außerdem kann das Schweißen von bestimmten Materialien, die Blei, Cadmium, Zink, Quecksilber oder Beryllium enthalten, besonders schädlich sein. Vor dem Schweißen sollten Sie die Elemente entfetten.
- Page 30 Betriebsanleitung Übersetzung der E1 - E2 - E3 GYS AUTO Originalbetriebsanleitung Alle Schweißer sollten die folgenden Verfahren anwenden, um die Wirkung von elektromagnetischen Feldern aus dem Schweißstromkreis zu minimieren: • Elektrodenhalter und Massekabel bündeln, wenn möglich machen Sie sie mit Klebeband fest;...
- Page 31 - Legen Sie die Schweißbrenner oder die Elektrodenhalter auf eine isolierte Oberfläche, wenn sie nicht benutzt werden! Die Versorgungs-, Verlängerungs- und Schweißkabel müssen komplett abgerollt werden, um ein Überhitzen zu verhindern. Der Hersteller GYS haftet nicht für Verletzungen oder Schäden, die durch unsachgemäße Handhabung dieses Gerätes entstanden sind.
- Page 32 Betriebsanleitung Übersetzung der E1 - E2 - E3 GYS AUTO Originalbetriebsanleitung Gasanschluss (Brenner 1) Massekabel mit Klemme (3,5 m) Gasanschluss (Brenner 2) Euro-Anschluss (Brenner 1) Gasanschluss (Brenner 3) Euro-Anschluss (Brenner 2) Spulenhalter Ø 200 mm (Brenner 1) Euro-Anschluss (Brenner 3) Spulenhalter Ø...
- Page 33 Dieses Gerät kann Stahl- und Edelstahldraht von Ø 0,6 bis 1,0 mm (I-A) schweißen. E1 / E2 : Das Gerät wird standardmäßig mit Rollen Ø 0,6/0,8 für Stahl oder Edelstahl geliefert. E3: Das Gerät wird standardmäßig mit Rollen Ø 0,6/0,8 und Ø 0,8/1,0 für Stahl oder Edelstahl geliefert.
-
Page 34: Empfohlene Kombinationen
Betriebsanleitung Übersetzung der E1 - E2 - E3 GYS AUTO Originalbetriebsanleitung HALBAUTOMATISCHES SCHWEISSEN ALUMINIUM (MIG-MODUS) Dieses Gerät kann Aluminiumdraht von Ø 0,8 bis 1,2 mm (I-B) schweißen (Ø 1,2 mm, nicht intensives Schweißen). E2 / E3 : Das Gerät wird standardmäßig mit Rollen Ø 0,8/1,0 für Aluminium geliefert. - Page 35 Der Zugriff auf einige Schweißparameter hängt vom gewählten Anzeigemodus ab: Einstellungen/Anzeigemodus: Easy oder Expert. Beachten Sie die Betriebsanleitung für die Schnittstelle (HMI). SCHWEISSVERFAHREN Für weitere Informationen zu GYS-Synergien und Schweißverfahren, scannen Sie den QR-Code : 3 SCHWEISSARTEN (EASY) • Schweißen (durchgehend) •...
- Page 36 Betriebsanleitung Übersetzung der E1 - E2 - E3 GYS AUTO Originalbetriebsanleitung Gasvorströmung Dauer der Gasvorströmung vor der Zündung. Punkt Definierte Dauer. Dauer der Aufrechterhaltung des Schutzgases nach dem Erlöschen des Lichtbogens. Es schützt das Gasnachströmung Werkstück und die Elektrode vor Oxidation.
- Page 37 Betriebsanleitung Übersetzung der E1 - E2 - E3 GYS AUTO Originalbetriebsanleitung Prüfen Sie die Gasanschlüsse Kein Gas am Ausgang des Brenners Falscher Gasanschluss Prüfen Sie, ob das Gasventil richtig funktio- niert. Die Daten auf die SD-Karte sind falsch oder Fehler beim Download Prüfen Sie Ihre Daten.
-
Page 38: Algemene Instructies
Gebruikershandleiding E1 - E2 - E3 GYS AUTO Vertaling van de originele handleiding WAARSCHUWINGEN - VEILIGHEIDSINSTRUCTIES ALGEMENE INSTRUCTIES Voor het in gebruik nemen moeten deze instructies zorgvuldig gelezen en goed begrepen worden. Voer geen onderhoud of wijzigingen uit die niet in de handleiding vermeld staan. -
Page 39: Elektrische Veiligheid
Gebruikershandleiding E1 - E2 - E3 GYS AUTO Vertaling van de originele handleiding Waarschuwing: bij het lassen in kleine ruimtes moet de veiligheid op afstand gecontroleerd en gemonitord worden. Bovendien kan het lassen van materialen die bepaalde stoffen zoals lood, cadmium, zink, kwik of beryllium bevatten bijzonder schadelijk zijn. Ontvet de te lassen materialen voor aanvang van de laswerkzaamheden. - Page 40 Gebruikershandleiding E1 - E2 - E3 GYS AUTO Vertaling van de originele handleiding • houd uw romp en uw hoofd zo ver mogelijk verwijderd van het lascircuit; • wikkel de laskabels nooit rond uw lichaam; • ga niet tussen de laskabels in staan. Houd de twee laskabels aan dezelfde kant van uw lichaam;...
- Page 41 Gebruikershandleiding E1 - E2 - E3 GYS AUTO Vertaling van de originele handleiding Til nooit een gasfles en het apparaat tegelijk op. De vervoersnormen zijn verschillend. Het is beter om eerst de spoel te verwijderen voordat u de lasstroomvoeding op wilt tillen of wilt verplaatsen.
- Page 42 Gebruikershandleiding E1 - E2 - E3 GYS AUTO Vertaling van de originele handleiding Aansluiting gas (toorts 1) Euro-aansluiting (toorts 1) Aansluiting gas (toorts 2) Euro-aansluiting (toorts 2) Spoelhouder Ø 200 mm.(toorts 1) Passage sas-afscheiding Spoelhouder Ø 200 mm (toorts 2) Voedingskabel (6.25m)
- Page 43 - Plaats de aanvoerrollen die geschikt zijn voor de door u uit te voeren werkzaamheden en schroef de schroeven weer vast. De bijgeleverde aanvoerrollen hebben een dubbele groef : - staal Ø 0,6/0.8 mm (E1 + E2 + E3) - staal Ø 0,8/1.0 (E3) - aluminium Ø 0,8/1.0 (E2 + E3) - Controleer het opschrift op de rol, om er zeker van te zijn dat deze geschikt is voor de diameter en het materiaal van het door u gebruikte draad (voor een draad van Ø...
- Page 44 Met dit apparaat kunt u lassen met staaldraad en roestvrijstaaldraad met een Ø 0.6 tot 1,0 mm (I-A). E1 / E2 : Het apparaat wordt standaard geleverd met rollers voor een Ø 0.6/0.8 voor staal en roestvrijstaal. E3 : Het apparaat wordt standaard geleverd met rollers voor een Ø 0.6/0.8 en Ø 0.8/1.0 voor staal en roestvrijstaal..
- Page 45 De toegang tot sommige las-instellingen hangt af van de gekozen schermweergave : Instellingen/Weergave : Easy of Expert. Raadpleeg de HMI-handleiding LASPROCEDURES Voor meer informatie betreffende de GYS synergieën en de lasprocedures kunt u de QR-code scannen : 3 LASMODULES (EASY) • Lassen (continu) •...
- Page 46 Gebruikershandleiding E1 - E2 - E3 GYS AUTO Vertaling van de originele handleiding Voor het aanpassen van de afstand tussen het uiteinde van de draad en het smeltbad (afstellen van de span- Booglengte ning). Pre-gas Duur van het zuiveren van de toorts en het creëren van een beschermgas voorafgaand aan de ontsteking.
- Page 47 Gebruikershandleiding E1 - E2 - E3 GYS AUTO Vertaling van de originele handleiding Boogspanning is te laag of te hoog. Lasinstellingen controleren. Controleer en plaats de massaklem zo dicht Zeer grote vonkdelen. Slechte aarding. mogelijk bij de laszone. Beschermgas is onvoldoende.
-
Page 48: Istruzioni Generali
Manuale di utilizzo Traduzione delle istruzioni E1 - E2 - E3 GYS AUTO originali AVVERTENZE - NORME DI SICUREZZA ISTRUZIONI GENERALI Queste istruzioni devono essere lette e ben comprese prima dell’uso. Ogni modifica o manutenzione non indicata nel manuale non deve essere effettuata. -
Page 49: Sicurezza Elettrica
Manuale di utilizzo Traduzione delle istruzioni E1 - E2 - E3 GYS AUTO originali Le bombole devono essere posizionate in locali aperti ed aerati. Devono essere in posizione verticale su supporto o su un carrello. La saldatura è proibita se effettuata in prossimità di grasso o vernici. -
Page 50: Installazione Del Dispositivo
Manuale di utilizzo Traduzione delle istruzioni E1 - E2 - E3 GYS AUTO originali I portatori di pacemaker devono consultare un medico prima di usare questo dispositivo di saldatura. L’esposizione ai campi elettromagnetici durante la saldatura potrebbe avere altri effetti sulla salute che non sono ancora conosciuti. - Page 51 Manuale di utilizzo Traduzione delle istruzioni E1 - E2 - E3 GYS AUTO originali • La fonte di corrente di saldatura deve essere al riparo dalla pioggia e non deve essere esposta ai raggi del sole. • Il dispositivo è di grado di protezione IP21, che significa : - una protezione contro l’accesso delle parti pericolose di corpi solidi di diametro >12.5mm e,...
- Page 52 Manuale di utilizzo Traduzione delle istruzioni E1 - E2 - E3 GYS AUTO originali Connettore gas (torcia 1) Cavo di massa (3,5 m) Connettore gas (torcia 2) Connettore Euro (torcia 1) Connettore gas (torcia 3) Connettore Euro (torcia 2) Supporto bobina Ø 200 mm (torcia 1) Connettore Euro (torcia 3) Supporto bobina Ø...
- Page 53 Il dispositivo può saldare l’acciaio inossidabile da Ø 0.6 a 1,0 mm (I-A). E1 / E2 : Il dispositivo è fornito con dei rulli di Ø 0.6/0.8 per acciaio o inox. E3 : Il dispositivo è fornito con dei rulli di Ø 0.6/0.8 e Ø 0.8/1.0 per acciaio o inox.
- Page 54 Manuale di utilizzo Traduzione delle istruzioni E1 - E2 - E3 GYS AUTO originali Quando si utilizza la guaina rossa o blu (saldatura alluminio), si raccomanda di utilizzare l’accessorio 90950 (I-C). Questa guida per guaina inox migliora il centraggio della guaina e facilita il flusso del filo.
- Page 55 Traduzione delle istruzioni E1 - E2 - E3 GYS AUTO originali PROCESSI DI SALDATURA Per avere maggiori informazioni sulle sinergie GYS e i processi di saldatura, scannerizzare il QR code: 3 MODALITÀ DI SALDATURA (EASY) • Saldatura (in continuo) • Puntatura Questa modalità...
-
Page 56: Anomalie, Cause, Rimedi
Manuale di utilizzo Traduzione delle istruzioni E1 - E2 - E3 GYS AUTO originali ANOMALIE, CAUSE, RIMEDI SINTOMI POSSIBILI CAUSE RIMEDI Pulire il tubo contatto oppure cambiarlo e Dei residui ostruiscono il foro. rimettere del prodotto anti-adesione. Il filo scivola nei rulli. -
Page 57: Condizioni Di Garanzia
Manuale di utilizzo Traduzione delle istruzioni E1 - E2 - E3 GYS AUTO originali RULLI (B) OPZIONALE Riferimento (x2) Diametro Acciaio Alluminio ø 0.6/0.8 042087 ø 0.8/1.0 042360 042377 ø 1.0/1.2 040915 CONDIZIONI DI GARANZIA La garanzia copre ogni difetto di fabbricazione per 2 anni, a partire dalla data d’acquisto (pezzi e mano d’opera). - Page 58 Instrukcja obsługi E1 - E2 - E3 GYS AUTO Tłumaczenie instrukcji oryginalnej OSTRZEŻENIA - ZASADY BEZPIECZEŃSTWA WPROWADZENIE I OPIS OGÓLNY Niniejsza instrukcja musi być przeczytana i zrozumiana przed rozpoczęciem eksploatacji. Nie wolno przeprowadzać żadnych modyfikacji ani konserwacji, które nie zostały określone w ins- trukcji.
-
Page 59: Bezpieczeństwo Elektryczne
Instrukcja obsługi E1 - E2 - E3 GYS AUTO Tłumaczenie instrukcji oryginalnej Butle powinny być przechowywane w otwartych lub dobrze wentylowanych pomieszczeniach. Muszą one być w pozycji pionowej i utrzymywane na wsporniku lub na wózku. Spawania nie należy przeprowadzać w pobliżu smarów lub farb. -
Page 60: Instrukcja Obsługi
Instrukcja obsługi E1 - E2 - E3 GYS AUTO Tłumaczenie instrukcji oryginalnej • podłączyć kabel powrotny do przedmiotu obrabianego jak najbliżej miejsca, które ma być spawane; • nie pracować obok źródła prądu spawania, nie siadać na nim ani nie opierać się o nie;... - Page 61 Instrukcja obsługi E1 - E2 - E3 GYS AUTO Tłumaczenie instrukcji oryginalnej INSTALACJA MATERIAŁU • Umieścić źródło prądu spawania na podłodze, której maksymalne nachylenie wynosi 10°. • Zapewnić wystarczającą strefę do chłodzenia źródła prądu spawania i do łatwego dostępu do panelu sterowania.
- Page 62 Instrukcja obsługi E1 - E2 - E3 GYS AUTO Tłumaczenie instrukcji oryginalnej Złącze gazu (palnik 1) Eurozłącze (palnik 1) Złącze gazu (palnik 2) Złącze Euro (palnik 2) Uchwyt szpuli Ø 200 mm (palnik 1) Przejście przez przegrodę gazową Uchwyt szpuli Ø 200/300 mm (palnik 2)
- Page 63 Urządzenie to może spawać drut stalowy i nierdzewny od Ø 0,6 do 1,0 mm (II-A). E1 / E2 : Urządzenie jest dostarczane z rolkami Ø 0,6/0,8 do stali lub stali nierdzewnej. E3 : Urządzenie jest dostarczane z rolkami Ø 0,6/0,8 do stali lub stali nierdzewnej.
-
Page 64: Podłączenie Gazu
Instrukcja obsługi E1 - E2 - E3 GYS AUTO Tłumaczenie instrukcji oryginalnej SPAWANIE PÓŁAUTOMATYCZNE ALUMINIUM (TRYB MIG) Urządzenie to może spawać drut aluminiowy od Ø 0,8 do 1,2 mm (II-B) (Ø 1,2 mm, spawanie nieintensywne). E2 / E3 : Urządzenie jest dostarczane z rolkami Ø 0,8/1,0 do aluminium. - Page 65 Dostęp do niektórych parametrów spawania zależy od wybranego trybu wyświetlania: Ustawienia/Tryb wyświetlania: Easy lub Expert. Więcej infor- macji na ten temat można znaleźć w rozdziale HMI. METODY SPAWANIA Aby uzyskać więcej informacji na temat synergii GYS i procesów spawalniczych, zeskanuj kod QR : 3 TRYBY SPAWANIA (EASY) • Spawanie (ciągłe) •...
- Page 66 Instrukcja obsługi E1 - E2 - E3 GYS AUTO Tłumaczenie instrukcji oryginalnej KONTROLA PRZEPŁYWU GAZU Na ekranie głównym długie naciśnięcie przycisku n°1 pozwala na regulację przepływu gazu na manometrze bez odwijania przewodu zasilającego. Procedura po uruchomieniu jest wyjaśniana za pomocą animacji na ekranie. Przepływ gazu powinien być okresowo sprawdzany, aby zapewnić op- tymalne spawanie.
-
Page 67: Warunki Gwarancji
Instrukcja obsługi E1 - E2 - E3 GYS AUTO Tłumaczenie instrukcji oryginalnej ROLKI (B) OPCJA Nr kat. (x2) Średnica Stali Aluminium ø 0.6/0.8 042087 ø 0.8/1.0 042360 042377 ø 1.0/1.2 040915 WARUNKI GWARANCJI Gwarancja obejmuje wszystkie usterki lub wady produkcyjne przez okres 2 lat od daty zakupu (części i robocizna). -
Page 68: Pièces De Rechange
Pièces de rechange E1 - E2 - E3 GYS AUTO SPARE PARTS / ERSATZTEILE / PIEZAS DE REPUESTO / ЗАПАСНЫЕ ЧАСТИ / RESERVE ONDERDELEN / PEZZI DI RICAMBIO E1 GYS AUTO E2 GYS AUTO... - Page 69 Pièces de rechange E1 - E2 - E3 GYS AUTO E3 GYS AUTO Support bobine / Wire reel holder 71613 Protection écran / Screen protector 56296 Poignée / Handle 56047 IHM / HMI E0123C Molette / Knob 56294 Interrupteur / Switch...
- Page 70 Pièces de rechange E1 - E2 - E3 GYS AUTO 16 - CIRCUIT PRINCIPAL / MAIN CIRCUIT 16-1 16-9 16-8 16-2 16-7 16-10 16-3 16-6 16-4 16-5 16-1 Flanc B / Side B K0662 16-2 Carte de contrôle / Control board...
-
Page 71: Schéma Électrique
Schéma électrique E1 - E2 - E3 GYS AUTO CIRCUIT DIAGRAM / SCHALTPLAN / DIAGRAMA ELECTRICO / ЭЛЕКТРИЧЕСКАЯ СХЕМА / ELEKTRISCHE SCHEMA / SCEMA ELETTRICO... - Page 72 Schéma électrique E1 - E2 - E3 GYS AUTO...
- Page 73 Schéma électrique E1 - E2 - E3 GYS AUTO...
-
Page 74: Spécifications Techniques
Spécifications Techniques E1 - E2 - E3 GYS AUTO TECHNICAL SPECIFICATIONS / TECHNISCHE DATEN / ESPECIFICACIONES TÉCNICAS / ТЕХНИЧЕСКИЕ СПЕЦИФИКАЦИИ / TECHNISCHE GEGEVENS / SPECIFICHE TECNICHE Primaire / Primary / Primär / Primario / Первичка / Primaire / Primario Tension d’alimentation / Power supply voltage / Versorgungsspannung / Tensión de red eléctrica / Напряжение питания / Voedingss-... - Page 75 Spécifications Techniques E1 - E2 - E3 GYS AUTO Classe d’isolation minimale des enroulements / Minimum coil insulation class / Clase mínima de aislamiento del bobinado / Minimale isola- tieklasse omwikkelingen / Classe minima di isolamento degli avvolgimenti / Minimalna klasa izolacji okablowania Dimensions (Lxlxh) / Dimensions (LxWxH) / Abmessungen (Lxbxt) / Dimensiones (Lxlxh) / Размеры...
- Page 76 Pictogrammes E1 - E2 - E3 GYS AUTO SYMBOLS / ZEICHENERKLÄRUNG / ICONOS / СИМВОЛЫ / PICTOGRAMMEN / ICONE Attention ! Lire le manuel d’instruction avant utilisation. Warning ! Read the user manual before use. ACHTUNG ! Lesen Sie diese Anleitung sorgfältig durch vor Inbetriebnahme des Geräts.
- Page 77 Pictogrammes E1 - E2 - E3 GYS AUTO L’appareil respecte la norme EN 60974-5. This product is compliant with standard EN 60974-5. Das Gerät entspricht der Norm EN 60974-5. El aparato es IEC 60974-5 conforme a las normas EN60974-5. Аппарат соблюдает нормы EN 60974-5.
- Page 80 GYS France GYS Italia Siège social / Headquarter Filiale / Filiale 1, rue de la Croix des Landes - CS 54159 Vega – Parco Scientifico Tecnologico di 53941 Saint-berthevin Cedex Venezia France Via delle Industrie, 25/4 30175 Marghera - VE www.gys.fr...
-
Page 81: Version Du Logiciel
Lire et respecter les instructions de la notice générale, en particulier les consignes de sécurité ! Utilisation et exploitation exclusivement avec les produits suivants E1 GYS AUTO E2 GYS AUTO E3 GYS AUTO Version du logiciel Cette notice décrit les versions de logiciel suivantes :... - Page 82 Utilisation de l’interface machine Commande du générateur L’écran principal contient toutes les informations nécessaires avant, pendant et après le soudage. L’interface est configurable avec 2 modes d’affichage : Easy ou Expert. Easy Expert Épaisseur Épaisseur Soudage Torche utilisée (E2 / E3) Torche utilisée (E2 / E3) Horaire Horaire...
-
Page 83: Menu Général
Menu général La navigation entre les différents blocs s’effectue grâce à la molette. À partir de l’écran principal, un appui long sur la molette permet d’accéder au menu général. Un appui court sur le bouton-poussoir n°1 ( ) permet de revenir au menu précédent ou d’accéder à l’écran principal. Paramètres Système Portabilité... - Page 84 Utilisation de l’interface machine Système Nom de l’appareil Information relative au nom de l’appareil et possibilité de le personnaliser. Horloge Réglage de l’heure, la date et format (AM / PM). Information Données de configuration des composants système du produit : - Modèle - Numéro de série - Nom de l’appareil...
-
Page 85: Chargement Du Fil
Contrôle du débit de gaz Dans l’écran principal, un appui long sur le bouton poussoir n°1 permet de régler son débit de gaz sur le manomètre sans dérouler de fil d’apport. La procédure une fois lancée est expliquée avec une animation sur l’écran. -
Page 86: Codes Erreur
Le tableau suivant présente une liste non exhaustive de messages et codes d’erreur qui peuvent apparaitre. Effectuer ces vérifications et contrôles avant de faire appel à un technicien spécialisé GYS agréé. Si l’utilisateur doit ouvrir son produit, il est obligatoire de couper l’alimentation en débranchant la prise électrique et d’attendre 2 minutes par sécurité. -
Page 87: Software Version
A general manual is included with the product. Read and follow the general manual’s instructions, particularly the safety instructions! For use and application to the following products only E1 GYS AUTO E2 GYS AUTO E3 GYS AUTO Software version This manual covers the following software versions:... - Page 88 Using the machine interface Control of the power source The main screen displays all the information needed before, during, and after welding. The interface is adjustable with 2 different display modes: Easy or Expert. Easy Expert Thickness Thickness Welding Torch used (E2 / E3) Torch used (E2 / E3) Schedule Schedule...
-
Page 89: General Menu
General menu The navigation between the different sections is done with the thumbwheel. From the home screen, a long press on the thumbwheel takes you to the main menu. Briefly pressing button no. 1 ( ) returns to the previous menu or accesses the main screen. Settings System Portability... -
Page 90: Import Config
Using the machine interface System Device name: Device name information and customisation options. Clock: Setting the time, date and format (AM/PM). Information Configuration data of the system components: - Model - Serial number - Device name - Software version Press push-button no. 2 : Exporting the machine configuration to the USB stick (not supplied) Reset Resets product settings:... -
Page 91: Gas Flow Control
Gas flow control In the main screen, a long press on button N°1 allows you to adjust the gas flow on the manometer without unwinding the supply wire. Once started, the proceedure is illustrated with an animation on the screen. The gas flow setting should be checked periodically to ensure optimal welding. Wire loading To unwind the wire in the MIG/MAG torch without using gas, please follow the procedure below: 1- In the non-welding position, hold the trigger down without releasing it. -
Page 92: Error Codes
The following table shows a non-exhaustive list of messages and error codes that may appear. Carry out these checks and inspections before calling in an authorised GYS technician. If the user needs to open the product, they must turn off the power supply by disconnecting the electrical plug from the socket, and wait two minutes for safety. - Page 93 Dokumentation. Eine allgemeine Anleitung liegt dem Gerät bei. Lesen und beachten Sie die allgemeine Anleitung, vor allem die Sicherheitshinweise! Nutzung und Betrieb ausschließlich mit den folgenden Produkten E1 GYS AUTO E2 GYS AUTO E3 GYS AUTO Software-Version In dieser Anleitung werden die folgenden Software-Versionen beschrieben:...
- Page 94 Bedienung des Bedienfeldes Steuerung der Stromquelle Der Hauptbildschirm enthält alle Informationen, die Sie vor, während und nach dem Schweißen benötigen. Die Schnittstelle ist mit 2 Anzeigemodi konfigurierbar: Easy oder Expert. Easy Expert Stärke Stärke Schweißen Verwendeter Brenner (E2 / E3) Verwendeter Brenner (E2 / E3) Uhrzeit Uhrzeit...
- Page 95 Menü „ Allgemein“ Die Navigation zwischen den verschiedenen Blöcken erfolgt mit dem Drehpoti. Vom Hauptbildschirm aus gelangt man durch langes Drücken auf das Drehpoti in das Menü „Allgemein“. Durch kurzes Drücken der Drucktaste Nr. 1 ( ) kehrt man zum vorherigen Menü zurück oder gelangt zum Haupt- bildschirm.
- Page 96 Bedienung des Bedienfeldes System Name des Geräts Information zum Namen des Geräts und zur Möglichkeit der Personalisierung. Uhrzeit Einstellung der Uhrzeit und des Datums im Format (AM / PM). Information Konfigurationsdaten der Systemkomponenten des Geräts: - Modell - Seriennummer - Name des Geräts - Software-Version Drücken auf die Drucktaste Nr.
- Page 97 Kontrolle des Gasflusses Im Hauptbildschirm kann man durch langes Drücken der Drucktaste Nr. 1 seinen Gasdurchsatz auf dem Manometer einstellen, ohne Schweißdraht- Vorschub. Der Vorgang wird beim Start durch eine Anima- tion auf dem Bildschirm erklärt. Der Gasfluss muss regelmäßig überprüft werden, um ein optimales Schweißen zu gewährleisten.
- Page 98 Bedienung des Bedienfeldes Fehlercodes Führen Sie diese Prüfungen und Kontrollen durch, bevor Sie einen autorisierten Servicetechniker von GYS heranzie- hen. Wenn der Bediener sein Gerät öffnen muss, ist es zwingend vorgeschrieben, die Stromzufuhr durch Ziehen des Netzsteckers zu unterbrechen und zur Sicherheit 2 Minuten zu warten.
- Page 99 Lees de instructies zoals beschreven in deze algemene handleiding en respecteer ze te allen tijde, in het bijzonder de veiligheidsmaatregelen ! Gebruik uitsluitend met de volgende pro- ducten E1 GYS AUTO E2 GYS AUTO E3 GYS AUTO Software versie Deze handleiding beschrijft de volgende software versies :...
- Page 100 Gebruik van het bedieningspaneel van het apparaat Bediening van de generator Het hoofdscherm bevat alle informatie die u nodig heeft voor, tijdens en na het lassen. De bediening kan worden ingesteld met 2 weergave-modules : Easy of Expert. Easy Expert Dikte Dikte Lassen...
- Page 101 Algemene menu U kunt met het draaiwieltje door de verschillende blokken navigeren. Als u in het hoofdmenu bent, kunt u met een langere druk op het wieltje toegang krijgen tot het algemene menu. Met een korte druk op de drukknop n°1 ( ) kunt terugkeren naar het vorige menu, of naar het hoofdscherm gaan. Instellingen Systeem Portability...
- Page 102 Gebruik van het bedieningspaneel van het apparaat Systeem Naam van het apparaat Informatie betreffende de naam van het apparaat en de mogelijkheid tot personaliseren. Klok Instellen tijd, datum en formaat (AM / PM). Informatie Gegevens configuratie van de componenten van het apparaat : - Model - Serienummer - Naam van het apparaat...
- Page 103 Controle gastoevoer Op het hoofdscherm kunt u, met een langere druk op de drukknop n°1, de gastoevoer op de nanometer regelen zonder dat het draad aangevoerd wordt. Wanneer de procedure gelanceerd wordt, wordt deze uitgelegd aan de hand van een animatiefilmpje op het scherm. De toevoer van het gas moet regelmatig worden gecontroleerd om een optimale laskwaliteit te garanderen.
- Page 104 De volgende tabel toont een (niet complete) lijst met meldingen en error codes die op uw apparaat kunnen verschijnen. Voer eerst de beschreven controles uit, voordat u een beroep doet op een door GYS erkende technicus. Wanneer de lasser het apparaat moet openen, moet eerst de stroom worden afgesloten en de stekker uit het stopcontact worden gehaald.
- Page 105 Utilizzo e sfruttamente solamente con i seguenti prodotti E1 GYS AUTO E2 GYS AUTO E3 GYS AUTO Versione del software Questo manuale descrive le versioni dei seguenti software:...
- Page 106 Utilizzo dell’interfaccia macchinaù Comando del generatore Il display principale contiene tutte le informazioni necessarie per il procedimento di saldatura prima, durante e dopo la saldatura. L’interfaccia è configurabile con 2 modalità di visualizzazione: Easy o Expert. Facile Expert Spessore Spessore Saldatura Torcia utilizzata (E2 / E3) Torcia utilizzata (E2 / E3)
-
Page 107: Menù Generale
Menù generale La navigazione tra i diversi blocchi avviene con la rotella. Dalla schermata principale, premendo a lungo la rotellina si accede al menu principale. Premendo brevemente il pulsante n. 1 ( ) si torna al menu precedente o si accede alla schermata principale. Parametri Sistema Portability... - Page 108 Utilizzo dell’interfaccia macchinaù Sistema Nome dell’apparecchio Informazioni sul nome del dispositivo e sulla possibilità di personalizzarlo. Orologio Regolazione dell’ora, data e formato (AM / PM). Informazione Dati della configurazione dei componenti sistema del prodotto: - Modello - Numero di serie - Nome dell’apparecchio - Versione del software Premere il pulsante 2:...
-
Page 109: Caricamento Del Filo
Controllo del flusso di gas Nella schermata principale, una pressione prolungata sul pulsante n°1 consente di regolare il flusso di gas sul manometro senza srotolare il filo d’apporto. Una volta avviata la procedura, viene spiegata con un’animazione sullo schermo. Il flusso di gas deve essere controllato periodicamente per garantire una saldatura ottimale. -
Page 110: Codici Errore
La seguente tabella presenta una lista non esaustiva dei messaggi e codici di errore che possono apparire. Effettuare queste verifiche e controlli prima di ricorrere all’aiuto di un tecnico specializzato GYS autorizzato. Se l’utilizzatore deve aprire il suo prodotto, è obbligatorio staccare l’alimentazione scollegando la presa di corrente elettrica e aspettare 2 minuti per sicurezza. -
Page 111: Wersja Oprogramowania
Wraz z produktem dostarczana jest ogólna instrukcja obsługi. Przeczytać i przestrzegać wskazówek zawartych w instrukcji ogólnej, zwłaszcza wskazówek dotyczących bezpieczeństwa! Stosowanie i eksploatacja tylko z następującymi produktami E1 GYS AUTO E2 GYS AUTO E3 GYS AUTO Wersja oprogramowania W niniejszej instrukcji opisano następujące wersje oprogramowania:... - Page 112 Korzystanie z interfejsu maszyny Sterowanie źródła prądu Główny ekran zawiera wszystkie niezbędne informacje przed, podczas i po spawaniu. Interfejs jest konfigurowalny z 2 trybami wyświetlania: Easy lub Expert. Łatwy Expert Grubość Grubość Spawanie Używany palnik (E2 / E3) Używany palnik (E2 / E3) Harmonogram Harmonogram Bieżące ustawienia...
-
Page 113: Tryb Wyświetlania
Menu ogólne Nawigacja pomiędzy poszczególnymi blokami odbywa się za pomocą pokrętła. Z ekranu głównego, długie naciśnięcie na pokrętło przenosi nas do menu głównego. Naciśnięcie przycisku nr 1 ( ) powoduje krótki powrót do poprzedniego menu lub przejście do ekranu głównego. Parametry System Portability... - Page 114 Korzystanie z interfejsu maszyny System Nazwa urządzenia Informacja o nazwie urządzenia i możliwości jego personalizacji. Zegar Ustawienie czasu, daty i formatu (AM/PM). Informacja Dane konfiguracyjne dla elementów systemu produktu: - Model - Numer seryjny - Nazwa urządzenia - Wersja oprogramowania Nacisnąć...
- Page 115 Kontrola przepływu gazu Na ekranie głównym długie naciśnięcie przycisku n°1 pozwala na regulację przepływu gazu na mano- metrze bez odwijania przewodu zasilającego. Procedura po uruchomieniu jest wyjaśniana za pomocą animacji na ekranie. Przepływ gazu powinien być okresowo sprawdzany, aby zapewnić optymalne spawanie.
-
Page 116: Kody Błędów
Kody błędów Poniższa tabela przedstawia niewyczerpującą listę komunikatów i kodów błędów, które mogą się pojawić. Wykonać te sprawdzenia i kontrole przed wezwaniem autoryzowanego technika GYS. W przypadku konieczności otwarcia produktu przez użytkownika należy obowiązkowo odciąć zasilanie poprzez wyjęcie wtyczki elektrycznej i odczekać 2 minuty dla bezpieczeństwa. - Page 117 împreună cu acest produs. Citiți și respectați instrucțiunile din manualul general de utilizare, în special informațiile cu privire la securitate ! Utilizarea și exploatarea exclusivă a următoarelor produse E1 GYS AUTO E2 GYS AUTO E3 GYS AUTO Versiune software Acest manual descrie versiunea softului :...
- Page 118 Utilizarea interfeței echipamentului Comenzile generatorului Ecranul principal conține toate informațiile necesare înainte, în timpul și după sudare. Interfața este configurabilă cu 2 moduri de afișare: Easy sau Expert. Ușor Expert Grosime Grosime Sudură Pistolet utilizat (E2 / E3) Pistolet utilizat (E2 / E3) Orar Orar Reglaj în curs...
-
Page 119: Meniu Principal
Meniu principal Navigarea între diferitele blocuri se face cu ajutorul rotiței. Din ecranul principal, o apăsare lungă pe rotița vă duce la meniul principal. O apăsare scurtă a butonului nr. 1 ( ) permite revenirea la meniul anterior sau accesarea ecranului principal. Parametri Sistem Portabilitate... - Page 120 Utilizarea interfeței echipamentului Sistem Nume aparat Informații despre numele dispozitivului și posibilitatea de a-l personaliza. Ceas Reglaj oră, dată și format (AM/PM). Informații Datele de configurare a componentelor aparaturii : - Model - Serie - Nume echipament - Versiune soft Apăsați butonul nr.
- Page 121 Controlul debitului de gaz În ecranul principal, o apăsare lungă pe butonul nr. 1 vă permite să reglați debitul de gaz pe manometru fără a derula cablul de alimentare. Odată lansat procedeul, pe ecran se vor afișa o serie de explicații animate.
-
Page 122: Coduri De Eroare
Tabelul următor prezintă o listă neexhaustivă de mesaje și coduri de eroare care pot apărea. Efectuați aceste verificări și controale înainte de a apela un tehnician autorizat GYS. Dacă utilizatorul trebuie să demonteze postul, acesta este obligat să oprească alimentarea decuplând postul de la priză și să aștepte 2 minute din motive de securitate.
Need help?
Do you have a question about the E1 and is the answer not in the manual?
Questions and answers