Table of Contents
Advertisement
Quick Links
Advertisement
Table of Contents

Related Manuals for Azbil AUD300C1000


Summary of Contents for Azbil AUD300C1000
- Page 1 No. CP-UM-5274JE 火炎検出器 ア ドバンス トUVセンサ 形 AUD300C1000 取扱説明書 このたびは当社製品をご購入いただき、 まことにありがとうございます。この取 扱説明書には、製品を安全に正しくご使 用いただくための必要事項が記載されて おります。 当社製品を使用した操作盤、装置の設計、 保守を担当される方は、必ずお読みにな り、理解したうえでご使用ください。 また、この取扱説明書は、取り付け時だ けでなく、保守、トラブル時の対応など の際に必要です。いつもお手元において ご活用ください。...
- Page 2 ご注文・ご使用に際しては、下記 URL より 「ご注文・ご使用に際してのご承諾 事項」 を必ずお読みください。 https://www.azbil.com/jp/product/factory/order.html お願い この取扱説明書は、本製品をお使いになる担当者のお手元に確実に届くようお 取りはからいください。 この取扱説明書の全部、または一部を無断で複写、または転載することを禁じ ます。この取扱説明書の内容を将来予告なしに変更することがあります。 この取扱説明書の内容については、万全を期しておりますが、万一ご不審な点 や記入もれなどがありましたら、当社までご連絡ください。 お客さまが運用された結果につきましては、責任を負いかねる場合がございま すので、ご了承ください。 © 2018-2019 Azbil Corporation. All Rights Reserved.
- Page 3 この取扱説明書の表記について ■ あなたや他の人々への危害や財産への損害を未然に防止するために、安全上の注意 を次の区分で説明しています。 警告 取り扱いを誤った場合に、使用者が死亡または重傷を負う危険の 状態が生じることが想定される場合。 注意 取り扱いを誤った場合に、使用者が軽傷を負うか、または物的損 害のみが発生する危険の状態が生じることが想定される場合。 ■ 本書では次の記号、および表記方法で説明しています。 : このような表示は、取り扱い上、気を付けていただきたい 「注意」 を表す内容です。 : このような表示は、 してはいけない 「禁止」 を表す内容です。 : このような表示は、必ず実行していただきたい 「指示」 を表 す内容です。 取り扱い上の注意 : 取り扱い上、注意していただきたい事柄を示しています。 : 参照していただきたい項目およびページを示しています。 ①②③ : 操作の手順、または図などの説明のため対応する部分を示 しています。 ≫ : 操作の結果、および操作後の状態を示しています。...
- Page 4 安全上の注意 警告 本器は当社のバーナコントローラ以外の機器とは組み合わせないでください。 本器はバーナ火炎以外の紫外線を検出しないようにしてください。本器が他 の紫外線に応答しているとバーナが断火したにもかかわらず炎ありとみなし、 燃料を出し続け爆発の原因となります。 本器の取り付け、取り外し、および結線のときは、本器および接続機器の電 源をすべて切ってください。感電することがあります。 結線は装置の電源を切った状態で行ってください。 感電するおそれがあります。 爆発防止のためにパイロットターンダウンテストは確実に実施してください。 メインバーナに着火できない小さなパイロット炎を本器が検出すると、たと えメインバーナが断火していてもバーナコントローラは断火とみなさないた め、燃料を出し続けることになり爆発を生じる危険な状態になります。 繰り返しパイロットターンダウンテストを行うときは、その都度装置をいっ たん完全に停止させ、燃焼室内や煙道にたまった未燃ガスや油を完全に排出 してください。未燃ガスや油を完全に排出しないと爆発の危険があります。 バーナコントローラの電源を切った直後に本器やバーナコントローラの F 端 子、G 端子には触らないでください。電源を切ったあとも 1 分以内は F 端子、 G 端子に電荷が残っており感電するおそれがあります。 結線のチェックで、本器の F 端子、G 端子の電圧を測定するときは、端子部 に手を触れないでください。感電するおそれがあります。 カバーを取り付けずに使用しないでください。感電するおそれがあります。本器 からカバーを外した場合、カバーを取り付け、固定ねじ4本で固定してください。 注意 本器はバッチ運転 (24 時間以内に 1 回以上発停する装置) 、 および連続運転 (24 時間以上連続して燃焼が継続する装置)...
- Page 5 注意 次のような場所へは取り付けないでください。 ・ 特 殊薬品や腐食性ガスのある場所 (アンモニア、 硫黄、 塩素、 エチレン化合物、 酸、その他) ・水滴や過度の湿気がある場所 ・高温にさらされる場所 ・振動が長時間続く場所 紫外線の透過を妨げる蒸気、ばい煙、霧化した油、ほこり、有機溶剤などが 監視視野内にある場合は、十分な対策をしてください。 多本バーナの場合、本器は監視するバーナの炎だけを検出するような位置に 取り付けてください。 結線は、すべて定められた基準に従ってください。 本器の信号線は、点火トランスの高圧ケーブルや動力線とは分離し、別配管 で配線してください。 結線したあとには、結線が間違っていないことを確認してください。 誤った結線は、破損や誤動作の原因となります。 パイロットターンダウンテストは、燃焼装置・燃焼安全に関する知識と技術 を習得した経験のある専門の方が行ってください。 本器を燃焼装置に装着したまま運搬しないでください。運搬時の衝撃や振動 により正常に動作しなくなることがあります。運搬時は本器を取り外し、専 用の梱包箱に入れて輸送してください。 本器に組み込まれているチューブユニット、シャッタユニットの有効使用期 限は 3 年です。安全対策上、この期限内に新しいものと交換してください。 交換はチューブユニット、シャッタユニットが組み込まれている AUD メンテ ナンスキット形 AUD60A1000 を使用して実施してください。...
- Page 6 確認してください 商品の開梱時に次の点について確認してください。 1. ご注文の商品に間違いがないか、形番をチェックする 2. 商品に破損がないかどうか、外観をチェックする 3. 付属品が規定どおりあるか、チェックする 付属品は、次のとおりです。 開梱後は、付属品を紛失したり破損したりしないように、十分注意して取り扱ってくだ さい。 万一、異常や間違いがあった場合は、直ちにお買い上げの販売店までご連絡ください。 品 名 形 番 数 量 備 考 本 体 AUD300C1000 シリーズ ■ 形番構成 (1 ページ) 取扱説明書 CP-UM-5274JE 本書です 有効使用期限ラベル 81409735-001 保守管理に使用してください この取扱説明書の位置づけ 関連の取扱説明書は次のとおりです。用途に応じて必要な取扱説明書をお読みください。 バーナコントローラアドバンストUVリレー 形 AUR300C/350C 資料番号 CP-UM-5495 ダイナミックセルフチェックバーナコントローラ 形 AUR450C 資料番号 CP-UM-5936JE ダイナミックセルフチェックバーナコントローラ 形AUR450C 資料番号...
- Page 7 目 次 この取扱説明書の表記について 安全上の注意 確認してください この取扱説明書の位置づけ 第 1 章 概 要 ■ 概 要 ■ 特 長 ■ 各部の名称 ■ 形番構成 第 2 章 取り付け ■ 取り付けの前に ■ バーナ火炎の監視方法 ■ 取付位置 ■ 取付姿勢 ■ 監視パイプの取り付け ■ 取付方法 第 3 章 結 線 ■ 結線図 ■ 結線のチェック 第...
- Page 8 ■ AUDメンテナンスキット 形AUD60A1000によるシャッタユニット、 チューブユニットの交換 第 7 章 仕 様 ■ 仕 様 ■ 外形寸法図 ■ 中国 RoHS...
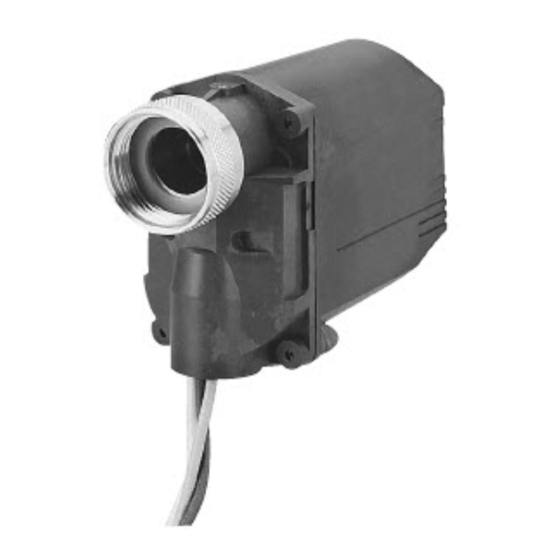
- Page 9 第 1 章 概 要 ■ 概 要 火炎検出器アドバンスト UV センサ AUD300C1000 シリーズ (以 下、本器と呼びます) は油・ガスバーナ火炎の紫外線を検出す る連続運転・バッチ運転用火炎検出器です。専用のバーナコン トローラと組み合わせ、UV センサとバーナコントローラに異 常がないか、起動時のスタートチェックと内蔵シャッタによる 連続自己点検 (ダイナミックセルフチェック) をしながら、燃焼 監視をする信頼性の高い燃焼安全制御をします。 ■ 特 長 • 保守部品として、チューブユニット、シャッタユニット内蔵 のメンテナンスキットを用意していますので、交換・メンテ ナンスが簡単です。 • セルフチェック用の火炎センサとして小形・軽量のためバー ナ取り付けでの制約が少なくなります。 • 使用周囲温度 100 ℃ (火炎検出中は 120 ℃) 、保護構造 IP66 と耐環境性能に優れています。...
- Page 10 第 1 章 概 要 ● 認 証 • UL : File No. MH27717 • * : ・Gas Appliance Directive 0063BS1427 ( AUR450C シリーズと Q241A104 と の組み合わせ) 0063CN6671 ( RX-R4□Cシリー ズとの組み合わせ ) ・RoHS Directive • FM : File No. 0003059531 * CE ロゴは RoHS 対応として表示しています。 ●...
- Page 11 第 2 章 取り付け 警告 本器の取り付け・取り外し、および結線のときは、本器および接続機器の電源 をすべて切ってください。感電することがあります。 次のようなバーナ火炎以外の紫外線の発生源、および雰囲気の場所で使用する 場合は、十分な対策をしてください。 ・紫外線の発生源 1371 ℃以上に赤熱した炉壁 ・ガンマ線、X 線の発生源 回析分析計、電子顕微鏡、レントゲン撮影機、高電圧真空スイッチ、 高電圧コンデンサ、放射性同位元素など ・紫外線の透過を妨げる雰囲気 蒸気、ばい煙、霧化した油、ほこりなど 火炎検出器は、点火スパークを検出しない角度に取り付けてください。 本器はバーナ火炎以外の紫外線を検出しないようにしてください。本器が他の 紫外線に応答しているとバーナが断火したにもかかわらず炎ありとみなし、燃 料を出し続け爆発の原因となります。 注意 本器は関連する法令や規格に従って設置してください。 本器を破棄するときは、産業廃棄物として各自治体の条例に従って適切に処理 してください。 取り付け、結線、点検、調整、保守などは燃焼装置・燃焼安全装置に関する技 術を習得した専門の方が行ってください。 蒸気、ばい煙、霧化した油、ほこり、有機溶剤など紫外線の透過を妨げる雰囲 気の場所で使用する場合は、十分な対策をしてください。 多本バーナの場合、本器は監視するバーナの炎だけを検出するような位置に取 り付けてください。 次のような場所へは取り付けないでください。 ・ 特殊薬品や腐食性ガスのある場所 (アンモニア、 硫黄、 塩素、 エチレン化合物、 酸、その他) ・...
- Page 12 第 2 章 取り付け ■ 取り付けの前に • 本器を適切に取り付けるために、バーナやボイラなど装置 メーカの取扱説明書もご覧ください。それらの取扱説明書に 従って正しい取り付けを計画してください。 • 本器は実際に炎を監視することが必要です。バーナ周りの全 体配置、温度やその他の制約が許される限り炎に近づけてく ださい。紫外線放射量は、バーナノズルに近い方が検出量が 多くなります。 • 本器は点火トランスから離れた位置に取り付けるようにして ください。また、点火トランスはできる限りバーナの近くに 取り付けて、必ず接地してください。 ■ バーナ火炎の監視方法 ● パイロット炎だけを監視する場合 (連続パイロット、重複パイロット) 本器が検出できる最も小さいパイロット炎でメインバーナに確 実に点火できなければなりません。したがって、メインバーナ にようやく点火できるまでパイロットの燃料手動弁を絞り、そ の条件でパイロット炎の先端だけを監視するようにしてくださ い。監視視野を炎の先端にできるだけ近づけ、パイロット炎の 軸方向に沿って監視するようにしてください。 ● パイロット炎、およびメイン炎を共に監視する場合 (連続パイロット、重複パイロット) パイロット炎とメイン炎とが交差する範囲を監視するようにし てください。 ● メイン炎だけを監視する場合 (時限パイロット) メイン炎が低燃焼、高燃焼など、どのような燃焼状態でも、火 炎の最も安定した部分を監視できるようにします。 特殊燃焼の場合、高燃焼用と低燃焼用に分けて監視するために は、2 台使用することを推奨します。...
- Page 13 第 2 章 取り付け ● リダンダントシステム (重複監視) ● システムの不必要な遮断をできるだけ避け、システムの信頼性 を高めるために、重複監視をお勧めします。一本のバーナの火 炎を監視するのに本器とバーナコントローラの組み合わせを 2 セットで行うとリダンダントなシステムを構成できます。 一台の火炎検出器から火炎信号が出ないか、疑似信号が存在す る場合は警告を発し、システムとしては燃焼を続けます。 2 台のバーナコントローラが同時に消炎を検出したときは、シ ステムを遮断するようにします。こうすると本器や燃焼安全制 御器の故障、炎の揺動に起因する不必要な遮断を防ぐことがで きます。 ■ 取付位置 ■ 本器は次の項目に十分に配慮し、最適な取付位置を決めてくだ さい。 ● 温 度 ● 使用周囲温度− 20 ℃〜+ 100 ℃ (火炎検出中は 120 ℃) 内の場 所に取り付けてください。 ■取り扱い上の注意 • 温度範囲を守らないと本器に組み付いているチューブユニット やシャッタユニットの故障や不必要な遮断の原因になります。 • 火炎を検出していないときは、周囲温度を...
- Page 14 第 2 章 取り付け ● 屋 外 雨よけ用の屋根またはひさしを設けてください。 取り扱い上の注意 • 太陽光などの影響でケース表面が変色することがあります が、製品の機能上、使用には支障ありません。 ■ 取付姿勢 本器は電線管取付口を下向きにして、垂直面に合わせて取り付 けてください。 監視パイ プ 傾け禁止 取付部 垂直面取り付け 電線管取付口 横向き禁止 正面側 逆さ禁止 側面側からの取付角度の許容範囲は、上方向 90° から下方向は 45° までです。 上方向90° 90° 水平面 45° 垂直面 側面側 下方向45°...
- Page 15 第 2 章 取り付け 取り扱い上の注意 • 本器はバーナを上部斜めから監視する角度に取り付けてくだ さい。下部斜め、または水平から監視すると監視窓や監視パ イプにほこり、すすなどがたまり紫外線をさえぎり、炎を検 出できなくなることがあります。 ■ 監視パイプの取り付け ● 監視パイプの材料 監視パイプの内側の壁は黒色のものを使用してください。内側 の壁にステンレス鋼、または電気メッキしたパイプを使用する と紫外線が内部で乱反射を起こすなど誤動作の原因になります。 ● 監視パイプのサイズ 炎からの紫外線を最大量検出するために、本器の受光面の視野 を広く取ることが必要です。推奨フレーム電圧 2.0 V 以上を確 保できないときは、監視パイプを太くして十分な紫外線を確保 できるようにしてください。 • 監視パイプはできるだけ太いものを使い、本器との接続には 径違いソケットを使用して接続してください。 • 監視パイプの長さはできるだけ短くしてください。ただし、 本器の使用周囲温度 100 ℃ (検出中は 120 ℃) 以下の条件を 守ってください。 ● 取付スペース 保守点検・サービスがしやすいように、スペースを確保してく...
- Page 16 第 2 章 取り付け 取り扱い上の注意 • 本器はバーナを上部斜めから監視する角度に取り付けてくだ さい。下部斜め、または水平から監視すると監視窓や監視パ イプにほこり、すすなどがたまり紫外線をさえぎり、炎を検 出できなくなることがあります。 • 本器の監視する方向は炎の軸に対してできるだけ浅い角度で 交差するように取り付けてください。炎と本器の監視視野の 交差面が大きくなり、紫外線検出量が多くなります。 ア ドバンス トUVセンサ 火炎の監視視野が広く (大き く ) 、 紫外線検出量が多い AUD300C 良い取付位置 未燃焼の燃料 バーナ ア ドバンス トUVセンサ 火炎の監視視野が小さ い AUD300C 悪い取付位置 ● 監視パイプの位置決めのための仮溶接 ① 監視パイプの準備と取付穴あけ 選定した監視パイプ取付位置に、監視パイプ用の取付穴を あけてください。監視パイプの一端にねじを切り、できる だけ短くして希望の長さに切断してください。 ②...
- Page 17 第 2 章 取り付け ③ 監視パイプのエアパージ 監視パイプ内のエアパージは、本器の冷却や監視視野をき れいに維持するのに有効です。とくに、本器の周囲温度が 120 ℃を超える場合はエアパージなどの冷却が必要です。 • 炉内が誘引式の場合は、監視パイプにエアパージ用の穴を あけてください。 • 押込式の場合には、エアパージを供給する配管を取り付け てください。 ■ 取付方法 本器を監視パイプに取り付けるときは、次のように行ってくだ さい。 ● 確認事項 監視パイプにバリや突起がないように、あらかじめやすりなど で面取りしてください。 ● 取り付け ① 本体が回らないように片方の手で押さえてください。 ② もう一方の手で取付部のナットを約 4 回転させて、しっか り締め付けてください。 ③ 正面側からの取り付けを垂直面に合わせてください。 ( ■ 取付姿勢 (6 ページ) をご覧ください) 取り扱い上の注意...
- Page 18 第 3 章 結 線 警告 結線は装置の電源を切った状態で行ってください。 感電するおそれがあります。 結線のチェックで、本器の F 端子、G 端子の電圧を測定するときは、端子部に 手を触れないでください。感電するおそれがあります。 注意 取り付け、結線、点検、調整、保守などは燃焼装置・燃焼安全装置に関する技 術を習得した専門の方が行ってください。 本器の信号線は、点火トランスの高圧ケーブルや動力線と分離し、別配管で配 線してください。 ■ 結線図 AUD300C 白 シャッタ 白 出力端子 黄 (G) 青 (F) バーナコントローラとの結線のすべてのリード線は、必ず電線 管およびコンジットボックスの中に入れて結線してください。 また、他の動力線とは別配線にしてください。 取り扱い上の注意 • 本器への配線は、電源線や点火トランスの高圧ケーブル と同じ電線管には絶対に通さないでください。 • 点火トランスの高圧ケーブル、アース線はひとつの電線 管に入れて結線し、同時に電線管の片端を接地してくだ さい。とくに自動車用点火プラグを使用する場合は注意 してください。 •...
- Page 19 第 3 章 結 線 ■ 結線のチェック 本器に電圧を印加する前に結線が正しいことをチェックしてく ださい。 ● 手 順 ① 中継ボックス内の AUD300C から、信号線の青色リード線 と黄色リード線を取り外してください。 ② バーナコントローラの電源を入れてください。 ③ テスターまたはデジタル電圧計で中継ボックス内に配線さ れた、F 端子、G 端子間の DC 電圧を測定してください。 ④ プラスプロブを G 端子 (黄色リード線) 、マイナスプロブを F 端子 (青色リード線) に接続してください。 ≫ DC160 〜 220 V の電圧が出ていれば正しく結線されていま す。DC 電圧の読みがマイナスのときは F 端子、G 端子の結 線が逆接続されています。...
- Page 20 第 4 章 調 整 ■ フレーム電圧測定の前に フレーム電圧を測定する前に、バーナコントローラのフレーム 電圧出力端子で本器の動作を確認してください。 形 番 フレーム電圧出力端子 AUR300C 端子 9 (+) AUR350C 端子 10 (−) AUR450C +端子、−端子 ① バーナコントローラのフレーム電圧出力端子にアナログフ レームメータ FSP136A100 を接続します。 ② 本器の紫外線受光部の直前でライターなどを点火し、電圧 が出ることを確認してください。 取り扱い上の注意 • 火気使用時は、周囲に可燃ガスがないことを確認してく ださい。 ■ フレーム電圧測定 パイロット炎、メイン炎と両方の火炎があるときはそれぞれの フレーム電圧を測定してください。また、最大燃焼時、最小燃 焼時のフレーム電圧も測定してください。 ① 監視パイプに本器を仮取り付けしてください。 ② バーナを燃焼させてください。 ③...
- Page 21 第 4 章 調 整 ■ パイロットターンダウンテスト ■ この試験はガス圧、空気圧を最悪条件に変化させた状態で本器 がパイロット炎を検出したときに、必ずメインバーナへ確実に 火移りすることを確認するためのテストです。 ■警告 爆発防止のためにパイロットターンダウンテストは確実に実施してください。 メインバーナに着火できない小さなパイロット炎を本器が検出すると、たとえ メインバーナが断火していてもバーナコントローラは断火とみなさないため、 燃料を出し続けることになり爆発を生じる危険な状態になります。 繰り返しパイロットターンダウンテストを行うときは、その都度装置をいった ん完全に停止させ、燃焼室内や煙道にたまった未燃ガスや油を完全に排出して ください。未燃ガスや油を完全に排出しないと爆発の危険があります。 ■注意 取り付け、結線、点検、調整、保守などは燃焼装置・燃焼安全装置に関する技 術を習得した専門の方が行ってください。 パイロットターンダウンテストは、燃焼装置・燃焼安全に関する知識と技術を 習得した経験のある専門の方が行ってください。 パイロットターンダウンテストの手順は、組み合わせのバーナ コントローラの取扱説明書または装置メーカの取扱説明書に 従ってください。 ■ 点火スパーク応答テスト ■ ■警告 本器はバーナ火炎以外の紫外線を検出しないようにしてください。本器が他の 紫外線に応答しているとバーナが断火したにもかかわらず炎ありとみなし、燃 料を出し続け爆発の原因となります。 ● 手 順 ● ① パイロットバーナ、およびメインバーナの手動遮断弁を閉 じてください。 ② バーナを起動させ、点火動作を行わせてください。 点火スパークが開始し、そのときバーナコントローラの...
- Page 22 第 4 章 調 整 ③ フレームリレーが ON するようなら、点火スパークまたは その反射の影響を避けるように再度、本器の監視点を調整 してください。 取り扱い上の注意 • 本器が動作する火炎以外の発生源には、次のものがあり ます。すべての運転条件のもとで影響のないことを確認 してください。 例: 紫外線発生源 1371 ℃以上の赤熱炉壁 点火トランスおよび溶接アークのスパーク (電光) ガスレーザ 太陽灯 殺菌灯、紫外線ランプ、蛍光灯 強いフラッシュ光 (UV センサに向けた) ガンマ線 X 線回析、ガンマ線分析測定器 および X 線源 電子顕微鏡 レントゲン撮影機 高電圧真空スイッチ 高電圧コンデンサ 放射性同位元素 その他すべての紫外線、ガンマ線、X 線の発生源 ■ 監視パイプの本取り付け ①...
- Page 23 第 5 章 トラブルシューティング 警告 本器の取り付け・取り外し、および結線のときは、本器および接続機器の電源 をすべて切ってください。感電することがあります。 バーナコントローラの電源を切った直後に本器やバーナコントローラのF端 子、G 端子には触れないでください。電源を切ったあとも 1 分以内はF端子、 G 端子に電荷が残っており感電するおそれがあります。 注意 取り付け、結線、点検、調整、保守などは燃焼装置・燃焼安全装置に関する技 術を習得した専門の方が行ってください。 ■ 用意するもの • アナログフレームメータ FSP136A100 • 交換部品の詳細は、 ● 保守部品・オプション部品 (2 ページ) をご覧ください。 ■ 故障点検手順 ① 使用条件の点検を行ってください。 点検項目 点検内容 電源電圧 • 電源スイッチの投入は確実か • 電源端子の緩みはないか •...
- Page 24 第 6 章 保守点検 警告 本器の取り付け・取り外し、および結線のときは、本器および接続機器の電源 をすべて切ってください。感電することがあります。 バーナコントローラの電源を切った直後に本器やバーナコントローラのF端 子、G 端子には触らないでください。電源を切ったあとも 1 分以内は F 端子、 G 端子に電荷が残っており感電するおそれがあります。 カバーを取り付けずに使用しないでください。感電するおそれがあります。 本器からカバーを外した場合、カバーを取り付け、固定ねじ 4 本で固定してく ださい。 注意 取り付け、結線、点検、調整、保守などは燃焼装置・燃焼安全装置に関する技 術を習得した専門の方が行ってください。 チューブユニット、シャッタユニットの有効使用期限は 3 年です。 安全対策上、この期限内に新しいものと交換してください。交換はチューブ ユニット、シャッタユニットが組み込まれている AUD メンテナンスキット AUD60A1000 を使用して実施してください。 ■ 定期点検 ① バーナコントローラの電源を切ってください。 ② 定期的に本器の監視窓、および監視パイプを清掃してくだ さい。監視パイプから本器を取り外し、監視パイプの内側 やレンズをきれいな布で拭いてください。...
- Page 25 第 6 章 保守点検 ● 保守点検の周期 点検内容 点検周期 監視窓、監視パイプの汚れ、ねじの緩み 1 回 / 月 以上 安全遮断テスト 1 回 / 月 以上 フレーム電圧測定 1 回 / 月 以上 パイロットターンダウンテスト 1 回 / 年 以上 取り扱い上の注意 • バーナ遮断動作が起こり、装置に重大な損害が生じる場合は 点検回数を多くしてください。 • バーナメーカから保守点検について特別な指示がある場合は それに従ってください。 • 故障、修理などのお問い合わせは、当社販売員までご連絡く ださい。 ■ AUD メンテナンスキット 形 AUD60A1000 によるシャッタユニット、 チューブユニットの交換...
- Page 26 第 6 章 保守点検 ● シャッタユニット、チューブユニットの取り外し ① バーナコントローラの電源を切ってください。 ② 1 分以上経過してからカバー固定ねじ4本を外して、カバー を取り外してください。 ③ 端子ねじ 4 本 (白色リード線 2 本、青色リード線 1 本、黄色 リード線 1 本) を外して、シャッタユニットからリード線を 取り外してください。 ④ シャッタユニット固定ねじ 2 本を外してください。 ⑤ フランジユニットとシャッタユニットを上側を開くように して分離して取り外してください。 シャッタユニット 固定ねじ (2 本) O リング チューブユニット シャッタユニット F 端子...
- Page 27 第 6 章 保守点検 ③ チューブユニットを取り外したシャッタユニットをフラン ジに固定ねじ 2 本で固定します。 取り扱い上の注意 • あらかじめシャッタユニットのスリットにそれぞれの リード線を挟み込んで、下側の白いリード線をケーブル ガイドの溝に押さえ込むようにしてフランジユニットに 組み付けてください。 ④ シャッタユニットの 4 個の端子にリード線を正しく取り付 けてください。 取り扱い上の注意 • F 端子が青色リード線、 G 端子が黄色リード線です。 シャッ タユニットの極性表示ラベルの F、G に合わせて信号線を 間違えないように結線してください。 ● チューブユニット、シャッタユニットの結線確認 ① F 端子、G 端子の結線が正しいかどうかのチェックをするた め、バーナコントローラの電源を入れてください。 ② テスターまたはデジタル電圧計で F 端子、G 端子間の DC 電 圧を測定します。...
- Page 28 第 6 章 保守点検 ● チューブユニット、本体カバーの取り付け ① バーナコントローラの電源を切ってください。 ② 1 分以上経過してからチューブユニットを装着し、固定ねじ 2 本で固定してください。 ③ O リングが本体フランジに正しく取り付けていることを確 認してください。 ④ カバーを取り付け、固定ねじ 4 本で固定してください。 取り扱い上の注意 • チューブユニットには極性があります。シャッタユニッ トの上部の極性表示ラベル F、G にあわせて正しく取り付 けてください。また、シャッタユニットにはチューブユ ニットに合わせて段差が設けてあります。逆向きには取 り付きませんが、 無理に組み付けようとしないでください。 • チューブユニットに貼り付けてあるサーモラベルが白か ら黒に変わっている場合は、使用温度範囲を超えている 可能性があります。運転中のアドバンスト UV センサの周 囲温度が高いときは、エアパージなどで冷却するように してください。なお、サーモラベルは目安です。正しい 周囲温度は温度計で確認してください。 • カバーを取り付けるときフランジの...
- Page 29 第 7 章 仕 様 ■ 仕 様 項 目 内 容 適用火炎 * 1 都市ガス、天然ガス、プロパンガス、灯油、重油、コークス炉ガス、水素、 塩酸、アンモニア、ナフサ、エチレンなどの燃焼火炎 シャッタ電圧 約 DC24 V (バーナコントローラから供給) セルフチェック回数 約 80 回 /min 絶縁抵抗 フランジユニットの取付部と F 端子 (青色リード線) 間 フランジユニットの取付部と G 端子 (黄色リード線) 間 フランジユニットの取付部と S1 端子 (白色リード線) 間 フランジユニットの取付部と S2 端子 (白色リード線) 間 上記のすべてにおいて、DC500 V メガーにて...
- Page 30 第 7 章 仕 様 ■ 外形寸法図 単位:mm 153.5 140.0 54.5 24.5 (104.6) 管用 平行ね じG1 23.7 電線管取付口 1/2-14NPSM ■ 中国 RoHS...
- Page 31 改訂履歴 (CP-UM-5274JE) 印刷年月 版 数 改訂ページ 改訂内容 18-09 初 19-07 英文版の改訂に伴う改訂 (和文は修正箇所なし)...
- Page 32 東 京 支 社 ☎ (093) 285 ー 3530 九 州 支 社 ☎ (03) 6432 ー 5142 製品のお問い合わせは… コールセンター : 0466-20-2143 〈アズビル株式会社〉 https://www.azbil.com/jp/ 〈COMPO CLUB〉 https://www.compoclub.com お問い合わせは、下記または当社事業所へお願いいたします。 2018 年 9 月初版発行 (M) 2019 年 7 月改訂 2 版 (V)...
- Page 33 No. CP-UM-5274JE Advanced Ultraviolet Flame Detector Model AUD300C1000 User’s Manual Thank you for purchasing an Azbil Corporation product. This manual contains information for ensuring the correct use of this product. It also provides necessary information for installation, main- tenance, and troubleshooting.
- Page 34 If you should find an error or omission, please contact the azbil Group. In no event is Azbil Corporation liable to anyone for any indirect, special or consequential damages as a result of using this product. © 2018-2109 Azbil Corporation. All Rights Reserved.
- Page 35 Conventions Used in This Manual „ The safety precautions explained in the following section aim to prevent injury to the operator „ and others, and to prevent property damage. W ARNING Warnings are indicated when mishandling this product might result in death or serious injury. ...
-
Page 36: Safety Precautions
Safety Precautions WARNING Do not use this unit with a burner controller that is not made by Azbil Corporation. Make sure that this device does not detect ultraviolet rays other than those of the burner flame. If it responds to other ultraviolet radiation, flame failure in the burner will not be detected. - Page 37 CAUTION Do not install where the product will be exposed to any of the following: • Certain chemicals or corrosive gases (ammonia, sulfur, chlorine, ethylene com- pounds, acid, etc.). • Splashing water or excessive humidity • High temperatures • Prolonged vibration If this device is operated in an atmosphere where there is steam, sooty smoke, oil mist, dust, and/or organic solvents that interfere with ultraviolet rays, take appropriate corrective measures.
-
Page 38: Unpacking
3. Check the contents of the package against the packing list to make sure that all items are included. Items included in the Model AUD300C1000 are shown below. Handle the Model AUD300C1000 and its accessories with care to prevent damage or loss of parts. If there is any problem with your order, please contact your dealer immediately. -
Page 39: Table Of Contents
Contents Conventions Used in This Manual Safety Precautions Unpacking The Role of This Manual Chapter 1. OVERVIEW „ Overview „ „ Features „ „ Names of parts „ „ Model selection table „ Chapter 2. MOUNTING „ What to know before installation „... - Page 40 Chapter 7. SPECIFICATIONS „ Specifications „ „ External dimensions „ „ China RoHS „...
-
Page 41: Overview
The AUD300C1000 is used in combination with a dedicated burner controller. By means of the built-in shutter, any malfunction... - Page 42 Chapter 1. OVERVIEW zCertification • UL: File No. MH27717 • CE : Gas Appliance Directive 0063BS1427 (with AUR450C series and Q241A104) 0063CN6671 (with RX-R4-C series) RoHS Directive • FM: File No. 0003059531 * CE marking appears to comply with RoHS zCombined burner controller Model Name RX-R40, RX-R44, RX-R46...
-
Page 43: Mounting
Chapter 2. MOUNTING WARNING Before mounting or removing, be sure to turn off the power to this device and all connected devices. Failure to do so may result in electric shock. If this device is installed near a source of ultraviolet rays other than the burner flame or in an atmosphere that interferes with UV rays, as described below, take sufficient countermeasures. -
Page 44: X84; What To Know Before Installation „
Chapter 2. MOUNTING „ What to know before installation • For proper installation of the device, thoroughly read the instruction manuals for the burner, boiler, and other equipment provided by the combustion equipment manufacturers. Make an appropriate instal- lation plan according to those instruction manuals. •... -
Page 45: X84; Mounting Position „
Chapter 2. MOUNTING zRedundant system (redundant monitoring) Redundant monitoring is recommended to avoid unnecessary shutoff as much as possible and to ensure the reliability of the system. A re- dundant system can be made if two pairs of this device plus a burner controller are used to monitor the flame of one burner. -
Page 46: X84; Mounting Orientation „
Chapter 2. MOUNTING zOutdoor use Provide a roof, etc., to protect against rain. Handling Precautions • The surface of the case may change color due to sunshine or other causes. However, this will not affect the functioning of the product. „... -
Page 47: X84; Mounting Of The Monitoring Pipe „
Chapter 2. MOUNTING Handling Precautions • Mount this device so that it monitors the burner at an angle from above. If it monitors the burner at an angle from below or from the same level, dust, soot, etc., will accumulate on the monitoring window or in the monitoring pipe. - Page 48 Chapter 2. MOUNTING Handling Precautions • Mount this device so that it monitors the burner at an angle from above. If it monitors the burner at an angle from below or from the same level, dust, soot, etc., will accumulate on the monitoring window or in the monitoring pipe.
-
Page 49: X84; Mounting Procedure „
Chapter 2. MOUNTING (3) Carry out the air purging of the monitoring pipe. The air purging of the inside of the monitoring pipe is useful to cool this unit and keep the monitoring area clean. In particular, if the ambient temperature of this unit exceeds 120 °C, the cooling, such as air purging is needed. -
Page 50: Wiring
Chapter 3. WIRING WARNING Before doing any wiring work, be sure to disconnect the equipment power to prevent electrical shock. When measuring the voltage between terminal F and terminal G of this device in order to check the wiring, do not touch any part of the terminals. Doing so may result in an electric shock. -
Page 51: X84; Wiring Check „
Chapter 3. WIRING „ Wiring check Before applying voltage to this device, check that the wiring is correct. zSteps (1) In the relay box, disconnect the blue and yellow wires that come from the AUD300C. (2) Turn on the power to the burner controller. (3) Measure the DC voltage between terminals F and G in the relay box using a circuit tester or a digital voltage meter. -
Page 52: Adjustment
Chapter 4. ADJUSTMENT „ Before measuring the flame voltage Before measuring the flame voltage, execute an operational check of this device using the flame voltage output terminals of the burner controller. Model No. Flame voltage output terminals AUR300C Terminal 9 (+) AUR350C Terminal10 (−) AUR450C... -
Page 53: X84; Pilot Turndown Test „
Chapter 4. ADJUSTMENT „ Pilot turndown test This test is intended to check that any pilot flame detected by this device will reliably ignite the main burner, even if the gas pressure and air pressure have changed to their worst possible conditions. WARNING To prevent explosion, carry out the pilot turndown test carefully. -
Page 54: X84; Permanent Mounting Of Monitoring Pipe „
Chapter 4. ADJUSTMENT (3) If the flame relay turns ON, adjust the monitoring point of this device to avoid effects from the ignition spark and its reflection. Handling Precautions • The following shows various sources other than flame that may activate this device. Check that the device’s operation is not affected by these sources under any operating conditions. -
Page 55: Troubleshooting
Chapter 5. TROUBLESHOOTING WARNING Before removing, mounting, or wiring this device, be sure to turn off the power to the device and all connected devices. Failure to do so may cause electric shock. Do not touch terminals F or G on this device or on the burner controller imme- diately after the power to the burner controller has been turned OFF. -
Page 56: Maintenance And Inspection
Chapter 6. MAINTENANCE AND INSPECTION WARNING Before mounting, removing, or wiring this device, be sure to turn OFF the power to the module and any connected devices. Failure to do so may result in an elec- tric shock. Do not touch terminals F or G on this device or on the burner controller imme- diately after the power to the burner controller has been turned OFF. -
Page 57: Maintenance Kit (Model Aud60A1000)
If the burner manufacturer provides specific instructions for maintenance and inspection, be sure to observe them. • For inquiries about device failure, repair service, etc., contact the azbil Group. „ Replacement of the shutter unit and tube unit using the AUD Maintenance Kit (Model AUD60A1000) CAUTION The service life of the tube unit and shutter unit components of this device is a maximum of 3 years. - Page 58 Chapter 6. MAINTENANCE AND INSPECTION zRemoving of shutter unit and tube unit (1) Turn off the power to the burner controller. (2) After 1 min. has elapsed, remove 4 cover mounting screws to de- tach the cover. (3) Remove the 4 terminal screws to disconnect the lead wires (2 white, 1 blue, and 1 yellow) from the shutter unit.
- Page 59 Chapter 6. MAINTENANCE AND INSPECTION (3) After removing the tube unit, mount the shutter unit only on the flange unit using the 2 retaining screws. Handling Precautions • Before mounting, insert the lead wires (blue and yellow) into the slits of the shutter unit. When mounting the unit onto the flange unit, hold the white lead wires under the shutter unit so that they stay in the cable guide groove.
- Page 60 Chapter 6. MAINTENANCE AND INSPECTION zMounting the tube unit and cover (1) Turn OFF the power to the burner controller. (2) After 1 minute or more, mount the tube unit onto the shutter unit, holding the back of the tube unit, and tighten the 2 retaining screws to secure the unit.
- Page 61 Chapter 7. SPECIFICATIONS „ Specifications Item Description Compatible flame* Flame from natural gas, propane gas, kerosene, heavy oil, coke oven gas, hydrogen, chlo- rine, ammonia, naphtha, ethylene, etc. Shutter voltage Approx. 24 V DC (supplied from burner controller) Self-checking cycle Approx. 80 cycles/min Insulation Between flange unit mounting conduit and F-terminal (or blue lead wire), resistance...
- Page 62 Chapter 7. SPECIFICATIONS „ External dimensions Unit: mm 153.5 140.0 54.5 24.5 (104.6) Parallel pipethread 23.7 Conduit tube connection port 1/2-14NPSM „ China RoHS...
- Page 63 Revision History (CP-SP-5274JE) Printed Edn. Revised pages Description Sep. 2018 July 2019 Related user’s manuals added...
- Page 64 1st edition: Sep. 2018 (M) URL: https://www.azbil.com 2nd edition: July 2019 (V)
Need help?
Do you have a question about the AUD300C1000 and is the answer not in the manual?
Questions and answers