
Subscribe to Our Youtube Channel
Related Manuals for Aura AMD-772DSP


Summary of Contents for Aura AMD-772DSP
- Page 1 OWNER’S MANUAL AMD-772DSP CAR BLUETOOTH / USB RECEIVER WARNING! PLEASE READ CAREFULLY BEFORE USING...
- Page 2 Copyrights is a registered trademark. All rights reserved. This document in whole or in part may not be reproduced or copied without the prior written permission of the manufacturer. All brand and product names used in this document are trademarks or registered trademarks of their respective companies.
-
Page 3: Table Of Contents
Content Precautions................... Package bundle and installation............Connection.................... Appearance, control elements.............. Overall size.................... Remote control..................Main functions..................Settings....................Radio..................... USB....................... Bluetooth....................Phone app..................... Technical features.................. -
Page 4: Precautions
Precautions This user manual contains important safety advice and information on the correct use of the device. Please follow all instructions in this manual carefully. 1. While installing the device, avoid places with high temperature, humidity, or dusty places. 2. Make sure that the device and especially its installation accessories are out of the reach of children. -
Page 5: Package Bundle And Installation
Package bundle and installation Open the package and make sure that inside include: 1. USB-receiver - 1piece 2. Remote control - 1 piece 3. Keys for receiver remove - 2 pieces 4. ISO - jack- 1 piece 5. Instruction 6. Guarantee If the car has a standard 1DIN hole for installing the head unit, use it as described below. -
Page 6: Connection
Connection 1. Make sure that the on-board voltage of your vehicle is +12 volts 2. Remove the fuse from the device before connecting the wires. 3. Connect the yellow (A4) wire to the +12 Volt DC power circuit. 4. Connect the red wire (A7) to the ACC terminal of the ignition switch. 5. -
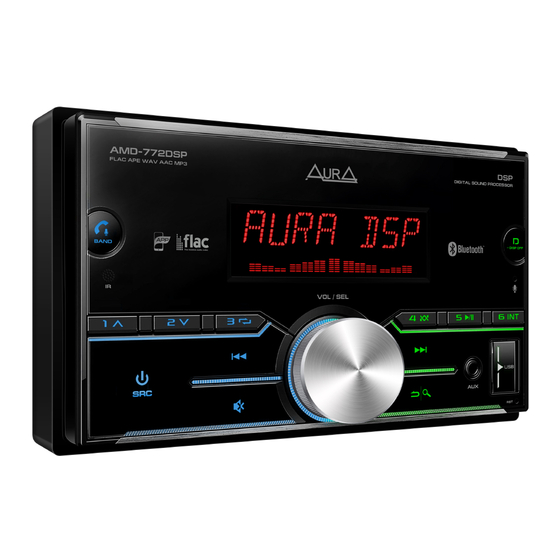
Page 7: Appearance, Control Elements
Control elements 1. Turn on / off the device / Select source 2. Adjust volume / Switch settings / Confirm selection 3. LCD display 4. IR receiver 5. Reset device to factory settings (RST) 6. USB connector 7. Microphone 8. Switching radio bands / Receiving / ending a call / Voice assistant 9. -
Page 8: Overall Size
Overall sizes 100MM 97MM 172MM 192MM 120MM Remote control Removing the battery protection (CR-2025). Remote control supplied with battery protection. The remote control will not work until the protection is removed. Battery replacement: 1. When the lithium battery has lost capacity, replace it as shown in the figure. - Page 9 Remote control Turn on/ off the device 2. Volume control 3. Switching radio bands answer call Previous track / Rewind / Radio setup 5. Source selection Next track / Fast forward / Radio setup 7. Mute mode End call / Clock 9.
-
Page 10: Main Functions
Main functions ON / OFF Power Press any button to turn on the device. Press and hold the button (1) /SRC, to turn on the device. Volume control Rotate the volume knob (3) to set the desired level. Source selection Press the (1) / SRC button to switch between sources playback: Radio ->... - Page 11 AUDIO - sound settings Subwoofer set Turns on / off the subwoofer. Fader Adjusts the relative volume between front and rear speakers. Balance Adjusts the relative volume between left and right channels. Sub-W level Adjusts the volume level of the subwoofer (from -13 dB to +13 dB). Sub-W stereo Switching the operating mode of the RCA outputs of the subwoofer (Mono / Stereo).
- Page 12 AUDIO - sound settings 3-WAY (Network) Tweeter - setting the HPF for the tweeters. HP FRQ - Cutoff frequency: 1 / 1.6 / 2.5 / 4/5 / 6.3 / 8/10 / 12.5 kHz. SLOPE - Slope: 6 / 12 / 18 / 24 dB per octave. PHASE - electrical phase switching: 0 °...
- Page 13 AUDIO - sound settings Gain - volume value of each channel FL - front left / FR - front right / RL - rear left RR - rear right / SUB-L - subwoofer left / SUB-R - subwoofer right. Data reset - reset settings. Delay unit - selection of the unit of measurement.
-
Page 14: Radio
TA - traffic announcements. * AF - moves to steadier frequencies. * EON - auto switch to traffic announcement channels. * Radio text - displays text information. PI regional - displays the station name. PTY search - searches by program type. * the function is not supported in Russia. -
Page 15: Usb
Range selection Press the (8) BAND button to select the broadcasting range of radio stations: FM1, FM2, FM3 (VHF), AM1, AM2. Automatic station search Press the button (14) or (15) to quickly search for stations. Search and store stations automatically Press and hold the SEARCH button (10) for more than 2 seconds. -
Page 16: Bluetooth
Switching folders and tracks Press the (12) or (11) button to switch to the previous or next source folder. Press and hold the (12) or (11) button to skip 10 tracks backward or forward. BLUETOOTH Pairing with your phone Pair your phone with the AMH-772DSP receiver: 1. -
Page 17: Phone App
Phone App Most of the device settings are available in the AurA mobile application for Android or IOS. You can control the AMH-772DSP receiver from your smartphone: 1. - Page 18 Phone App 3-band crossover Time delays lights...
-
Page 19: Technical Features
TECHNICAL FEATURES Main Working supply voltage: 12 V (allowable range 9.6 - 15 V) Fuse: 15 A Maximum output power: 4 x 51 W (4 Ohm) Rated output power: 4 x 16 W (4 ohms) Speaker Impedance: 4 - 8 Ohm Frequency Response Range: 20 Hz - 20 kHz Display viewing angle:... - Page 20 Due to continuous product development and improvement, all specifications ©2020 AURA Electronics Inc. All rights reserved.
Need help?
Do you have a question about the AMD-772DSP and is the answer not in the manual?
Questions and answers