
Subscribe to Our Youtube Channel
Related Manuals for Aura AMH-240WG


Summary of Contents for Aura AMH-240WG
- Page 1 OWNER’S MANUAL AMH-240WG CAR USB / SD / FM RECEIVER WARNING! PLEASE READ CAREFULLY BEFORE USING...
- Page 2 Àâòîðñêèå ïðàâà is a registered trademark. All rights reserved. This document in whole or in part may not be reproduced or copied without the prior written permission of the manufacturer. All brand and product names used in this document are trademarks or registered trademarks of their respective companies.
-
Page 3: Table Of Contents
Content Precautions................... Package bundle and installation .............. Connection ..................Appearance, controls ................Sizes..................... Main operations ................... Radio..................... USB ...................... AUX....................... Technical features.................. Warranty card .................. -
Page 4: Precautions
Precautions This user manual contains important safety advice and information on the correct use of the device. Please follow all instructions in this manual carefully. 1. While installing the device, avoid places with high temperature, humidity, or dusty places. 2. Make sure that the device and especially its installation accessories are out of the reach of children. -
Page 5: Package Bundle And Installation
Package bundle and installation Open the package and make sure that it contains: 1. BT / USB receiver - 1pc. 2. Keys for removing the receiver - 2 pcs. 3. ISO connector - 1 pc. 4. Instruction If the car has a standard 1DIN hole for installing the head unit, use it as described below. -
Page 6: Connection
Connection 1. Make sure your vehicle's on-board voltage is +12 or 24 volts. 2. Remove the fuse from the device before connecting the wires. 3. Connect the yellow (A4) wire to the +12 or 24 volt DC power supply. 4. Connect the red wire (A7) to the ACC terminal of the ignition switch. 5. -
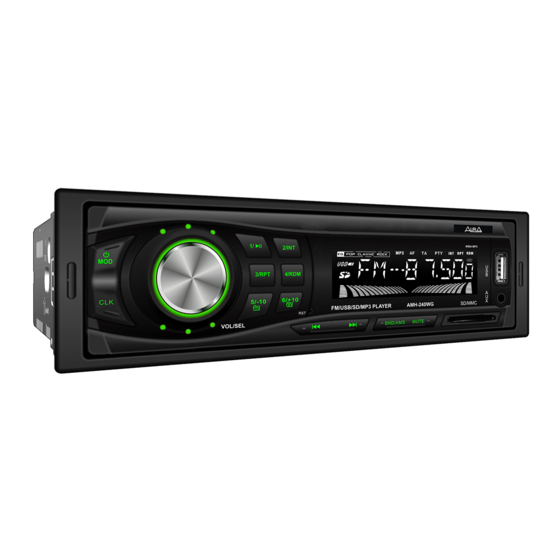
Page 7: Appearance, Controls
Control elements WMA MP3 1. Button on. / off. nutrition. Source selection. 2. Fast forward / select next song button. 3. Volume control / select button (SEL). 4. Preset button 1 / play / pause button. 5. Preset button 2 / Record scan button. 6. -
Page 8: Sizes
Overall sizes,mm... -
Page 9: Main Operations
Main functions ON / OFF Power Press any button to turn on the device. Press and hold the button (1) /SRC, to turn on the device. Volume control Rotate the volume knob (3) to set the desired level. Source selection Press the (1) / SRC button to switch between sources playback: Radio ->... -
Page 10: Usb
Radio Search and store stations automatically Press and hold the button (9) BND/AMS more than 2 seconds. The unit will quickly search for and automatically store 18 FM radio stations with strong signals. Manual station search Press and hold more than 2 seconds the button (2) or (11) , to enter manual tuning mode. -
Page 11: Aux
You can connect an external source to the 3.5mm jack on the front of the receiver using the AurA AUX cable (optional). Note: When the power is turned off, all parameter settings are saved in the device's memory. -
Page 12: Technical Features
TECHNICAL FEATURES Main 12/24 V (9,6 – 25 V allowable Working supply voltage: 10 А Fuse: 4 х 36 W (4 Ohm) Maximum output power: Rated output power (at THD less than 1%): 4 х 10 W (4 Ohm) 4 - 8 Ohm Speaker Impedance: Frequency Response Range: 20 Hz –... -
Page 13: Warranty Card
WARRANTY CARD Model name Serial No. Buyer name Buyer address Phone No. Sales date Signature Seller name/stamp... - Page 14 TERMS OF WARRANTY SERVICE The manufacturer guarantees high quality and reliability of the products, subject to the technical requirements described in the instructions for use. This warranty is valid for one year from the date of purchase and is carried out in the event that the goods are found to be defective due to inadequate quality of materials or assembly of the manufacturer.
- Page 16 Due to continuous product development and improvement, all specifications are subject to change ©2021 AURA Electronics Inc. All rights reserved.
Need help?
Do you have a question about the AMH-240WG and is the answer not in the manual?
Questions and answers