Table of Contents
Advertisement
Quick Links
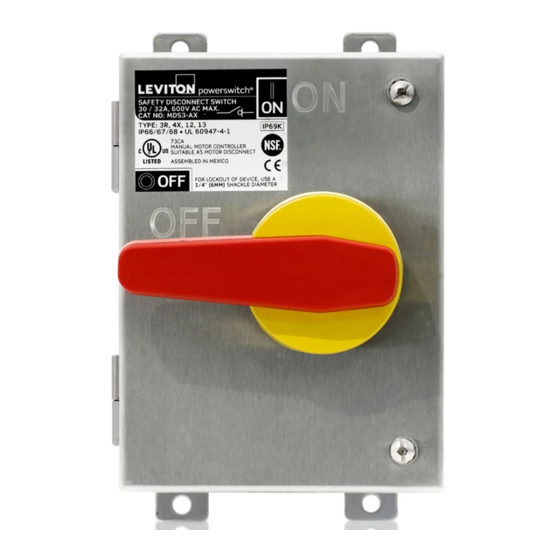
powerswitch
®
WARNINGS:
• TO AVOID FIRE, SHOCK, OR DEATH, TURN OFF POWER AT CIRCUIT BREAKER OR FUSE AND TEST THAT
POWER IS OFF BEFORE WIRING OR SERVICING DEVICE.
• TO AVOID FIRE, SHOCK, OR DEATH, DISCONNECT ALL POWER SUPPLIES TO ENCLOSURE BEFORE
EXPOSING INTERIOR. MORE THAN ONE SUPPLY DISCONNECT MAY BE REQUIRED TO DE-ENERGIZE THIS
EQUIPMENT BEFORE SERVICING.
• Separate over-current protection must be provided in accordance with the NEC
as appropriate.
• This enclosure includes a lockout provision (in the OFF position) for a suitable padlock. USE ONLY a padlock with
a shackle diameter of 1/4 in. (6.35 mm.) to isolate power from the connected equipment, in compliance with OSHA
Lockout/Tagout Regulation 29 CFR Part 1910.147.
NOTE: Lockout feature does NOT interrupt the power supplied to the switch within the enclosure.
FEATURES
• Provides ON/OFF switched control of a directly connected load.
• Meets the requirements of Outdoor/Indoor (IP66, IP67, IP68, IP69K NEMA Type 3R, 4X, 12, 13 Watertight,
Corrosion-Resistant) and Indoor (Type 12 Dust-Tight) installations.
• The cover cannot be opened or removed when the handle is in the "ON" position.
• This product is certified by NSF
International, for use in food processing facilities.
®
• Normally open and normally closed auxiliary contact (if used) is rated 10A-600VAC.
INSTALLATION
STEPS
1. Mount Safety Disconnect Switch.
2. Remove enclosure cover by loosening two cover screws and lifting cover off hinges.
3. Remove switch (see REMOVE SWITCH section). This is recommended to prevent steel debris from entering
switch components.
4. Drill or punch conduit hole in desired location(s). See Table 1 for fitting size.
NOTE: If you have a slope top version (MDS3-ST, MDS3-AST, MDS6-ST, MDS6-AST), top feeding wiring is NOT
an option.
5. Install conduit fitting. Ensure "O" ring is properly seated and that the inside locking ring is seated tightly against the
inside surface of enclosure, to ensure proper grounding.
6. Re-install switch (see REPLACE SWITCH section).
7. Connect wires (see WIRING section).
8. Replace cover and hand thread screws to engagement.
NOTE: Handle must be in the "OFF" position to close cover. Tighten screws to 15-18 in.-lbs. (1.7-2.0 N-m) torque.
CLEANING PROCEDURES
WARNING: RISK OF ELECTRIC SHOCK. TURN OFF POWER AT CIRCUIT BREAKER OR FUSE. DO NOT clean this product while undergoing electrical maintenance or service.
CAUTION: Use only chemicals and cleaning solutions that are safe for use with plastics and rubber gaskets.
1. Follow general cleaning procedures established by your facility.
2. This product is certified by NSF
®
International to NSF/ANSI/3-A 14159-1.
3. Recommended cleaning procedures are:
a. Use hose-directed water or a cleaning solution to remove any collected contaminants from behind the enclosure. Ensure water completely cleans the area between the enclosure and the mounting surface.
b. Use hose-directed water or a cleaning solution to remove soil and contaminants from the exterior surfaces of the enclosure.
c. CAUTION: DO NOT direct or concentrate high-pressure water or cleaning solution on the enclosure gasket seams, switch handle area, or exterior labels.
d. After cleaning the exterior surfaces of the enclosure, open the enclosure door and use a clean, damp cloth to manually remove any soil or contaminants from the gasket seam area and flanged lip on enclosure body.
e. If needed, the door can be lifted off the enclosure body to clean hinge cavities.
f. Use a dry, clean cloth to wipe away any excess water.
Captive cover screw (2)
ON/OFF
handle
Drill point
Drill point for
breather drain
Drill point
Mounting feet
Listed/certified
conduit hub rated
type 3R, 4X, 12
(not provided)
10.12 in.
Condensation
drip loops
4.75 in.
Top or bottom conduit connection/wire entry
MDS6-AX depicted (60A)
WIRING
NOTE: Use conductors with insulation rated 167°F (75°C) or higher, having sufficient ampacity in accordance with the 140°F (60°C) column of Table 310.15(B)(16) of the 2014 NEC
NOTE: Ensure that there are no stray conductor strands. DO NOT tin conductors.
1. WARNING: TO AVOID FIRE, SHOCK, OR DEATH, TURN OFF POWER AT CIRCUIT BREAKER OR FUSE AND TEST THAT POWER IS OFF BEFORE WIRING OR SERVICING DEVICE.
2. Strip all conductors approximately 1/2 in. (13.0 mm.).
NOTE: Refer to conductor sizes accepted for specific switch below.
3. Connect conductors per appropriate WIRING DIAGRAM (see reverse side).
4. Tighten all terminal screws per specific torque values below:
WIRING DIAGRAMS
Break All Lines
120 VAC 1 Ø
277 VAC 1 Ø
Note: Auxiliary Contact,
if used
L
G
W
G
T
B
T
1
3
5
N
G
G
13
14
G
N
G
2
6
4
Safety Disconnect Switch in Watertight Enclosure
Cat. Nos. MDS3-AC, MDS3-AX, MDS3-ST, MDS3-AST – Rated: 30/32A-600VAC Max.
Cat. Nos. MDS6-AC, MDS6-AX, MDS6-ST, MDS6-AST – Rated: 60A-600VAC Max.
Cat. Nos. MDS8-AC, MDS8-AX – Rated: 80A-600VAC Max.
Cat. Nos. MDS1-AC, MDS1-AX – Rated: 100A-600VAC Max.
Aux. Contact – Rated: 10A, 600V
Article 220 or CEC, Section B,
®
INSTALLATION INSTRUCTIONS
Lift cover
off hinges.
Breather drain
(not supplied)
NOTE: Enclosure to be mounted such that drain
will always be on the bottom as shown.
Listed/certified
Mounting
conduit hub rated
holes for
type 3R, 4X, 12
enclosure
(not provided)
Note: Auxiliary
Contact, if used
Condensation
drip loops
4.75 in.
Dual top or bottom conduit connection/wire entry
MDS8-AX depicted (80A)
120/240 VAC 1 Ø
Note: Auxiliary Contact,
if used
L
L
L
W
G
B
T
1
3
5
1
N
G
N
13
14
G
N
N
2
6
2
4
CAUTIONS:
• For installation ONLY by an electrician, in accordance with the National Electrical Code
Electrical Code (CEC), and local codes.
• Use this device with copper or copper-clad wire only.
• Ensure that the rating marked on the device is correct for the intended installation.
• Suitable as Motor Disconnect on a circuit capable of delivering not more than:
- MDS3-AC, MDS3-AX - 10kA rms symmetrical amperes, 600V max., when protected by 60A, Class J fuses.
- MDS3-ST, MDS3-AST - 10kA rms symmetrical amperes, 600V max., when protected by 60A, Class J fuses.
- MDS6-AC, MDS6-AX - 100kA rms symmetrical amperes, 600V max., when protected by 100A, Class J or T fuses.
- MDS6-ST, MDS6-AST - 100kA rms symmetrical amperes, 600V max., when protected by 100A, Class J or T fuses.
- MDS8-AC, MDS8-AX - 100kA rms symmetrical amperes, 600V max., when protected by 100A, Class J or T fuses.
- MDS1-AC, MDS1-AX - 65kA rms symmetrical amperes, 600V max., when protected by 100A, Class J fuses.
NOTES:
• For NEMA Type 4X, Type 12 and IP69K applications, enclosure must be mounted by means of mounting feet.
Do not drill or punch any holes into enclosure for mounting purposes.
• Use of a UL Listed Watertight conduit fitting required to maintain the NEMA Type 4X, Type 12 and IP69K ratings.
Leviton conduit hubs (see Table 1) are rated for Type 4X and Type 12 applications. NOTE: If required, use only a listed/
certified breather drain rated for Type 4X, Type 12 and/or IP69K depending on required environmental application. Drill or
punch a 0.796
in
(20.2 mm) diameter hole through the bottom of the enclosure at the drill point provided.
• Mounting feet will accept up to 1/4
in
(6 mm) screws.
• Drill points provided for conduit entry.
• When using top or side feed conduit entrance, always form condensation drip loops in wiring as shown.
TABLE 1
Cat. No.
Hub Trade Size
Min QTY Required
MDS3
3/4 in (19.05 mm)
MDS6
1-1/4 in (31.75 mm)
MDS8
1-1/4 in (31.75 mm)
MDS1
1-1/4 in (31.75 mm)
Note: Auxiliary
Switch
Contact, if used
DIN rail
Ground bus
Neutral bus
Listed/certified
Mounting
conduit hub rated
holes for
type 3R, 4X, 12
enclosure
(not provided)
10.12 in.
Note: Auxiliary
Contact, if used
Condensation
drip loops
240 VAC 1 Ø
240 VAC 3 Ø
480 VAC 1 Ø
480 VAC 3 Ø
600 VAC 1 Ø
600 VAC 3 Ø
Note: Auxiliary Contact,
Note: Auxiliary Contact,
if used
L
X
Y
Z
G
T
3
5
1
3
5
G
N
13
14
G
N
6
2
6
4
4
PK-A3191-10-00-0F
®
(NEC), the Canadian
Leviton Cat. No.
Conduit Hole
1
HUB-034
1.05 in (26.67 mm)
1
HUB-114
1.66 in (42.16 mm)
2
HUB-114
1.66 in (42.16 mm)
2
HUB-114
1.66 in (42.16 mm)
Mounting
Listed/certified
holes for
conduit hub rated
enclosure
type 3R, 4X, 12
(not provided)
8.38 in.
Condensation
drip loops
Note: Auxiliary
3.5 in.
Contact, if used
Top or bottom conduit connection/wire entry
MDS3-AX depicted (30A)
Mounting
holes for
enclosure
11.38 in.
Note: Auxiliary
Contact, if used
5.75 in.
Feed through conduit connection/wire entry
MDS1-AX depicted (100A)
®
or Table 2 of the Canadian Electrical Code.
120/208 VAC 3 ØY
277/480 VAC 3 ØY
347/600 VAC 3 ØY
Note: Auxiliary Contact,
if used
if used
X
Y
Z
G
W
T
B
1
3
5
G
N
13
13
14
14
G
N
2
6
4
ENGLISH
Advertisement
Table of Contents

Subscribe to Our Youtube Channel
Related Manuals for Leviton powerswitch MDS3-AC


Summary of Contents for Leviton powerswitch MDS3-AC
- Page 1 • Meets the requirements of Outdoor/Indoor (IP66, IP67, IP68, IP69K NEMA Type 3R, 4X, 12, 13 Watertight, Leviton conduit hubs (see Table 1) are rated for Type 4X and Type 12 applications. NOTE: If required, use only a listed/ Corrosion-Resistant) and Indoor (Type 12 Dust-Tight) installations.
- Page 2 Leviton warrants to the original consumer purchaser and not for the benefit...
Need help?
Do you have a question about the powerswitch MDS3-AC and is the answer not in the manual?
Questions and answers