Table of Contents
Advertisement
Quick Links
Advertisement
Table of Contents

Related Manuals for National Instruments 7932


Summary of Contents for National Instruments 7932
- Page 1 NI-7932 2022-07-06...
-
Page 2: Table Of Contents
NI-7932 Contents GSG Purpose..............3 FlexRIO Documentation. -
Page 3: Gsg Purpose
Contains signal information, for your adapter at ni.com/manuals. examples, and CLIP details for your module adapter module. Specifications Available from the Start menu and Contains specifications for your document for your at ni.com/manuals. adapter module. adapter module © National Instruments... - Page 4 NI-7932 Document Location Description LabVIEW FPGA Embedded in LabVIEW Help and Contains information about the basic Module Help at ni.com/manuals. functionality of the LabVIEW FPGA Module. Real-Time Module Embedded in LabVIEW Help and Contains information about real-time Help at ni.com/manuals.
-
Page 5: Safety Guidelines
Furthermore, any changes or modifications to the product not expressly approved by National Instruments could void your authority to operate it under your local regulatory rules. Caution To ensure the specified EMC performance, operate this product only with shielded cables and accessories. -
Page 6: Verifying The System Requirements
NI-7932 USB device ports or host ports must be no longer than 30 m (100 ft). The lengths of Ethernet cables and optical SFP+ cables are not limited. Caution The USB device port is intended only for use in device configuration, application deployment, debug, and maintenance. -
Page 7: Unpacking The Kit
Note Do not install a device if it appears damaged in any way. 3. Unpack any other items and documentation from the kit. Store the device in the antistatic package when the device is not in use. © National Instruments... -
Page 8: Preparing The Environment
NI-7932 Preparing the Environment Ensure that the environment you are using the NI-7932R in meets the following specifications. Operating temperature (IEC 60068-2-1, IEC 60068-2-2) 0 °C to 55 °C Operating humidity (IEC 60068-2-56) 10% to 90% RH, noncondensing Pollution Degree Maximum altitude 2,000 m at 25 °C ambient temperature... -
Page 9: Powering On The Ni-7932R
There is no software installed, which is the out-of-box state, or the controller seconds has detected an error in its software. An error can occur when an attempt to upgrade the software is interrupted. Refer to the MAX Help for information about reinstalling software on the controller. © National Instruments... -
Page 10: Connecting The Ni-7932R To The Host Computer
NI-7932 LED State Indication 3 flashes every few The controller is in safe mode. Refer to the MAX Help for information about seconds safe mode. 4 flashes every few The software has crashed twice without rebooting or cycling power between seconds crashes. -
Page 11: Installing The Flexrio Adapter Module
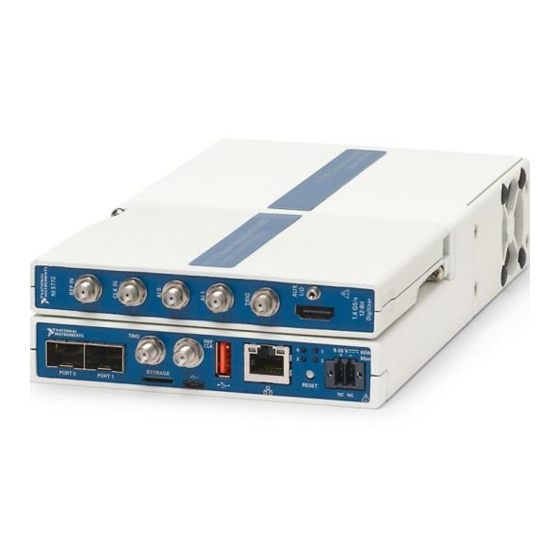
The following figure shows the NI-7932R with the FlexRIO adapter module connected. Figure 1. NI-7932R with FlexRIO Adapter Module Refer to the getting started guide for your adapter module for more information about your adapter module, including programming information. © National Instruments... -
Page 12: Setting A System Password
NI-7932 Configuring the System in Measurement & Automation Explorer (MAX) After connecting the NI-7932R to the host computer, complete the following steps to configure the system for the first time in MAX. 1. Launch MAX on the host computer. 2. Expand Remote Systems in the MAX configuration tree and select the system. -
Page 13: Installing Software On The Ni-7932R
You can use the LabVIEW Real-Time Software Wizard to install more software add-ons later. The FlexRIO 15.0 Recommended Software Set is enough to get started. 8. Click Next. 9. Review the summary of software to install. Click Next to begin the update. © National Instruments... -
Page 14: Adding The Ni-7932R To A Labview Project
NI-7932 10. Wait for the installation to finish, and then click Finish. Adding the NI-7932R to a LabVIEW Project 1. Launch LabVIEW. The LabVIEW Getting Started window appears. 2. Click Create Project or open an existing project. 3. Right-click the project root in the Project Explorer window and select New »... -
Page 15: Programming With Labview
3. Unscrew the adapter module. 4. Remove the adapter module. If you cannot power down the NI-7932R, use the System Configuration application programming interface (API) to disable power to the adapter module. Troubleshooting the NI-7932R Related tasks © National Instruments... -
Page 16: Why Can't The Ni-7932R Communicate With The Network
NI-7932 Connecting the NI-7932R to the Host Computer ■ Why Can't the NI-7932R Communicate with the Network? 1. Connect cables from your device to the host computer. 1. If you are using the USB port, use a USB cable to connect the NI-7932R USB device port to a host computer. -
Page 17: Appendix: Front Panel
■ adapter is recognized. In Windows 7, select Start » Control Panel » Device Manager » Network adapters » National Instruments » USBLAN adapter. If the USBLAN adapter is not recognized, you must reinstall FlexRIO Support. Ensure that the Ethernet cable is connected correctly. - Page 18 NI-7932 Figure 3. NI-7932R 1. TRIG 2. REF CLK 3. Storage (µSD card) 4. USB device port 5. USB host 6. 1 Gigabit Ethernet 7. LED indicators 8. Reset 9. DC power source 10. FlexRIO adapter module connector 11. Port 0/Port 1 (SFP+ connectors) Related information http://www.ni.com/manuals/...
- Page 19 GPIO_35 S119 GPIO_11 GPIO_52 GPIO_62 GPIO_36_n S118 GPIO_12_n GPIO_53_n GPIO_63_n GPIO_36 S117 GPIO_12 GPIO_53 GPIO_63 GPIO_37_n S116 GPIO_13_n GPIO_54_n GPIO_64_n GPIO_37 S115 GPIO_13 GPIO_54 GPIO_64 GPIO_55_n GPIO_65_n GPIO_55 GPIO_65 GPIO_56_n GPIO_66_n GPIO_56 GPIO_66 GPIO_57_n GPIO_67_n GPIO_57 GPIO_67 © National Instruments...
-
Page 20: Worldwide Support And Services
NI-7932 Worldwide Support and Services The National Instruments website is your complete resource for technical support. At ni.com/support, you have access to everything from troubleshooting and application development self-help resources to email and phone assistance from NI Application Engineers. Visit ni.com/services... - Page 21 User Manual LabVIEW Real-Time Module Help FlexRIO Help DISCOVER more about your products through ni.com. Support FlexRIO Services Updates ni.com/support ni.com/services ni.com/updates ni.com/flexrio Located online at ni.com/manuals Located using the NI Example Finder © National Instruments © 2022 National Instruments Corporation.
Need help?
Do you have a question about the 7932 and is the answer not in the manual?
Questions and answers