Volk Vista View Quick Start Manual
Hide thumbs
Also See for Vista View:
- Instructions for use manual (55 pages) ,
- Instructions for use manual (54 pages)

Related Manuals for Volk Vista View


Summary of Contents for Volk Vista View
- Page 1 ® Take the View with You! QUICK START GUIDE sales@mercoframes.net 5555 NW 74 Av. +1 305-882-0120 Miami, Fl 33166 www.mercoframes.com 1 of 16 ML-1717 Rev B...
- Page 2 PREPARATION Be sure device is fully charged before Before performing any imaging, have Attach the eye cup to VistaView use. Turn on the device by pressing an authorized person dilate the device. the small button on the right side of patient’s eyes to at least 5 mm.
- Page 3 PREPARATION Click “Launch VistaView” to open the Accept Volk Optical Inc. VistaView™ Enter a password for export. app. Terms and Conditions after reading Note: Store this password in a safe carefully. Scroll to the bottom to location, as the password can only click I Understand and Agree.
- Page 4 PREPARATION: OPTIONAL For best results when using the Voice To train the device, tap the If voice capture set up is skipped, the Capture feature during imaging, microphone icon and repeat the word user can train the keyword anytime in train the device to recognize your “Capture”...
- Page 5 IMAGING Select Start Imaging. Choose to enter a New Patient or If New Patient is chosen, enter new select Existing Patients. patient data by filling out the patient information. Click Save and Begin Imaging at the end of the form. 5 of 16...
- Page 6 IMAGING If Existing Patient is chosen, select an The imaging screen appears. To adjust the focus mode, select the existing patient from the list by Focus icon then select Auto or clicking Next to image that patient. Manual mode. 6 of 16...
- Page 7 IMAGING To adjust the brightness, select the If using voice capture to image, If using manual focus, use the buttons Brightness icon. Start with the turn on the Voice Capture feature on the right-hand side of the screen lowest brightness and increase as by activating the toggle button, to increase or decrease the focus needed.
- Page 8 IMAGING The patient and examiner should be Ask the patient to look over your Slowly, move the device closer to the seated facing each other. Use your shoulder or to fixate at a spot near eye while keeping the pupil in the dominant hand to hold the VistaView your ear.
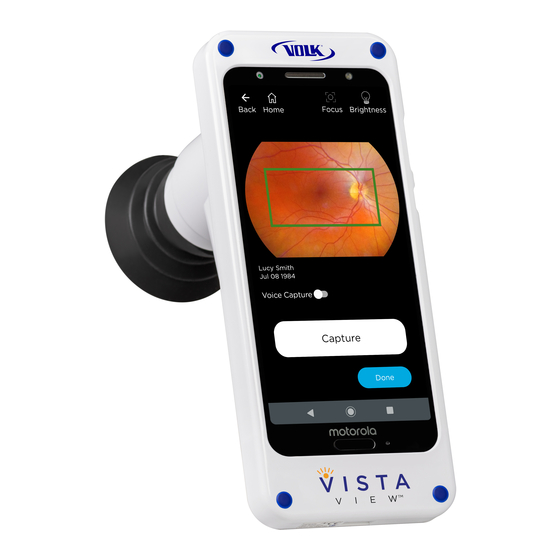
- Page 9 IMAGING The correct imaging distance is If auto-focus is enabled, tap Capture the image by pressing reached when the retina completely anywhere on the screen to focus, Capture or by saying “Capture” if the fills the imaging window. except for a button. A green box will Voice Capture feature is turned on.
-
Page 10: Generating A Report
IMAGING GENERATING A REPORT Accept or reject images. If needed, When imaging is complete, press After imaging the patient, review and repeat the process from step 9 to Done. select the images to include in the step 15 to obtain more images. report by selecting the circle in the lower right corner of the image to add a green check mark. - Page 11 GENERATING A REPORT When viewing enlarged images, there Notes can be added to the report to Once a report is generated, the report is an option to add a red free image convey patient history, key findings is ready to be reviewed and saved. To to the standard image.
-
Page 12: Wireless Transfer
WIRELESS TRANSFER Select Manage Patients. Select Export Patient Data. The default and recommended setting is Password Protected export. Only turn off password protected export, if needed, by toggling the lock icon. Select the check box next to the patients to export and select the Export Selected. - Page 13 WIRELESS TRANSFER A confirmation will appear The Download folder on the Select the preferred method to share indicating successful export to the VistaView opens. Select VistaView > the zip file. Note: The zip file is locked device’s internal storage. Select View Protected Data >...
- Page 14 WIRED TRANSFER To transfer exported files to a PC, Select the File Transfer option on this Follow steps #1-4 on pages 11 and 12 connect the device via USB-C cable screen to connect the VistaView to to export your files. to a PC.
- Page 15 WIRED TRANSFER On your PC, select moto g(6) in the An application such as Winrar or 7Zip Input the password from devices and drives section of a PC. To should be used to access the Preparation step #6 on page 3. access the patient folders, follow the password protected patient data.
- Page 16 TROUBLESHOOTING IMAGES Image is too bright: Correct this by Image is too dark: Correct this by Image is not in focus: If using auto-focus mode, changing the Brightness settings. Decrease the changing the Brightness settings. Increase the wait until the focus is locked and the green box brightness level found on the imaging screen to brightness level found on the imaging screen to appears before capturing the image.
Need help?
Do you have a question about the Vista View and is the answer not in the manual?
Questions and answers