
Related Manuals for Rollei LUMIS Key Light Pro


Summary of Contents for Rollei LUMIS Key Light Pro
- Page 1 LUMIS Key Light Pro Desktop Bi-Color LED-Panel mit Fernbedienung | with Remote Control Anleitung auf Deutsch Manual in English www.rollei.de...
-
Page 2: Table Of Contents
Inhalt Vor dem ersten Gebrauch . . . . . . . . . . . . . . . . . . . . . . 4 Bestimmungsgemäßer Gebrauch . - Page 3 Content Before the First Use . . . . . . . . . . . . . . . . . . . . . . . . . . 24 Intended Use .
-
Page 4: Vor Dem Ersten Gebrauch
Zwecken, und insbesondere nicht zur häus lichen Raumbeleuchtung, verwendet werden . Zeichenerklärung Die folgenden Symbole werden in dieser Bedienungsanleitung, auf dem Rollei LUMIS Key Light Pro oder auf der Verpackung verwendet . Mit diesem Symbol gekennzeichnete Produkte erfüllen alle maßgeblichen Gemeinschaftsvorschriften des Europäischen Wirtschaftsraumes . -
Page 5: Sicherheitshinweise
Sicherheitshinweise Gefahr durch elektrischen Strom! Fehlerhafte elektrische Installationen oder eine übermäßige Netz spannung können Stromschläge verursachen. – Das Produkt für den Betrieb an eine leicht zugängliche Steckdose anschließen, damit Sie es bei Problemen schnell vom Netz tren nen können . –... - Page 6 Sicherheitshinweise – Dieses Produkt ist nicht wasserdicht! Benutzen Sie dieses Produkt nicht im Regen oder in nassen Umgebungen . – Nutzen oder lagern Sie das Produkt nicht bei hohen oder nied- rigen Temperaturen oder in geschlossenen Räumen mit direkter Sonneneinstrahlung . Bei Umgebungstemperaturen von mehr als 50°...
- Page 7 Sicherheitshinweise – Dieses Produkt kann von Personen mit eingeschränkten physi- schen, sensorischen oder geistigen Fähigkeiten oder mangelnder Erfahrung und Know-how benutzt werden, sofern diese beauf- sichtigt werden oder eine Anleitung zur sicheren Verwendung des Produktes erhalten haben und die sich aus dem Gebrauch entstehenden möglichen Gefahren verstehen .
-
Page 8: Warnhinweise Für Akkus
Warnhinweise für Akkus – Demontieren, schlagen oder durchstechen Sie den Akku nicht, achten Sie darauf, den Akku nicht kurzzuschließen . – Setzen Sie den Akku keinen Orten mit hohen Temperaturen aus . – Verwenden Sie den Akku nicht weiter, falls er ausläuft oder sich ausdehnt . -
Page 9: Lieferumfang
Lieferumfang LED-Panel Kugelkopf Stativbein Inbusschlüssel Schraube Stativfuß USB-C-Kabel Fernbedienung Magnetische Befestigungsplatte für die Fernbedienung... -
Page 10: Aufbau
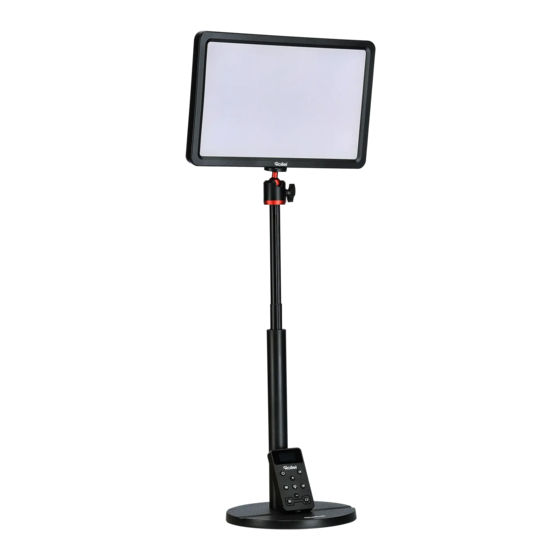
– Montieren Sie das LED-Panel [1] auf den Kugel- kopf [2] des Stativbeins [3] . – Justieren Sie im Anschluss das Rollei LUMIS Key Light Pro auf die ge- wünschte Höhe, indem Sie die Beinsegmente des Stativbeins [3] aus- einanderziehen . -
Page 11: Hinweis Zum Betrieb
Output von 5,0 V 2,0 A (nicht im Lieferumfang enthalten) . Bei anderen USB-Netzteilen oder USB-Ausgängen an anderen Produkten (bspw . Computern, Laptops) kann es aufgrund einer abweichenden Spannung zu Fehlermeldungen oder zum automatischen Abschalten des Rollei LUMIS Key Light Pro kommen . -
Page 12: Bestandteile
Bestandteile: LED-Panel ¼“-Gewinde Magnetische Verstaufläche Fernbedienung USB-C-Eingang Knopf zum Erhöhen der Farbtemperatur / Helligkeit Knopf zum Verringern der Farbtemperatur / Helligkeit Kanalwechsel-Knopf An- / Ausschalter und Modusknopf Display DEUTSCH... - Page 13 Bestandteile: Fernbedienung Display An- / Ausschalter Knopf zum Erhöhen der Helligkeit Knopf zum Verringern der Farbtemperatur Foto-Auslöser Smartphone-Kamera Bluetooth *-Kontrollleuchte ® Kanalwechsel-Knopf Standby-Knopf LED-Panel Knopf zum Erhöhen der Farbtemperatur Knopf zum Verringern der Helligkeit Video-Auslöser Smartphone-Kamera...
-
Page 14: Bedienung Am Led-Panel
Bedienung am LED-Panel Kanalwechsel-Knopf Drücken Sie , um den Kanal des LED-Panels zu wechseln . Sie können zwischen Kanal 0 bis 6 wählen . Der Kanal der Fernbedienung bleibt unverändert . An- / Ausschalter und Modusknopf Drücken Sie für 3 Sekunden, um das Licht an oder aus zu schalten . Drücken Sie den Knopf kurz, um zwischen Farbtemperatur- und Hellig- keits-Modus zu wechseln . -
Page 15: Bedienung Per Fernbedienung
Bedienung per Fernbedienung An- / Ausschalter Drücken Sie für 1 Sekunde, um die Fernbedienung anzuschalten . Drücken Sie für 3 Sekunden, um sie auszuschalten . Die Fern- bedienung wechselt nach 5 Minuten Inaktivität automatisch in den Stromsparmodus . Drücken Sie , um sie wieder zu aktivieren . -
Page 16: Bluetooth ® *-Verbindung Mit Dem Smartphone
Bluetooth *-Verbindung mit dem Smartphone ® – Drücken Sie für 3 Sekunden . Die Bluetooth *-Kontrolleuchte ® leuchtet rot auf . – Aktivieren Sie Bluetooth * auf Ihrem Smartphone . ® – Verbinden Sie die Fernbedienung mit Ihrem Smartphone, indem Sie in den Bluetooth *-Einstellungen Ihres Smartphones die Fern- ®... -
Page 17: Synchronisation Led-Panel Und Fernbedienung
Synchronisation LED-Panel und Fernbedienung Verbindung mit einem Rollei LUMIS Key Light Pro Pairing Das Display am LED-Panel zeigt an, welcher Kanal beim LED-Panel ein- gestellt ist . Auf dem Display der Fernbedienung ist der Kanal der Fernbedienung zu sehen . -
Page 18: Verbindung Mit Led-Panel-Gruppen
Panels selbst synchron vornehmen . Mehrere LED-Panels in verschiedenen Gruppen Um verschiedene Rollei LUMIS Key Light Pro in unabhängigen Gruppen zu bedienen, stellen Sie die LED-Panels auf die gewünsch- ten Kanäle . Bündeln Sie die LED-Panels, die dieselben Einstellungen vorweisen sollen, auf einen Kanal und die weiteren LED-Panels für... -
Page 19: Befestigung Der Fernbedienung An Beliebigen
Verbindung mit LED-Panel-Gruppen An der Fernbedienung wechseln Sie nun die Kanäle, indem Sie für 3 Sekunden gedrückt halten . Im Display wird Ihnen angezeigt, auf welchem Kanal Sie sich befinden . Nun können Sie die LED-Pa- nel-Gruppen auf den jeweiligen Kanälen unabhängig bedienen und Einstellungen vornehmen . -
Page 20: Technische Daten
Technische Daten Lichtpanel Anzahl LEDs 192 (96 Warmweiß, 96 Kaltweiß) Leistung 10 W EU-Energieeffizienzklasse (EU 2017 / 1369) EU-Energieeffizienzklasse- A – G Spektrum (EU 2017 / 1369) Farbtemperatur 2 .500 – 9 .000 K; einstellbar in 10- und 100-K-Schritten Farbwiedergabeindex (CRI) Television Lighting Consistency 95+ Index (TLCI) Leistungsregelung... - Page 21 Änderungen von Design und technischen Daten bleiben vorbehalten und bedürfen keiner Ankündigung . *Die Bluetooth -Wortmarke und Logos sind eingetragene Warenzeichen der Bluetooth SIG, Inc . und ® die Verwendung dieser Marken durch Rollei erfolgt unter Lizenz . Andere Warenzeichen und Handels- namen sind Eigentum ihrer jeweiligen Inhaber .
-
Page 22: Entsorgung
Entsorgung Entsorgen Sie die Verpackung sortenrein. Nutzen Sie dafür die örtlichen Möglichkeiten zum Sammeln von Papier, Pappe und leichten Verpackungen (anwendbar in der Europäischen Union und anderen europäischen Staaten mit Systemen zur getrennten Sammlung von Wertstoffen) . Produkte, die mit diesem Symbol gekennzeichnet sind, dürfen nicht mit dem Hausmüll entsorgt werden! Sie sind gesetzlich dazu verpflichtet, Altgeräte getrennt vom Hausmüll zu entsorgen . -
Page 23: Konformität
Konformität Hiermit erklärt die Rollei GmbH & Co . KG, dass der Funkanlagentyp „Rollei LUMIS Key Light Pro“ der Richtlinie 2014 / 53 / EU entspricht . Der vollständige Text der EU-Konformitätserklärung ist unter der folgenden Internetadresse verfügbar: www .rollei .com/egk/lumiskeylightpro Rollei GmbH &... -
Page 24: Before The First Use
. Explanation of Symbols The following symbols are used in this manual, the Rollei LUMIS Key Light Pro or on the packaging . Products marked with this symbol comply with all relevant commproducty regulations of the European Economic Area . -
Page 25: Safety Instructions
Safety Instructions Electric current hazard! Faulty electrical installations or excessive line voltage can cause electric shock. – Connect the product to an easily accessible socket for usage so that you can quickly disconnect it from the mains in case of problems . - Page 26 Safety Instructions – This product is not waterproof! Do not use this product in the rain or in wet areas . – Do not use or store the product at high or low temperatures or in closed rooms with direct sunlight . The product should not be used at ambient temperatures of more than 50°C or below -10°C .
- Page 27 Safety Instructions – This product can be used by persons with limited physical, sen- sory or mental capabilities or lack of experience and know-how, provided that they are supervised or have received instructions for the safe use of the product and understand the possible dangers arising from its use .
-
Page 28: Warnings Concerning Batteries
Warnings Concerning Batteries – Do not disassemble, hit or puncture the battery, be careful not to short-circuit the battery . – Do not expose the battery to places with high temperatures . – Do not continue to use the battery if it leaks or expands . –... -
Page 29: What's In The Box
What‘s in the Box LED panel Ball head Monopod Hex wrench Screw Base plate USB-C cable Remote control Magnetic mounting plate for the remote control... -
Page 30: Setting Up The Key Light
– Mount the light panel [1] on the ball head [2] of the monopod [3] . – Then adjust the Rollei LUMIS Key Light Pro to the desired height by pulling the leg segments of the monopod [3] apart . -
Page 31: Note On The Operation
Rollei LUMIS Key Light Pro . With other USB power supplies or USB outputs on other products (e .g . computers, laptops), error messages or automatic shutdown of the Rollei LUMIS Key Light Pro may occur due to a deviating voltage . -
Page 32: Components
Components: LED Panel ¼“ screw thread Magnetic stowage surface for the remote control USB-C input Button for increasing color temperature / brightness Button for decreasing color temperature / brightness Channel switch button Power and mode button Display ENGLISH... - Page 33 Components: Remote Control Display Power button Button for increasing the brightness Button for decreasing the color temperature Photo shutter release for smartphone camera Bluetooth * control light ® Channel switch button Standby button for LED panel Button for increasing the color temperature Button for decreasing the brightness Video shutter release for smartphone camera...
-
Page 34: Operation On The Led Panel
Operation on the LED Panel Channel Switch Button Press to change the channel of the LED panel . You can choose between channel 0 to 6 . The channel of the remote control remains unchanged . Power and Mode Button Press for 3 seconds to turn the light on or off . -
Page 35: Operation With The Remote Control
Operation with the Remote Control Power Button Press for 1 second for switching the remote control on . Press for 3 seconds for switching it off . The remote control, enters power saving mode after 5 minutes of inacitivty . Reactivate it by pressing Charge the remote control once every week for 1 hour to avoid a loss of battery capacity . -
Page 36: Bluetooth ® * Connection With The Smartphone
Bluetooth * Connection with the Smartphone ® – Press for 3 seconds . The Bluetooth * control light flashes red . ® – Activate Bluetooth * on your smartphone . ® – Connect the remote control to your smartphone by selecting the remote control ”Remote Control“... -
Page 37: Synching Led Panel And Remote Control
Synching LED Panel and Remote Control Connecting one Rollei LUMIS Key Light Pro Pairing The display on the LED panel shows which channel the LED panel is on . On the display of the remote control, you can see the channel the remote control is on . -
Page 38: Connecting Groups Of Led Panels
. Multiple LED Panels in Various Groups To operate different Rollei LUMIS Key Light Pro in independent groups, set the LED panels to the desired channels . Bundle the LED panels that are to have the same settings on one channel and the other LED panels for other settings on another channel . -
Page 39: Attachment Of The Remote Control
Connecting Groups of LED Panels Now change the channels on the remote control by pressing 3 seconds . The display will show you which channel you are on . Now you can operate the LED panel groups on the respective channels independently and adjust the settings . -
Page 40: Technical Data
Technical Data LED Panel Number of LEDs 192 (96 warm white, 96 cool white) Power 10 W EU energy efficiency class (EU 2017 / 1369) EU energy efficiency class A – G spectrum (EU 2017 / 1369) Colour temperature 2,500 – 9,000 K; adjustable in 10 and 100 K steps Colour rendering index (CRI) Television Lighting Consistency 95+... - Page 41 *The Bluetooth word mark and logos are registered trademarks of the Bluetooth SIG, Inc . and any ® use of such marks by Rollei is under licence . Other trademarks and trade names are the property of their respective owners .
-
Page 42: Disposal
Disposal Dispose of the packaging according to its type. Use the local possibilities for collecting paper, cardboard and other materials (applicable in the European Union and other European countries with systems for the separate collection of recyclable materials) . Devices that are marked with this symbol must not be disposed of with household waste! You are legally obli- ged to dispose of old products separately from to dispose of household waste . -
Page 43: Conformity
Conformity Rollei GmbH & Co . KG hereby declares that the product ”Rollei LUMIS Key Light Pro“ is in compliance with Directive 2014 / 53 / EU . The full text of the EU Declaration of Conformity is available at the following Internet address: www .rollei .com/egk/lumiskeylightpro... - Page 44 Rollei GmbH & Co. KG In de Tarpen 42 D-22848 Norderstedt Service Hotline: +49 40 270750277 /rollei.foto.de @rollei_de Item No: 28623 www.rollei.com...
Need help?
Do you have a question about the LUMIS Key Light Pro and is the answer not in the manual?
Questions and answers