Table of Contents
Advertisement
Quick Links
Advertisement
Table of Contents

Related Manuals for Ingenico group MOVE 3500


Summary of Contents for Ingenico group MOVE 3500
- Page 1 MOVE 3500 USER GUIDE...
-
Page 2: Table Of Contents
CONTENTS POS DEVICE FUNCTIONS................. 3 TERMINAL MENU....................4 Purchase and Refunds..................5 a. Contactless Transactions................5 b. Credit Card Transactions / Swipe............... 6 Purchase & Refunds..................6 c. Chip Card Transactions / Insert..............8 d. Debit Card Transactions / Swipe or Insert..........9 e. -
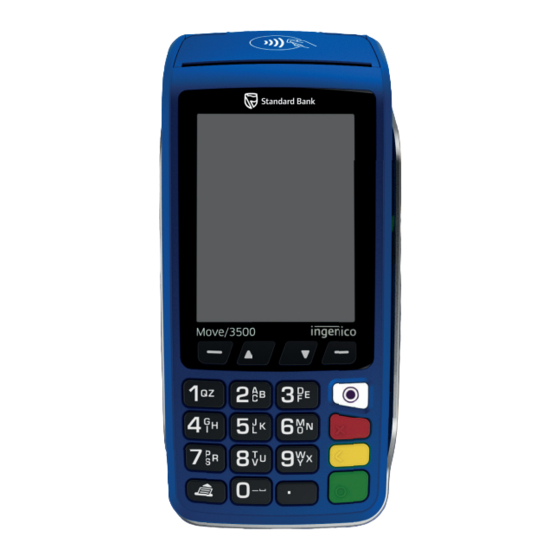
Page 3: Pos Device Functions
POS DEVICE FUNCTIONS Printer Lid Paper Exit Slot Mag-stripe Reader Menu Button Cancel Button (Red) Correction Button Paper Feed Button (Yellow) Accept or Enter Chip Card Slot Button (Green) -
Page 4: Terminal Menu
TERMINAL MENU Press Enter (Green ‘O’) key to access the terminal menu. 1- Purchase & Refunds 2- Contactless 3- Credit Card Transactions 4- Chip Card Transactions 5- Debit Card Transactions 6- Cancel 7- Balance Enquiry 8- Payment 9- Payment Reversal 10-Cash Withdrawal 11- Purchase & Cash 12-Auth Only 13-Auth Cancel 14-Auth Override... -
Page 5: Purchase And Refunds
PURCHASE AND REFUNDS CONTACTLESS TRANSACTIONS Important note: The offline Contactless option is available for transaction under R200. Transactions between R200 and R5 000 will require a PIN Entry and Online verification. PURCHASE • At the READY screen, press the Enter (Green ‘O’) key • Enter the amount /Rand value • Press Enter (Green ‘O’) key • Confirm the amount Entered and press Enter (Green ‘O’) key • Hold the contactless card to the terminal screen for a few seconds • Remove the card, then the terminal beeps • T he terminal will print two receipts, one for the merchant and another for the cardholder... -
Page 6: Credit Card Transactions / Swipe
CREDIT CARD TRANSACTIONS / SWIPE PURCHASE & REFUNDS PURCHASE • A t the READY screen swipe the card from the top to the bottom of the terminal • Enter the last four digits on the card face • Press Enter (Green ‘O’ key) when complete • Select the transaction type: PURCHASE followed by Enter (Green ‘O’) key • E nter the PURCHASE amount /Rand value; and press Enter (Green ‘O’) key If the PURCHASE amount is over R300, the terminal will give you the option to select between straight and budget. STRAIGHT • Select Straight Option followed by Enter (Green ‘O’) key • Confirm the amount Entered by Pressing Enter (Green ‘O’) key • If the amount Entered is incorrect, Press Cancel (Red Key) • T he terminal will connect to the bank for authorisation and print two receipts, one for the merchant and another for the cardholder BUDGET • Select Budget Option followed by Enter (Green ‘O’) key • Select the Budget period required and Enter... - Page 7 • The terminal will go online to confirm the transaction • T he terminal will print two receipts, one for the merchant and another for the cardholder REFUND • At the READY screen swipe the card from the top to the bottom of the terminal • Enter the last four digits on the card face. • Press Enter (Green ‘O’) key when complete • Select the transaction type: - Refund followed by Enter (Green ‘O’) key • Enter the Refund PIN and press Enter • Enter the Refund amount / Rand value and press Enter • Confirm the amount Entered • Select Enter (Green ‘O’) key • T he terminal will connect to the bank for authorisation and print two receipts, one for the merchant and another for the cardholder...
-
Page 8: Chip Card Transactions / Insert
CHIP CARD TRANSACTIONS / INSERT PURCHASE & REFUNDS • At the READY screen • Insert the chip card into the Chip reader • Select the transaction type - PURCHASE or Refund option - Press Enter (Green ‘O’) key PURCHASE • Enter the PURCHASE amount / Rand value • Press Enter (Green ‘O’) key • Confirm the amount Entered • Press Enter (Green ‘O’) key • Cardholder to Enter their card PIN • Press Enter (Green ‘O’) key • T he terminal will connect to the bank for authorisation and print two receipts, one for the merchant and another for the cardholder REFUND • Enter the Refund PIN • Press Enter (Green ‘O’) key • Enter the Refund amount / Rand value • Press Enter (Green ‘O’) key • Confirm the amount Entered... -
Page 9: Debit Card Transactions / Swipe Or Insert
CREDIT CARD TRANSACTIONS / SWIPE PURCHASE & CANCELLATIONS • At the READY screen, swipe or insert the debit card • Ask customer which account type to select: Cheque or Savings • Press the relevant number to select account type required • Select the Transaction Type: PURCHASE or Correction PURCHASE • Enter the PURCHASE amount/Rand value • Press Enter (Green ‘O’) key • Confirm the PURCHASE amount is correct • Press Enter (Green ‘O’) key • Debit cards and chip cards require a customer PIN code • Pass terminal to cardholder and ask them to Enter their card PIN - M ag-stripe cards: The terminal will go online for PIN authentication and approval - C hip cards: The terminal will authenticate the PIN offline and go online for approval • I f the transaction is approved, the terminal will print two receipts, one for the merchant and another for the cardholder CANCELLATION Transaction Cancellations can be done provided the transaction are cancelled is... -
Page 10: Balance Enquiry
BALANCE ENQUIRY DEBIT CARDS ONLY • At the READY screen swipe the debit card • Confirm with the customer which account type to select: - Cheque - Savings • Select the account required • Press Enter (Green ‘O’) key • Select Balance Enquiry followed by Enter • D ebit cards require a customer PIN code. Pass the terminal to the cardholder to Enter their card PIN and press Enter • Once the PIN has been Entered: - M agstripe cards: The terminal will go online for PIN authentication and approval - C hip cards: The terminal will authenticate the PIN offline and go online for approval • If approved, the balance will be displayed on the screen • Press cancel (red key) to remove the balance from the screen... -
Page 11: Banking Functions
BANKING FUNCTIONS A. CASH-UP • At the READY screen press the MENU key • Select the SBSA MENU • Select the REPORT MENU • Select the PERFORM CASH-UP option • Confirm you want to do a cash-up by pressing Enter (Green ‘O’) key • Enter the Supervisor PIN • Press Enter (Green ‘O’) key • The terminal will print the cash-up summary B. CASH-UP HISTORY • At the READY screen press the MENU key • Select the SBSA MENU • Select the REPORT MENU • Select the PERFORM CASH-UP HISTORY option • Confirm you want to do a cash-up by pressing Enter (Green ‘O’) key • The terminal will print the cash-up History An example and screenshot of a cash-up history is shown below. Please note that you can use the up and down arrow keys to access another batch. 001 = batch number 001 Time and date 2020-05-17 11:41 Indicates the total amount of entries in batch 001 and ENTRIES 50... -
Page 12: Reprint Receipt
C. REPRINT RECEIPT • At the READY screen press the MENU key • Select the SBSA MENU • Select the OPERATOR MENU Option • Select REPRINT RECEIPT • Two options are available - Last Transaction – the last successful transaction performed will print. - S pecific Receipt – a specific receipt number must be Entered and then will print NOTE: The ability to reprint a receipt is only applicable if the terminal has NOT been batched! If the transaction is still in the batch, the receipt will be printed. -
Page 13: General Information
GENERAL INFORMATION A. USAGE AND MAINTENANCE The Point-of-Sale (POS) device or terminal is a sensitive electronic device, similar to a cellphone. Physical operational abuse or dropping of the terminal can damage the terminal and result in unpredictable operational behaviour. The terminal must be kept clean and free of any dust, dirt or grime that can penetrate and damage the keyboard, thermal print head, CHIP reader, magnetic strip reader and result in the failure of one or more of these components. Do not pour liquids on to the terminal hardware, this will cause an electrical short and damage the terminal. The electronic components of the terminal are highly sensitive to fluctuations in power, power failures and lightning. Please ensure the terminal is on clean power at all times and is disconnected during severe lightning storms. B. SIM CARD USAGE AND REPLACEMENT SIM CARD INFORMATION The terminals make use of a GSM DATA only SIM card, provided either by MTN or Vodacom. This SIM card is provisioned for banking data transactions only and CANNOT be used in a standard cellular telephone. Should the SIM card be removed from the terminal and placed in another device, the SIM card will automatically be blocked by the network operator. A blocked SIM card will require a full swop out, the cost of which will be for the merchant’s account. The GSM SIM card provides for only 3Mb of data traffic per month. Excessive data throughput will again block the SIM card. -
Page 14: Frequently Asked Questions
FREQUENTLY ASKED QUESTIONS 1. HOW DO I TURN THE TERMINAL ON OR OFF? • H old down the Yellow button and the full stop button at the same time to reboot the terminal. • Press the Green button to turn the device on. 2. HOW DO I CHARGE THE PORTABLE TERMINAL? P lug the two-pin plug of the charging base into the AC (220v) wall power socket, turn the wall switch to On. Connect the cable to the charging base. Place the Terminal down on the charging base. The battery indicator on the terminal screen should indicate that it’s charging. 3. HOW MANY TRANSACTIONS CAN I DO BEFORE I NEED TO BATCH THEM? I t is recommended that you keep the number of transactions in a batch as low as possible. This will also improve the performance of the device. - Page 15 • H old the terminal in your one hand. Use two fingers from your other hand to lift the printer cover release, as shown above. • U nstick the end of the new roll. Carefully place the paper roll into the printer compartment. • H olding the free end of the paper and your terminal, close the printer cover carefully and push it down firmly until it locks. • W hile your terminal is displaying the idle screen, press and hold the Yellow button to make sure the paper feeds correctly. You can only use paper rolls that are 57mm wide and 40mm in diameter in your terminal. If you try to fit bigger or smaller rolls into your terminal, you may damage it. • Type of paper: Thermal paper • Size: 57 x 41cm...
-
Page 16: Terminal Support
TERMINAL SUPPORT A. CONTACT DETAILS For all merchant-related queries, contact Standard Bank Merchant Support on 086 100 1200. Hours of operation and support Monday to Friday 7am to 8pm Saturday 8am to 8pm Sunday 8am to 8pm Visit our website at www.standardbank.co.za/merchantsolutions for more information. You can fi nd a wide range of valuable resources under the ‘Tools and Services’ tab.
Need help?
Do you have a question about the MOVE 3500 and is the answer not in the manual?
Questions and answers