Table of Contents
Advertisement
Quick Links
Operating manual /
Information for use
Original operating manual
NORA Pro
Sit-to-stand lift
Version 0.1 / E
Subject to technical modifications
2022-05-05
WARNING
Before commissioning and
using the medical device, the user /
operator must familiarize himself with
the scope of functions of the medical
device by carefully reading this
operating manual!
Advertisement
Table of Contents

Related Manuals for Beka Hospitec NORA Pro


Summary of Contents for Beka Hospitec NORA Pro
- Page 1 Operating manual / Information for use Original operating manual WARNING Before commissioning and NORA Pro using the medical device, the user / operator must familiarize himself with Sit-to-stand lift the scope of functions of the medical device by carefully reading this Version 0.1 / E...
-
Page 2: Table Of Contents
Operating manual ....................6 Validity ......................6 Type plate ....................6 Description ....................6 Variants of the NORA Pro ................6 Safety ........................7 Intended and appropriate use ..............7 Electrical safety .................... 7 Follow / observe the operating instructions ..........8 List of used safety and warning signs ............ - Page 3 Disposal of the product ................38 Troubleshooting / After-sales service ..............39 Appendix ......................41 13.1 Technical description ...................41 13.2 Dimensions of the NORA Pro ..............43 13.3 Connection and assembly diagram .............44 13.4 Declaration of Conformity ................45 13.5 Additional equipment, accessories, and spare parts ........49 13.6...
-
Page 4: Imprint
1.1 Acknowledgement Dear customer, we would like to express our sincere thanks for the trust you have placed in us by purchasing this BEKA Hospitec GmbH product. Our products are manufactured and tested according to stringent quality criteria. 1.2 Manufacturer’s address We will be happy to advise you on questions about our products and to help you with any problems. -
Page 5: Introduction
The NORA Pro is a medical device according to DIN EN 60601-1 / IEC 60601-1 and DIN EN 60601-1-2 / IEC 60601-1-2 as well as MDR Medical Device Regulation (EU) 2017/745. -
Page 6: Operating Manual
3.3 Description In this manual, the product is called NORA, NORA Pro, sit-to-stand lift, or device. These names always refer to the same product. 3.4 Variants of the NORA Pro... -
Page 7: Safety
The patient is raised from a sitting position. The NORA Pro is to be used exclusively for the indoor transfer of residents on level floorings. The NORA Pro is designed for short-term use and any contact with injured skin must be avoided. -
Page 8: Follow / Observe The Operating Instructions
Professional wet cleaning. Solely intended for indoor use. Gentle cycle. Must not be disposed of with household waste. Do not put the treatment system and packaging materials in the household waste. Operating manual NORA Pro V0.1 E Page 8 of 60... -
Page 9: General Warning And Safety Instructions
The product and the accessories must not be used if any parts are damaged or malfunctioning. There is a risk of injury! ▪ Only operate this medical device with original accessories according to chapter 13.5. Operating manual NORA Pro V0.1 E Page 9 of 60... - Page 10 This will also void your warranty claims! Repairs may only be carried out by trained specialist personnel authorised by the manufacturer. Be sure to contact BEKA Hospitec’s customer service or that of its authorised distributors.
- Page 11 ▪ When used together with other medical devices, watch out for catching points and pinching as well as crushing of the patient's body or parts of the patient's body! Also watch out for instability / tipping during transfer of the patient! Operating manual NORA Pro V0.1 E Page 11 of 60...
- Page 12 Keep children and domestic animals away from the device. The hand control represents a strangulation hazard. Take all precautions to avoid this. Operating manual NORA Pro V0.1 E Page 12 of 60...
-
Page 13: Transport And Storage
• After all fixations have been released, the product can be driven off the pallet. • Remove the bubble wrap and the stretch film. The accessories of your product are included in the brake supplied cardboard box. Operating manual NORA Pro V0.1 E Page 13 of 60... -
Page 14: Installation
Please check that the emergency stop switch is released prior to moving the spreader bar. The NORA Pro sit-to-stand lift is equipped with an electrical motor. This motor is self- locking and therefore protected against unintentional lowering of the spreader bar in case of malfunction or failure. -
Page 15: Operating Elements And Their Function
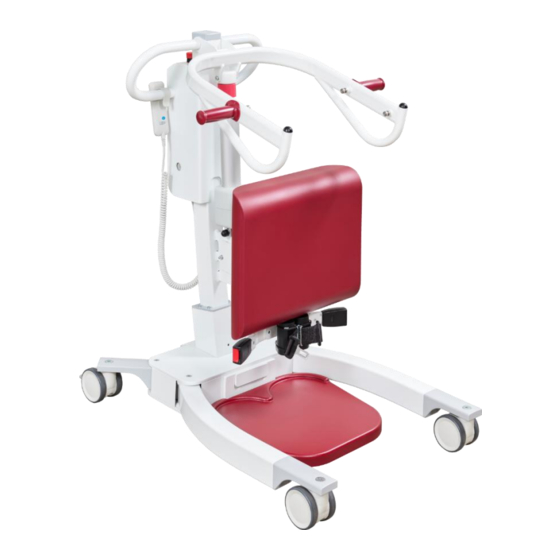
Battery Spreadable carrier frame Motor The contact surfaces of the NORA Pro are designed in a dementia-sensitive red colour scheme. In addition to the model RUBIN shown here, the dark red coloured model BAROLO is also available. Operating manual NORA Pro V0.1 E... -
Page 16: Hand Control
<25%)! In addition, a signal tone sounds when the button is pressed. LED flashes orange. Please have your sit-to-stand lift checked! Orange LED, overload, max. weight of 205 kg exceeded. Operating manual NORA Pro V0.1 E Page 16 of 60... -
Page 17: Functions And Connections Of The Control Unit
One minute of motor activation is counted as one cycle. If no button is pressed for more than 2 minutes, the NORA Pro display switches off to save energy. As soon as you press any button, the NORA Pro is activated again. -
Page 18: Connections Of The Control Unit
Vapours of the ingredients may cause respiratory irritation. Bring affected persons into fresh air and then seek medical advice. Operating manual NORA Pro V0.1 E Page 18 of 60... -
Page 19: Charging The Battery Unit
When the battery is fully charged, the colour changes back to green. The charging time for the battery units is approx. 5 hours. Beschreibung Beschreibung Charging station with battery mount Charger cable connection Charging indicator Power supply unit Operating manual NORA Pro V0.1 E Page 19 of 60... -
Page 20: Manual Emergency Lowering System
Alternatively, the plug of the power supply unit can be disconnected from the charging station and used directly for internal charging of the Nora Pro. To do this, use the connector on the side of the NORA pro control unit. Remove the rubber plug that closes the socket of the charging plug and insert the plug of the delivered power supply unit. -
Page 21: Emergency Stop Switch
(the knob lifts). Activating the emergency stop switch Deactivating the emergency stop switch NOTE The battery can only be charged internally when the emergency stop switch is not actuated! Operating manual NORA Pro V0.1 E Page 21 of 60... -
Page 22: Motor Safety Measures
Press the "Up" button until the lifting arm is again freely above the obstacle. Only then may the sit-to- stand lift be pulled away from the obstacle. Operating manual NORA Pro V0.1 E Page 22 of 60... -
Page 23: Spreader Bar And Sling Attachment Points
Operating elements and their function 7.9 Spreader bar and sling attachment points There is a total of four attachment points for the NORA Pro clip sling on the spreader bar. The outer, opposing attachment points are the default attachment points for people taller than 1.60 m. -
Page 24: Comfort-System
The leg separator made of skin-friendly PE material is placed on the 3D-Comfort-System from above and can just as easily be removed again by pulling it upwards slightly (double arrow). Operating manual NORA Pro V0.1 E Page 24 of 60... -
Page 25: Leg Straps
Opening the leg strap To open the leg strap, press the red button on the buckle. The connector is released and the strap is automatically retracted by the retractor mechanism. Operating manual NORA Pro V0.1 E Page 25 of 60... -
Page 26: Detachable Footplate
Operating elements and their function 7.12 Detachable footplate The foot plate enables the patient / resident to stand securely. It can be easily detached from the NORA Pro for cleaning. Mounting Footplate Remove the foot plate Take the footplate in both hands. Lift the footplate slightly upwards so that it releases from the suspension at the back. -
Page 27: Castors
Operating elements and their function 7.13 Castors The rear castors of the NORA Pro have brakes and can be locked. Castor Brake unlocked locked Locking the brake Press the light grey castor brake down with your foot (illustration left, red arrow). -
Page 28: Operation
Operation 8 Operation The NORA Pro is designed to be safely operated by a single caregiver. Before each use, it is the responsibility of the caregiver to decide, based on the assessments, whether the transfer should be made by one person alone or by two caregivers. - Page 29 Always check that the clips or the slings are secured and located in the right position before your start lifting your patient! Operating manual NORA Pro V0.1 E Page 29 of 60...
-
Page 30: After Use
4. Position the NORA in front of the patient and adjust it so that the patient’s legs are resting on the 3D-Comfort-System and form a right angle with the thighs. The patient’s feet must be located in the middle of the footplate. Operating manual NORA Pro V0.1 E Page 30 of 60... - Page 31 • During the movement of the sit-to-stand lift, the carrier frame must be closed. 10. The steering of the NORA is enhanced when the carrier frame is not spread. 11. Release the brakes to transfer the patient/resident. Imag Operating manual NORA Pro V0.1 E Page 31 of 60...
-
Page 32: Raising The Patient From A Wheelchair
• Check before and during the height adjustment procedure that your feet are not located in the area of the castors or in the resident’s area. 9. You can now raise the patient/resident. Operating manual NORA Pro V0.1 E Page 32 of 60... -
Page 33: Putting The Patient/Resident Down
If required, raise the spreader bar to avoid injury of the patient/resident. 7. Put the sit-to-stand lift at a safe location. 8. Remove the sling from the patient/resident. Operating manual NORA Pro V0.1 E Page 33 of 60... -
Page 34: Operation Of The Sit-To-Stand Lift
The spreadable chassis highly increases the stability of the sit-to- panel stand lift. Travel path When using the NORA sit-to-stand lift, make sure that the travel path is not narrowed by obstacles or other elements (e.g. wall racks, etc.). Operating manual NORA Pro V0.1 E Page 34 of 60... -
Page 35: Operation Of The Leg Separator (Option)
The battery and the control box must not be opened by the customer. Repairs may be carried out only either by BEKA Hospitec or by companies authorized to this effect by BEKA Hospitec. If the battery is discharged, recharge it as soon as possible to extend the lifetime. -
Page 36: Cleaning / Disinfection
For the manual disinfection of the surface, an isopropyl alcohol solution or a customary disinfection aerosol (spray) can be used. 9.3 Sterilising the sit-to-stand lift The NORA sit-to-stand lift is not suitable for sterilisation. Operating manual NORA Pro V0.1 E Page 36 of 60... -
Page 37: Maintenance, Safety Checks And Servicing
Maintenance, safety checks and servicing 10 Maintenance, safety checks and servicing In order to ensure a safe use of the NORA Pro and for the protection of users and patients, the product must be subjected to regular inspections and maintenance as well as to an annual safety check. -
Page 38: Prior To Each Use
WEEE. 11.2 Disposal of the product The expected operating lifetime of the NORA Pro is approx. 10 years. At the end of the product’s lifetime, contact your BEKA dealer, who will recycle the product in accordance with the locally applicable regulations and laws. -
Page 39: Troubleshooting / After-Sales Service
Check the battery’s charging state. the NORA Pro do not function. d) Remove the battery and check the contacts for damage. e) When hitting an obstacle, first press the "Up" button. - Page 40 The battery must be replaced. Inform the after-sales charged. However, when placed in service. the NORA Pro, just a few lifting cycles are possible. When the hand control is actuated, Check the battery’s charging state.
-
Page 41: Appendix
- Max. height: 1659 mm - Turning radius: 1263 mm - Weight without packaging: 50 kg - Safe Working Load (SWL): max. 205 kg (Nora Pro) IP degree of protection - Sit-to-stand lift IPX4 - Hand control IPX6 Operating mode... - Page 42 - Protection class: IPX4 Battery: - Battery type: Lithium-ion battery - Output voltage: 25 V (DC) - Capacity 4.3 Ah - Output current: I out max 13 A - Protection class: IPX6 Operating manual NORA Pro V0.1 E Page 42 of 60...
-
Page 43: Dimensions Of The Nora Pro
Appendix 13.2 Dimensions of the NORA Pro Operating manual NORA Pro V0.1 E Page 43 of 60... -
Page 44: Connection And Assembly Diagram
Appendix 13.3 Connection and assembly diagram Observe the information given in chapter 6 Installation. Operating manual NORA Pro V0.1 E Page 44 of 60... -
Page 45: Declaration Of Conformity
Appendix 13.4 Declaration of Conformity Operating manual NORA Pro V0.1 E Page 45 of 60... - Page 46 Appendix Operating manual NORA Pro V0.1 E Page 46 of 60...
- Page 47 Appendix Operating manual NORA Pro V0.1 E Page 47 of 60...
- Page 48 Appendix Operating manual NORA Pro V0.1 E Page 48 of 60...
-
Page 49: Additional Equipment, Accessories, And Spare Parts
Blue clip Washable to 60°C. 150 - 205 Orange Spare parts or consumables are available upon request from your BEKA Hospitec dealer or directly from the manufacturer. Operating manual NORA Pro V0.1 E Page 49 of 60... - Page 50 Appendix Please note: You cannot exchange and replace all spare parts by yourself. The assembly requires the knowhow of a qualified expert. Operating manual NORA Pro V0.1 E Page 50 of 60...
-
Page 51: Mounting Instructions
Image 4: The image shows the removed Image 3: battery. Pull the battery When replacing the towards the front to battery, please remove it. check that the release lever engages audibly. Operating manual NORA Pro V0.1 E Page 51 of 60... -
Page 52: Replacing The Hand Control
Remove the plug of control and replace the hand control it with a new one. from the control box Pay attention to (right plug). the coding groove when inserting the plug! Operating manual NORA Pro V0.1 E Page 52 of 60... -
Page 53: Replacing The Control Unit With Holder For The Battery Unit
M4x16 1 cross-head- screwdriver (PH1) Image 4: Image 3: Open the Disconnect the connection flap and NORA Pro from the disconnect all plug power supply by connections from activating the the control unit: emergency stop - Hand control button. Remove the... -
Page 54: Electromagnetic Compatibility
EMC and must be installed and operated in accordance with the EMC instructions included in the accompanying documents. For the devices and systems from BEKA Hospitec GmbH, no special measures must be observed. Portable and mobile HF-communications equipment can interfere with electrical medical equipment. - Page 55 Magnetic field location in a typical IEC 61000-4-8 business or hospital environment. CAUTION U is the mains AC voltage before the application of the test level. Operating manual NORA Pro V0.1 E Page 55 of 60...
- Page 56 In the frequency range from 150 kHz to 80 MHz, the field strength must be less than 10 V/m. Operating manual NORA Pro V0.1 E Page 56 of 60...
- Page 57 NOTE 1: At 80 MHz and 800 MHz, the separation distance for the higher frequency range applies. NOTE 2: These guidelines could not apply to all situations. Electromagnetic propagation is affected by absorption and reflection from structures, objects and people. Operating manual NORA Pro V0.1 E Page 57 of 60...
-
Page 58: Journal
Operator Ordinance), you are compelled to keep a journal for this device. Observe your applicable national / local legislation. You can use this journal as template. Journal Device: Sit-to-stand lift NORA Pro Manufacturer: BEKA Hospitec GmbH, Am Rübenmorgen 3, 35582 Wetzlar Serial number: _____________________________________________ Date of purchase: _____________________________________________ Site:... - Page 59 Appendix Periodic inspection, repair, DGUV-3, safety check, etc. Type of Date Result Measure Signature: inspection Operating manual NORA Pro V0.1 E Page 59 of 60...
- Page 60 BEKA Hospitec GmbH ●Am Rübenmorgen 3 ●35582 Wetzlar Germany● Phone: +49 6 41-9 22 20-0 ●Fax: +49 6 41-9 22 20-20...
Need help?
Do you have a question about the NORA Pro and is the answer not in the manual?
Questions and answers