Table of Contents
Advertisement
Quick Links
User's Manual
BWA2.0 User's Manual for Measurement Guide and Setup
Thank you for purchasing the BWA2.0. This User's Manual describes all the features of the BWA2.0.
Please read before use and keep it in a safe place. By following properly these instructions, you will be able to use the BWA2.0
more safely and effectively.
Advertisement
Table of Contents

Subscribe to Our Youtube Channel
Related Manuals for inbody BWA2.0


Summary of Contents for inbody BWA2.0
- Page 1 Thank you for purchasing the BWA2.0. This User's Manual describes all the features of the BWA2.0. Please read before use and keep it in a safe place. By following properly these instructions, you will be able to use the BWA2.0...
- Page 2 Percent body fat could be a useful parameter than just weight to verify health condition in children and adolescents. • Sarcopenia: InBody Test is a quick and easy way to provide the Skeletal Muscle mass Index (SMI), which is the sum of the skeletal muscle mass of the limbs divided by the height square.
- Page 3 Reproduction, adaptation, or translation of this manual is prohibited without prior written consent from InBody Co., Ltd. under the copyright laws. This manual may be printed incorrectly and subject to change without notice. InBody Co., Ltd. shall not be liable for any errors, incidental, or consequential damages that occurred by not complying with the content of the User᾽s Manual.
-
Page 5: Table Of Contents
Table of Contents I. Installing the BWA2.0 A. Product Components B. Accessories C. Installation Environment D. Installation E. Initial Setup F. Connecting External Devices G. Precautions for Maintenance II. BWA2.0 Test A. Precautions for Measurement B. Test Instructions C. Electrode Connection Method D. -
Page 6: Installing The Bwa2.0
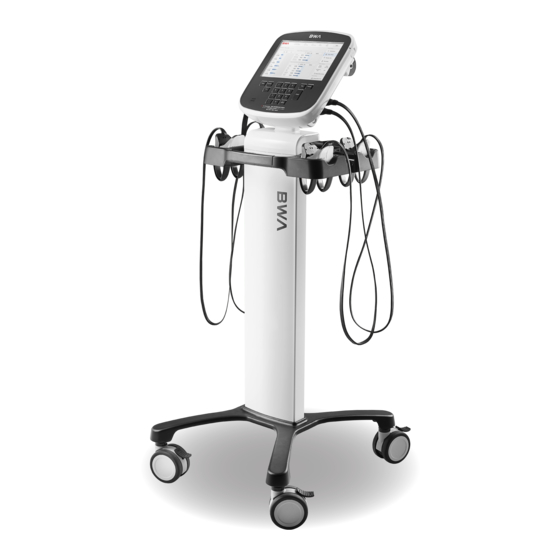
I. Installing the BWA2.0 A. Product Components The BWA2.0 consists of the following components. Make sure all of the following components are present. * Please check each component of the system for damage prior to installation. BWA2.0 main unit ❶... -
Page 7: Accessories
Caution • The BWA2.0 can be installed in the portable cart or portable bag, both are available for purchase. Attention • Le BWA 2.0 peut être installé dans le chariot portable ou la valise. Vous pouvez acheter l'un ou l'autre. -
Page 8: Installation Environment
C. Installation Environment Check the environment before installing the BWA2.0. This equipment is suitable for indoor use. If installing the equipment outdoors, the following requirements must be fulfilled. Temperatures range 0 ~ 40°C (50 ~ 104°F) Relative humidity 30 ~ 75% RH... - Page 9 2) Turn the two knobs on the bottom of the stand counterclockwise to remove them. 3) After aligning the two bolt positions of the stand and the lower body part, turn the knob clockwise to fix them. When aligning the stand on the lower body part, pay attention to the direction of the stand so the stand properly fits into the shape of the lower part.
- Page 10 5) Tilt the basket to insert it into the top of the stand as shown below. Hang it by aligning the four grooves with the four knob positions on the back of the stand. Caution • When hanging the basket on the top of the stand, be careful not to get your hands or other body parts caught. Attention •...
- Page 11 8) Open the main unit packing box and remove the packing pad. Take out the BWA2.0 main body, clamp electrodes (or forceps electrodes) and batteries from the box. Then remove the protective packaging material from the main unit and the electrodes.
- Page 12 9) Press the cover located on the back of the main unit and pull it down to remove the cover. (Store the cover separately.) 10) Align the main unit into the mounting part of the cart, and then lower the main body downward to insert it. Caution •...
- Page 13 Caution • When connecting or disconnecting the cable, grasp the connector part and not the cable. Otherwise, the cable may break. Attention • Pour éviter d'endommager le câble, saisissez le connecteur et non le câble en branchant et en débranchant celui-ci. Sinon, le câble peut briser.
- Page 14 NE PAS utiliser ou ranger une batterie près d'une source de chaleur(par ex. foyer ou chauffage - 60°C+). c. En rechargeant la batterie, veuillez utiliser l'adaptateur fourni par InBody. d. NE PAS brancher la batterie directement dans une prise murale ou une prise de véhicule.
- Page 15 • Do not use high temperature (over 60℃) packaging materials. • Dispose of the batteries according to local regulations and guidelines. • Improper using of batteries may cause the performance degradation of the BWA2.0 or a fire which may damage the BWA2.0.
- Page 16 Wheel unlocked Wheel locked 15) Connect the power adapter to the power inlet on the right-side port of the BWA2.0. Connect the power cable to the power adaptor. * The BWA2.0 can be connected to optional test equipment and PC programs such as stadiometer, blood pressure monitor and LookinBody120.
- Page 17 • If you are connecting the BWA2.0 to another electrical device, then turn on the other device first. When turning off the power, turn off the power of the BWA2.0 first, and then turn off the power of the other device. This can minimize the electric shock from the BWA2.0.
- Page 18 Dans un environnement sujet à l'électricité statique, posez l'équipement sur un tapis antistatique. • Installez le BWA2.0 sur un plancher plat et sans vibrations. Si ce n'est pas le cas, les résultats de tests pourraient s'avérer inexacts. • Ne nettoyez pas les électrodes avec un détergent. Un produit nettoyant liquide qui coulent dans l'électrode peut causer de la corrosion ou une défaillance de l'équipement.
- Page 19 Caution • When you insert the thermal printer to the BWA2.0, do not place your hands or other body parts on the main unit and the thermal printer fastening area. There is a risk of getting the hand or other body parts caught.
- Page 20 2. How to Install the Portable Bag 1) Open the box and take out the bag. 2) Put the BWA2.0, four clamps (or forceps) electrodes, two batteries, power cable, power adapter, thermal printer, disposable electrode, and electrolyte tissue into the portable bag.
- Page 21 Connect the electrode cables labeled Right Arm, Left Arm, Right Leg, and Left Leg to the BWA2.0 according to the cable color marked on the sides of the BWA2.0. Make sure the cables are plugged firmly into each location. 4) Connect the thermal printer to the COM port on the BWA2.0 using the thermal printer cable.
- Page 22 - Connect the thermal printer cable to the thermal printer. - Make sure the 'InBody' logo of the thermal printer is visible from above and that the thermal printer cable fits into the groove. Caution • The thermal printer is sold separately.
-
Page 23: Initial Setup
3. Enter the administrator password to set the password. This screen will appear only once for the initial password setup. * Be careful not to forget the password you set. If you have forgotten your password, please contact InBody Customer Service. - Page 24 07. Export Data as Excel : This option allows copying the test result saved in the BWA2.0 to USB memory as an Excel file format. The test result can be checked through an Excel file on the computer.
- Page 25 16. Internet Options : This option allows connecting the BWA2.0 to the Internet via Wi-Fi or wired LAN. Once the BWA2.0 is connected to the Internet, the BWA2.0 test results can be sent to the website (www.inbodycare.com), or the LookinBody120, the personal membership management PC application that can be connected remotely.
- Page 26 : This function allows seeing the information stored in "Setup 24. Customer Service Information" if you have any questions about the BWA2.0 or have a problem. 02. Results Sheet does not print : This option provides a checklist if printing does not work on the printer connected to the BWA2.0. 03. N/A 04. N/A 05.
-
Page 27: Connecting External Devices
Connect the thermal printer cable supplied with the thermal printer to the COM 9-pin serial terminal on ❷ the right-side port of the BWA2.0. Connect the other end of the cable to the serial terminal of the thermal printer. COM 9-pin serial terminal Turn on the thermal printer. - Page 28 4) Blood pressure monitor The blood pressure values measured by the blood pressure monitor are sent to the BWA2.0 when it is connected to the BWA2.0. * Make sure to connect only the InBody blood pressure monitor.
- Page 29 ❶ * When the BWA2.0 is already turned on, it may not be properly connected to the stadiometer and the blood pressure monitor. Connect the serial cable supplied with SD400 to the COM 9-pin serial terminal on the right-side port of ❷...
- Page 30 If there is not a serial port on your PC, you can connect a normal USB-AB type cable to the USB SLAVE port on the right-side port of the BWA2.0 instead of the serial cable above. Connect the other end of the USB cable to the USB port of the PC.
- Page 31 4) If "O" is selected on "Connect via Bluetooth?", then you can select a program or a stadiometer to connect. * If LookinBody and the BWA2.0 are already connected with Bluetooth, the connection will stop between LookinBody and the BWA2.0 when you are selecting an external device.
- Page 32 8) If the stadiometer is registered properly, the Bluetooth ID of the compatible device connected to the BWA2.0 will appear as shown below. 9) Press the Exit button to return to the test standby screen, and the Bluetooth icon and the stadiometer icon will be displayed in the upper left corner after a while.
- Page 33 3. Connecting to the Internet Once the BWA2.0 is connected to the Internet, you can use it to connect with cloud services or LookinBody. * If the cloud service does not work or if LookinBody is not recognized, please contact InBody Customer Support.
- Page 34 2) Connecting Wi-Fi Press the [Administrator Menu] button on the test standby screen. ❶ Enter the password to enter the Administrator Menu. ❷ Enter "16. Connect to the Internet". ❸ Press Wi-Fi and press the Next button. ❹ * Depending on the service area, you may need to enter the IP address or DNS address manually. In this case, press the corresponding button to enter manually.
-
Page 35: Precautions For Maintenance
à ne pas égratigner l'écran LCD. • Les emballages et autres déchets doivent être éliminés selon les lois et règlements applicables. • Éteignez le BWA2.0 en premier et les autres dispositifs par la suite, et ce, pour minimiser tout choc électrique de l'équipement. -
Page 36: Bwa2.0 Test
• A person who is equipped with a medical device that is essential for life support, such as pacemakers or patient monitoring devices, is not recommended to use the BWA2.0. Weak electric current flows in the human body during the test, which may lead to medical device failure and life risk. - Page 37 • Si la peau de vos poignets et chevilles est sèche ou recouverte de cellules mortes, il est possible que le test ne marche pas bien. Nettoyez vos poignets et chevilles à l'aide d'une lingette humide InBody avant de procéder aux mesures.
-
Page 38: Test Instructions
B. Test Instructions 1. Make sure that the battery is sufficiently charged in the main unit.At least 20% or more charge is required for measurement. 2. Stay at least 10-15 minutes in the posture you want to measure before measuring so that the body fluid distribution can be stable. If the following error screen appears, the measurement will not proceed if the battery charge is low. - Page 39 6. Press the "Accept Privacy Policy" section, and then the "Privacy Policy" screen will appear as shown below. Read the contents of the Privacy Policy of InBody. 7. Make sure that the electrodes are properly attached in the correct positions after entering the personal information.
- Page 40 9) The measurement result screen appears as shown below after finishing the BWA test. You can check the measurement information according to the selected type of Results Sheet if a printer is connected to the BWA2.0. * You can set the result sheet related settings from "10. Results Sheet Types" to "15. Printing Alignment" in the Administrator Menu.
-
Page 41: Electrode Connection Method
C. Electrode Connection Method 1. Clamp electrode (Contact type) 1) Wrist Attach the Left Arm clamp onto the left hand and attach the Right Arm clamp onto the right hand. Insert the electrode to the center of the carpal so that the side marked 'BWA' in red faces the back of the hand and the unmarked side faces the palm. - Page 42 2. Forceps electrode (Adhesion Type) 1) Wrist Attach the disposable electrode (BWA-ES100) to the center of the back of the hand with the carpal positioned in the center as shown below. Attach the disposable electrode (BWA-ES100) so that the red electrode is placed over the back of your hand and the black electrode is placed under the wrist.
- Page 43 Caution • Four electrodes of the same type must be connected to proceed with the test. • When attaching electrodes to the amputation site, attach the electrodes to the end of the site as much as possible. • However, a certain distance is required between the two electrodes, so refer to the image below for the correct attachment method.
-
Page 44: Test Posture
D. Test Posture In order to use the BWA2.0 correctly, it is necessary to understand the correct measuring posture. Maintain consistent measurement posture for high reproducibility and reliable results. 1) Lying Posture Accurate posture Measurement Posture • The BWA2.0 is located next to the knee as shown above. - Page 45 2) Seated Posture Accurate posture Measurement Posture • Sit in a chair with your back straight against the backrest. • Put a cushion behind your back. • Make arms naturally descend as if standing. • Spread your legs wide enough to keep your thighs from touching each other. •...
- Page 46 Do not put your arm on the armrest. Do not bend your back Do not measure directly on the floor barefoot. Measure on a mat where the current does not flow. Keep thighs from touching each other. Spread legs forward as possible rather than bending them at right angles.
- Page 47 3) Standing Posture Accurate posture Measurement Posture • Stand up facing the back side of the equipment. • Step up on a mat where the current does not flow out of your bare feet onto the floor. • Open your arms slightly beyond 15 degrees to keep your arms and torso from touching. •...
- Page 48 Attention • Mesurez après avoir gardé la position debout pendant au moins 10 à 15 minutes. • NE PAS mesurer à même le plancher. La valeur de la mesure peut s'avérer inexacte si les pieds nus touchent le plancher directement. Placez un tapis au plancher et surélever le d'au moins 3 cm. •...
-
Page 49: Transportation And Storage
To transport the BWA2.0 safely, two people should keep the equipment horizontal as follows. B. Repacking Instructions Do not transport the equipment frequently once the BWA2.0 has been installed. If you need to transport the BWA2.0, transport after repackaging it in the following order. - Page 50 - Put the removed power adapter, power cable, and batteries in the accessory box. 4. With one hand grasping the 'BWA' logo on the top of the BWA2.0 main unit, tilt the main unit slightly back by pressing the button on the bottom of it and lifting it up.
- Page 51 6. Wrap the BWA2.0 in protective vinyl and place it along with the two accessory boxes over the box containing the clamp electrodes after placing it in the air cell, and seal them as shown below. 7. Turn the knob on the lower part of the portable cart basket counterclockwise to remove it.
- Page 52 9. Tighten the knob removed from the lower part of the cart basket by turning it clockwise on the back of the stand to avoid losing it. 10. Turn the two knobs that have fastened the cart stand and the lower body part counterclockwise to remove. Caution •...
-
Page 53: Transportation And Storage Environment
Protective vinyl for package Caution • When repacking the equipment, the protective packing materials provided by InBody must be used. Attention • Pour réemballer l'équipement, vous devez utiliser les matériaux d'emballage protecteurs fournis par InBody. C. Transportation and Storage Environment The BWA2.0 should be transported or stored under the following conditions. -
Page 54: Regarding The Equipment
A. Regarding the Equipment If a problem occurs while using the BWA2.0, first check the "FAQ" in Administrator Menu of the BWA2.0. "FAQ" guides users through frequent problems so they can fix the problems themselves. If you can't check through "FAQ", check the questions and answers below. - Page 55 The touch screen used for the BWA2.0 is pressure sensitive. • Press firmly to optimize touchscreen response. I want to know how to connect Refer to "F. Connecting External device" in "I. Installing the BWA2.0" • with the accessories. in this User's Manual.
-
Page 56: Regarding The Test
The BWA2.0 does not harm the human body because it uses minute electric • test harmless to the human current. The safety of the BWA2.0 has been proven and is being used by many body? medical institutions because the BWA2.0 has already obtained the national and European medical device licenses. -
Page 57: Others
Others A. Exterior and Functions The names and functions of each part of the BWA2.0 are as follows. * Please check each component of the system for damage prior to installation. 1. Front view Display: It displays each step of the test, guide, and test result. It enables entering the data required for the test, ❶... - Page 58 LAN port (10/100T-Base): Used to connect the BWA2.0 to the Internet or LookinBody120 installed on the PC ❷ via a wired connection. * You can connect the BWA2.0 to LookinBody120 installed on the PC even if only one of ❷, ❹, ports is connected. ❺...
-
Page 59: Using And Charging The Battery
• InBody doit être le fournisseur de tous les dispositifs périphériques incluant les accessoires qui se connectent au BWA2.0. B. Using and Charging the Battery The battery (IB Battery 220) is designed to connect the BWA2.0 of InBody Co., Ltd. Do not use the battery for purposes other than connecting it to the BWA2.0. - Page 60 The percentage value and battery level are displayed on the upper right when you are charging the adapter by connecting it to the BWA2.0 main unit. If the following error screen appears or if the battery level drops below 20%, charge it again.
- Page 61 3. How to charge the battery The charging method of the battery can be selected using the ON/OFF switch of the BWA2.0 unit's power while the BWA2.0 unit is connected to the battery. 1) When the BWA2.0 is powered ON (Slow Charging) O n the right upper corner of the screen, the % and remaining chage amount is displayed.
-
Page 62: Safety Information
C. Safety Information Marks 9-pin serial terminal (Female, RS-232C) LAN port (10/100T-Base) USB port Safety Symbols Danger high voltage Warning / Caution BF-type equipment Power adapter terminal Etc. Symbols Manufacturer Serial number Authorized representative in the Alternating current EUROPEAN COMMUNTY European Conformity Operating Instructions 1639... -
Page 63: Product Classification
• Segmental Phase Angle(5kHz, 50kHz, 250kHz: Right Arm, Left Arm, Trunk, Right Leg, Left Leg) • Impedance(Each segment and each frequency) Graph • InBody Score(Body Fat-Fat Free Mass Control Output, Nutrition Evaluation Output, Body Balance, Evaluation Output, Segmental Fat Analysis (Graph) Output, Segmental Fat Analysis Output, Obesity,... - Page 64 • Whole Body Phase Angle(50kHz: the right side of the body) • Segmental Phase Angle (5kHz, 50kHz, 250kHz: Right Arm, Left Arm, Trunk, Right Leg, Left Leg) • Impedance(Each segment and each frequency Graph) InBody Result Sheet for Results and Interpretations Children •...
- Page 65 Research Results Sheet • Body Composition Summary (Soft Lean Mass, Fat Free Mass, Body Fat Mass, Intracellular Water, Extracellular Water, Total Body Water, ECW/TBW, Weight, Right arm, Left arm, Trunk, Right leg, Left leg, Whole body) • Body Composition Analysis (Soft Lean Mass, Intracellular Water, Extracellular Water, Body Fat Mass, ECW Ratio, Evaluate 'Whole body, Right arm, Left arm, Trunk, Right leg, Left leg' respectively) •...
-
Page 66: Feature Specification
The member ID will be automatically inputted when the barcode ID is scanned. Backup Data Backup data saved in the BWA2.0 by using a USB Thumb Drive, Restore results on the BWA2.0 from a backup file. QR Code If you scan the QR code, the InBody result will be transmitted to the website (InBodyCare) so that you can confirm it. -
Page 67: Other Specifications
RS-232C 1EA, USB HOST 2EA, USB SLAVE 1EA, LAN (100/10T) 1EA, Bluetooth 1EA, Wi-Fi 1EA Compatible Printer Laser/Inkjet Printers (Printers recommended by InBody) * A list of printers compatible with the InBody can be found at http://www.inbodyservice.com 322 (W) X 282 (L) X 81.5 (H): mm Dimension 12.7(W) X 11.1L) X 3.2(H) : inch... - Page 68 1639 ⓒ2021 InBody Co., Ltd. All rights reserved. IM-USA-I3-C-211119...
Need help?
Do you have a question about the BWA2.0 and is the answer not in the manual?
Questions and answers