Table of Contents
Advertisement
Quick Links
Quality and Experience
Operating Manual
pfm Slide 4005 E
Sliding microtome
Please read this operating manual
carefully before using the instrument
for the first time and make certain
that you are familiar with the method
of operation as well as the instrument's
operating elements to ensure that it
is used in the correct way.
www.pfmmedical.com
Advertisement
Table of Contents

Related Manuals for PFM Medical Slide 4005 E


Summary of Contents for PFM Medical Slide 4005 E
- Page 1 Quality and Experience Operating Manual pfm Slide 4005 E Sliding microtome Please read this operating manual carefully before using the instrument for the first time and make certain that you are familiar with the method of operation as well as the instrument’s operating elements to ensure that it is used in the correct way.
- Page 2 All the information in this operating manual applies to the pfm Slide 4005 E. Serial number: Please enter the serial number of your instrument here.
-
Page 3: Table Of Contents
1.6 General precautions Part 2 – Introduction 2.1 View of the pfm Slide 4005 E 2.2 Technical data for the pfm Slide 4005 E 2.3 Scope of delivery Part 3 – Operating instructions 3.1 Transportation, unpacking and setting up the instrument 3.2 Assembling the accessories... - Page 4 5.4 Returning the microtome for repair or maintenance 5.5 Decontamination 5.6 Instrument fuse 5.7 Warranty 5.8 Declaration of Conformity Part 6 – Disposal of the microtome when put out of use Part 7 – Accessories pfm Slide 4005 E Rev. 2022-03-31...
-
Page 5: Part 1 - Safety Instructions
Safety instructions Part 1 – Safety instructions Please read this operating manual carefully before working with the pfm Slide 4005 E. Make certain that you are familiar with the instrument‘s controls and method of operation. Always observe the following precautions during operation of the instrument. Failure to do so is contrary to the recognised technical regulations and the intended use of the instrument. - Page 6 Permissible temperature range at the place of use +10°C - +40°C 10°C 50°C Permissible temperature range for storage and transportation -10°C - +50°C -10°C Permissible humidity range for storage and transportation, and at the place of use 10% - 80% (non-condensing) pfm Slide 4005 E Rev. 2022-03-31...
-
Page 7: Intended Purpose
Safety instructions 1.2 Intended purpose The pfm Slide 4005 E is a modern, electronic slide microtome the histopathological process. It may only be operated by designed for preparation of thin sections of human and appropriately trained personnel. The sections obtained with... -
Page 8: Operating The Instrument
If unusual noises develop, please contact your responsible ▸ During the sectioning, do not place your fingers between pfm service technician or contact pfm medical ag directly. the sample and the knife/microtome blade. ▸ The instrument may only be opened and repaired by ▸... -
Page 9: General Precautions
The pfm Slide 4005 E fulfils the requirements of changing the accessory parts. the standard IEC 61326-2-6 on immunity and emissions. -
Page 10: Part 2 - Introduction
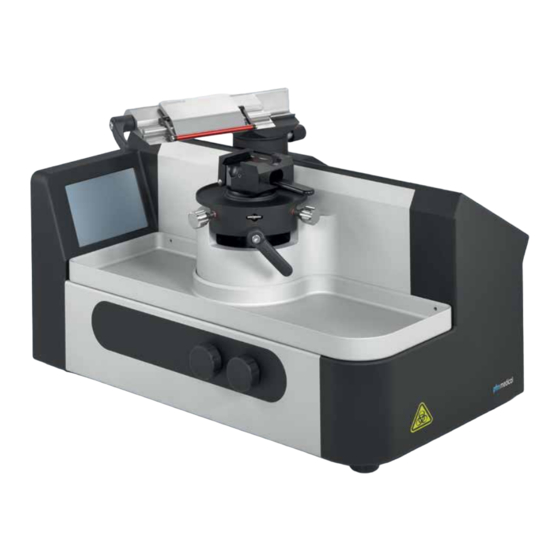
Introduction Part 2 – Introduction 2.1 View of the pfm Slide 4005 E Knife holder Adjustment screws for Clamping lever Control wheel Coarse Finger guard X/Y object orientation Section waste tray Feed/Trimming Universal cassette clamp Operating display Control wheel Settings... -
Page 11: Technical Data For The Pfm Slide 4005 E
Introduction 2.2 Technical data for the pfm Slide 4005 E ▸ Fine feed: automatically via sliding movement ▸ Horizontal range: 160 mm Section thickness: 0.5 - 100 μm ▸ ▸ Maximum sample size: ▸ Setting range: 0 - 10 μm in 0.5 μm steps / 10 - 20 μm in ▸... -
Page 12: Part 3 - Operating Instructions
NOTE If possible, retain the original packaging for the entire lifetime of the instrument so that you can repackage the instrument correctly if it needs to be sent for servicing. pfm Slide 4005 E Rev. 2022-03-31... -
Page 13: Assembling The Accessories
Some object clamps are optionally also available as a non-orientable version. For use on the instrument, the object clamp must be attached to the adapter fixed or adapter orientable. It is then fitted to the instrument as described. pfm Slide 4005 E Rev. 2022-03-31... - Page 14 Insert the microtome blade holder into the knife holder from the side. ▸ Clamp the microtome blade holder using the two clamping screws. ▸ After each change, check that the microtome blade holder is sufficiently clamped. pfm Slide 4005 E Rev. 2022-03-31...
- Page 15 After each change, check that the microtome blade is sufficiently clamped. Section waste tray The section waste tray is only attached to the pfm Slide 4005 E and can be removed at any time. pfm Slide 4005 E Rev. 2022-03-31...
-
Page 16: Initial Operation
. After this, the START display automatically goes back to the control panel display. WARNING Caution! Do not operate the instrument if the display has no function, shows illogical or incorrect values or is damaged. pfm Slide 4005 E Rev. 2022-03-31... -
Page 17: Operating Display
Settings control wheel. Press the It is also possible to change the preset section thickness button again or press the Settings control wheel during the sectioning by turning the Settings control wheel. THICKNESS to save the set value. pfm Slide 4005 E Rev. 2022-03-31... -
Page 18: Function And Adjustment Of The Coarse Feed And Trimming Modes
Trimming/Coarse Feed control wheel is released ▸ Feed the object in the direction of the knife using the (TRIMMING MAN) the infeed automatically reverts to the coarse feed setting. preselected section thickness. pfm Slide 4005 E Rev. 2022-03-31... -
Page 19: Memo
WARNING Caution! It is imperative that the knife slide be locked when working in the object orientation area. Object mounting pfm Slide 4005 E Rev. 2022-03-31... -
Page 20: Universal Cassette Clamp
Movement of the object along the x- and y-axes is possible using the coaxial adjusting screws. The clamping lever is set to the clamp position as soon as the required position is reached. The set position is thus fixed. X/Y adjustment screws Clamping lever pfm Slide 4005 E Rev. 2022-03-31... -
Page 21: Exchanging The Object Mounting
(refer to index on the scale). WARNING Caution! It is imperative that the knife slide lock be activated during all work on the knife holder. Caution! The clearance angle can only be adjusted when the clamping lever is loosened. pfm Slide 4005 E Rev. 2022-03-31... -
Page 22: Microtome Blade Holder
Adapter orientable 3.24 Section waste tray The section waste tray is only attached to the pfm Slide 4005 E and can be removed at any time in order to dispose of the paraffin section residue. pfm Slide 4005 E Rev. 2022-03-31... -
Page 23: Part 4 - Working With The Microtome
Selection of the knife and FEATHER® microtome blade other heat sources should be avoided, otherwise the paraffin will become soft and it will no longer be possible to section Information can be obtained directly from pfm medical ag. the sample. service@pfmmedical.com... -
Page 24: Troubleshooting
Inaccurate feed Cross roller guide Check mechanical clearances, adjust, clean Vertical cross roller guide Check mechanical clearances, adjust, clean Section thickness device Check adjustment, set No clearance angle adjustment Knife holder Check clamping, adjust pfm Slide 4005 E Rev. 2022-03-31... -
Page 25: Part 5 - Maintenance, Cleaning And Care
Details can be obtained from your sales representative or carried out by a trained service technician authorised by directly from pfm medical ag. We recommend an annual pfmmedical. pfm medical ag provides maintenance to ensure electrical safety inspection. -
Page 26: Returning The Microtome For Repair Or Maintenance
If this is not possible for any particular reason, the completed in advance and enclosed with the instrument. instrument can be sent to pfm medical ag. Before you send If it is found that the instrument poses a potential hazard,... -
Page 27: Warranty
The transport of the instrument to us and return transport during this period shall be at the customer’s risk. 5.8 Declaration of Conformity The current Declaration of Conformity form can be found on our website: http://www.pfmmedical.com/downloads pfm Slide 4005 E Rev. 2022-03-31... -
Page 28: Part 6 - Disposal Of The Microtome When Put Out Of Use
Substances in Electrical and Electronic Equipment). At pfm medical ag, we feel responsible for our products, from the initial concept through to their disposal, and we regard this as an opportunity for us to make our contribution to the conservation of resources. As the manufacturer, we assume responsibility for the disposal of the decommissioned instrument on your behalf. -
Page 29: Part 7 - Accessories
▸ ▸ Crossways and lengthways Crossways and lengthways clamping possible clamping possible ▸ Non-orientable version for ▸ Orientable version with direct adaptation adapter pfm Slide 4005 E Rev. 2022-03-31... - Page 30 Removable and easy to clean ▸ Black anodised pressure plate ▸ Finger guard ▸ Removable and easy to clean Finger guard ▸ Section waste tray REF 400520 ▸ Material: Anodised aluminium ▸ Easy to clean pfm Slide 4005 E Rev. 2022-03-31...
- Page 31 Notes For your notes pfm Slide 4005 E Rev. 2022-03-31...
- Page 32 Our Customer Solutions Team will be happy to advise you. service@pfmmedical.com +49 (0)2236 9641-220 +49 (0)2236 9641-51 pfm medical ag Certified according to Wankelstrasse 60 DIN EN ISO 13485 50996 Cologne Germany www.pfmmedical.com – For more information about pfm medical ag products IFU2004005/2022-03-31...
Need help?
Do you have a question about the Slide 4005 E and is the answer not in the manual?
Questions and answers