Table of Contents
Advertisement
Quick Links
Quality and Experience
Operating Manual
pfm Rotary 3005 E
Please read this operating manual
carefully before using the instrument
for the first time and make certain
that you are familiar with the method
of operation as well as the instrment's
operating elements to ensure that it
is used in the correct way.
www.pfmmedical.com
Advertisement
Table of Contents

Subscribe to Our Youtube Channel
Related Manuals for PFM Medical Rotary 3005


Summary of Contents for PFM Medical Rotary 3005
- Page 1 Quality and Experience Operating Manual pfm Rotary 3005 E Please read this operating manual carefully before using the instrument for the first time and make certain that you are familiar with the method of operation as well as the instrment’s operating elements to ensure that it is used in the correct way.
- Page 2 All the information in this operating manual applies to the pfm Rotary 3005 E. Serial number: Please enter the serial number of your instrument here.
-
Page 3: Table Of Contents
1.5 Operating the instrument 1.6 General precautions Part 2 – Introduction 2.1 Views of the pfm Rotary 3005 E 2.2 Technical data for the pfm Rotary 3005 E 2.3 Technical data control panel 2.4 Scope of delivery Part 3 – Operating instructions 3.1 Transportation, unpacking and setting up... - Page 4 5.4 Returning the microtome for repair or maintenance 5.5 Decontamination 5.6 Instrument fuse 5.7 Warranty 5.8 Declaration of Conformity Part 6 – Disposal of the pfm Rotary 3005 E when put out of use Part 7 – Accessories pfm Rotary 3005 E Rev.2022-03-21...
-
Page 5: Part 1 - Safety Instructions
Safety instructions Part 1 – Safety instructions Please read this operating manual carefully before working with the pfm Rotary 3005 E. Make certain that you are familiar with the instrument‘s controls and method of operation. Always observe the following precautions during operation of the instrument. Failure to do so is contrary to the recognised technical regulations and the intended use of the instrument. - Page 6 Permissible temperature range at the place of use +10°C - +40°C 10°C 50°C Permissible temperature range for storage and transportation -10°C - +50°C -10°C Permissible humidity range for storage and transportation, and at the place of use 10% - 80% (non-condensing) pfm Rotary 3005 E Rev.2022-03-21...
-
Page 7: Intended Purpose
Safety instructions 1.2 Intended purpose The pfm Rotary 3005 E is a modern, semi-electronic rotary examination as part of the histopathology process. It may microtome designed to generate thin sections of human only be operated by appropriately trained staff. The sections... -
Page 8: Operating The Instrument
If unusual noises develop, please contact your responsible ▸ A knife/blade holder should always be securely fixed to the pfm service technician or contact pfm medical ag directly. microtome so that it cannot fall off. ▸ The instrument may only be opened and repaired by ▸... -
Page 9: General Precautions
The pfm Rotary 3005 E fulfils the requirements changing the accessory parts. You can find additional of the standard IEC 61326-2-6 on immunity and emissions. -
Page 10: Part 2 - Introduction
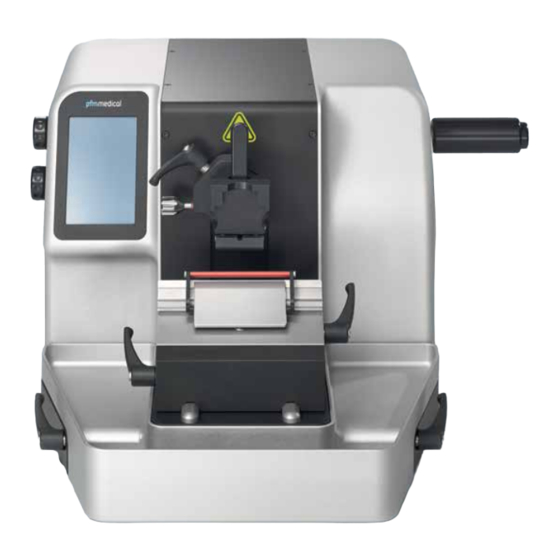
Introduction Part 2 – Introduction 2.1 Views of the pfm Rotary 3005 E Control wheel Settings Control wheel Coarse Feed/Trimming Display Universal cassette clamp Clamping lever for clearance angle adjustment Clamping levers for knife holder Clamping lever for object orientation... -
Page 11: Technical Data For The Pfm Rotary 3005 E
Introduction Nameplate Mains connection/ instrument fuse Foot switch connection 2.2 Technical data for the pfm Rotary 3005 E ▸ Section thickness: 0.5 - 100 μm ▸ Power supply: 100/120/230/240 V AC, 50 - 60 Hz ▸ Setting range: 0.5 - 10 μm in 0.5 μm steps / 10 - 20 μm in ▸... -
Page 12: Scope Of Delivery
1 Mains power cable 1 Protective cover Without blade holder base and disposable blade holder upper jaw Without object clamp and adapter Without control panel NOTE The up-to-date electronic operating manual can be found on our website: http://www.pfmmedical.com/downloads pfm Rotary 3005 E Rev.2022-03-21... -
Page 13: Part 3 - Operating Instructions
NOTE If possible, retain the original packaging for the entire lifetime of the instrument so that you can repackage the instrument correctly if it needs to be sent for servicing. pfm Rotary 3005 E Rev.2022-03-21... -
Page 14: Assembling The Accessories
Some object clamps are optionally also available as a non-orientable version. For use on the instrument, the object clamp must be attached to the adapter fixed or adapter orientable. It is then fitted to the instrument as described. pfm Rotary 3005 E Rev.2022-03-21... - Page 15 Slide the knife holder base onto the base plate via the two guides and fix it above the knife holder mounting device. ▸ Clamp the knife holder mounting device using the knife holder clamping levers. ▸ After each change, check that the clamping levers are sufficiently clamped. pfm Rotary 3005 E Rev.2022-03-21...
- Page 16 The colour-marked (green) connection for the control panel is located on the back of the instrument. ▸ Connect the control panel cable to the control panel socket. WARNING Caution! Please observe the guide on the foot switch socket and do not turn the plug in the connection socket. pfm Rotary 3005 E Rev.2022-03-21...
- Page 17 ▸ Make sure that the microtome blade is positioned parallel to the pressure plate. ▸ Clamp the pressure plate using the clamping lever. ▸ After each change, check that the clamping lever is sufficiently clamped. pfm Rotary 3005 E Rev.2022-03-21...
-
Page 18: Initial Operation
Caution! If the instrument is not operated with the mains power cable supplied, the user must carry out a safety test with the new mains power cable before using the instrument for the first time. pfm Rotary 3005 E Rev.2022-03-21... -
Page 19: Switching On The Instrument
3.5 Operating controls The pfm Rotary 3005 E is equipped with a modern touch comfortable operation. When the control panel is connected, screen system. The control panels and displays are clear and the instrument can only be controlled from the control arranged by function. -
Page 20: Control Panel
Operating instructions 3.7 Control panel If the pfm Rotary 3005 E is to be operated via the separate control panel, it must be connected to the instrument before switching it on. The connection for the control panel is located on the back of the instrument. -
Page 21: Function And Adjustment Of The Trimming And Coarse Feed Modes
▸ Move the object towards the knife using the Coarse Feed mode. ▸ Change to Trimming mode (AUT/MAN) by pressing the Trimming/Coarse Feed control wheel and trim the sample by turning the handwheel. pfm Rotary 3005 E Rev.2022-03-21... -
Page 22: Changing Samples/Interruption Of Work
A section counter is used to add up the sections performed. By pressing the button, the section counter/ After each turn of the handwheel, the counter increases by addition is set to zero. one or by the section thickness in µm. pfm Rotary 3005 E Rev.2022-03-21... -
Page 23: Mounting The Object
The clamping lever must be pulled upward to in- sert or withdraw an embedding cassette. WARNING Caution! The contact surfaces on the cheeks of the object clamps must be free of any residual paraffin. Otherwise proper clamping cannot be guaranteed. pfm Rotary 3005 E Rev.2022-03-21... -
Page 24: Object Orientation
Knife angle scale Clamping lever for clearance angle adjustment pfm Rotary 3005 E Rev.2022-03-21... -
Page 25: Removing/Attaching The Object Mounting Device
Caution! After completing the sectioning, the handwheel should always be locked using the handwheel lock. Take care that the slide of the handwheel lock is in the correct position to ensure that it is locked correctly. Handwheel Handwheel lock pfm Rotary 3005 E Rev.2022-03-21... -
Page 26: Knife Holder
The knife holder base is used for mounting the disposable blade holder upper jaw and is fixed to the base plate of the microtome above the knife holder mounting device. The knife holder base can be released or clamped with the knife holder clamping levers (on the left and right). pfm Rotary 3005 E Rev.2022-03-21... -
Page 27: Knife Holder Mounting Device
Pressure plate Under normal circumstances, a clearance angle setting of Clearance angle adjustment clamping lever 10° is recommended for the pfm Rotary 3005 E. The upper Pressure plate clamping lever jaw of the disposable blade holder is optionally available Knife angle scale either as a low profile blade holder for narrow blades or as a high profile blade holder for wide blades. -
Page 28: Section Waste Tray
Handwheel is hard to turn Ball bearing defective Replace the entire drive claw The clamping eccentric cannot be Clamping of the adapter is not correctly Adjust clamping of adapter fully tightened adjusted pfm Rotary 3005 E Rev.2022-03-21... -
Page 29: Part 4 - Working With The Microtome
Selection of the FEATHER® microtome blades will become soft and it will no longer be possible to section Information can be obtained directly from pfm medical ag. the sample. service@pfmmedical.com T +49 (0)2236 9641-220... -
Page 30: Trouble-Shooting
Longer trimming time required Section too thick Object holder is insufficiently clamped Check the clamping and clean Knife holder/pressure plate is insufficiently Check the clamping and clean clamped Block too warm Cool down the block pfm Rotary 3005 E Rev.2022-03-21... -
Page 31: Part 5 - Microtome Maintenance, Cleaning And Care
Details can be obtained from your sales representative or be carried out by a trained service technician authorised by directly from pfm medical ag. We recommend an annual pfmmedical. pfm medical ag provides maintenance to ensure electrical safety inspection. -
Page 32: Returning The Microtome For Repair Or Maintenance
If this is not possible for any particular reason, the completed in advance and enclosed with the instrument. instrument can be sent to pfm medical ag. Before you send If it is found that the instrument poses a potential hazard,... -
Page 33: Warranty
The transport of the instrument to us and return transport during this period shall be at the customer‘s risk. 5.8 Declaration of Conformity The current Declaration of Conformity form can be found on our website: http://www.pfmmedical.com/downloads pfm Rotary 3005 E Rev.2022-03-21... -
Page 34: Part 6 - Disposal Of The Pfm Rotary 3005 E When Put Out Of Use
Electrical and Electronic Equipment). At pfm medical ag, we feel responsible for our products, from the initial concept through to their disposal, and we regard this as an opportunity for us to make our contribution to the conservation of resources. As the manufacturer, we assume responsibility for the disposal of the decommissioned instrument on your behalf. -
Page 35: Part 7 - Accessories
▸ ▸ Crossways and lengthways Crossways and lengthways clamping possible clamping possible ▸ ▸ Non-orientable version for Orientable version with direct adaptation adapter pfm Rotary 3005 E Rev.2022-03-21... - Page 36 ▸ Removable pressure plate slide sideways (laterally) ▸ ▸ Three defined stop positions Easy to clean (left, middle, right) ▸ For use with low profile microtome blades ▸ Removable pressure plate ▸ Easy to clean pfm Rotary 3005 E Rev.2022-03-21...
- Page 37 ▸ Removable ▸ Easy to clean Section waste tray Control panel REF 030050 REF 030070 ▸ ▸ Control panel for the Material: Anodised pfm Rotary 3005 E aluminium ▸ Easy to clean pfm Rotary 3005 E Rev.2022-03-21...
- Page 38 Notes For your notes pfm Rotary 3005 E Rev.2022-03-21...
- Page 39 Our Customer Solutions Team will be happy to advise you. service@pfmmedical.com +49 (0)2236 9641-220 +49 (0)2236 9641-51 pfm medical ag Certified to Wankelstrasse 60 DIN EN ISO 13485 50996 Cologne Germany www.pfmmedical.com – Your information source for the products of pfm medical ag IFU2003005/Rev.2022-03-21...
Need help?
Do you have a question about the Rotary 3005 and is the answer not in the manual?
Questions and answers