Advertisement
- 1 BOX CONTENTS
- 2 SYSTEM REQUIREMENTS
- 3 REGISTRATION
- 4 GROUND RULES
- 5 CONNECTION DIAGRAM
- 6 INSTALL THE SOFTWARE
- 7 USING OTHER SOFTWARE PROGRAMS
- 8 COMPATIBLE iOS DEVICES
- 9 SETUP WITH iOS DEVICES
- 10 SETUP WITH USB
- 11 DECK FEATURES
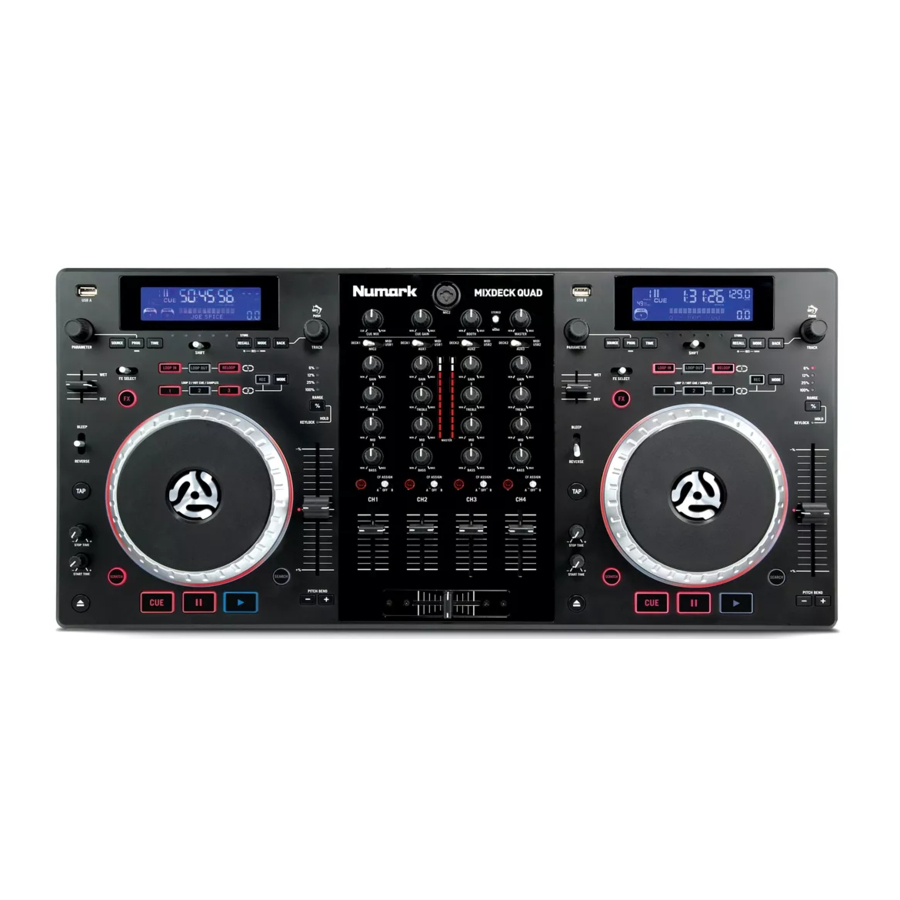
- 12 FRONT PANEL
- 13 REAR PANEL
- 14 MIXER PANEL
- 15 LCD FEATURES
- 16 PARAMETER KNOB FEATURES
- 17 MULTI-MODE TRIGGER BUTTONS
- 18 LOOPING
- 19 EFFECTS
- 20 USB MASTER MODE
- 21 USB MIDI MODE
- 22 UNIT FIRMWARE / SOFTWARE
- 23 Documents / Resources
BOX CONTENTS
- MIXDECK QUAD
- USB cable
- 30-pin cable
- Power adapter
- Software CD
- Quickstart Guide
- Safety & Warranty Information Booklet
SYSTEM REQUIREMENTS
Windows:
Operating System:
- Windows XP (latest Service Pack, 32-bit)
- Windows Vista (latest Service Pack, 32-/64- bit)
- Windows 7 (latest Service Pack, 32-/64-bit)
Processor:
- Intel Pentium 4 2.4GHz
- Intel Core Duo
2GB RAM
500MB free hard drive space
Available USB port
CD-ROM drive
Mac:
Operating System:
- OS X 10.6 (latest update)
- OS X 10.7
Processor:
- Intel Core Duo
2GB RAM
500MB free hard drive space
Available USB port
CD-ROM drive
REGISTRATION
Please go to http://www.numark.com to register your MIXDECK QUAD. Registering your product ensures that we can keep you up-to-date with any new product developments and provide you with world-class technical support, should you run into any problems.
GROUND RULES
- Make sure all items listed in the BOX CONTENTS section are included in the box.
- READ SAFETY & WARRANTY INFORMATION BOOKLET BEFORE USING THE PRODUCT.
- Study the connection diagram in this guide.
- Place mixer in an appropriate position for operation.
- Make sure all devices are turned off and all faders and gain knobs are set to "zero."
- Connect all stereo input sources as indicated in the diagram.
- Connect the stereo outputs to power amplifier(s), tape decks, and/or other audio sources.
- Plug all devices into AC power.
- Switch everything on in the following order:
- Audio input sources (i.e. turntables, CD players, etc.)
- Mixer
- Last, any amplifiers or output devices
- When turning off, always reverse this operation by turning off:
- Amplifiers
- Mixer
- Last, any input devices
CONNECTION DIAGRAM

INSTALL THE SOFTWARE
WINDOWS
Note: ASIO4ALL is not required when using Serato DJ Intro.
Before you can begin using MIXDECK QUAD with your computer, install the Serato DJ Intro software:
- Insert the installation CD into your computer's CD-ROM drive. (Free updates to the Serato DJ Intro software are available online at http://www.serato.com. We recommend checking the website for the latest update of Serato DJ Intro before installing it on your computer.)
- A pop-up screen should appear automatically. Click Run Installer to begin the installation process.
- Follow the on-screen instructions to install the software.
To start using using MIXDECK QUAD:
- Connect using MIXDECK QUAD to an available USB port on your computer. (If possible, use a USB port on the rear panel of your computer.)
- Open Serato DJ Intro by double-clicking the icon on your computer's Desktop (if you created a Desktop shortcut) or by going to:
Windows XP: Start Menu![]() Programs
Programs ![]() Serato DJ Intro
Serato DJ Intro
Windows Vista & Windows 7: Windows Menu![]() All Programs
All Programs ![]() Serato
Serato ![]() Serato DJ
Serato DJ ![]() Serato DJ Intro
Serato DJ Intro
 Programs
 For more information on how to use Serato DJ Intro, see the manual on the CD.
MAC
Before you can begin using using MIXDECK QUAD with your computer, you must install the Serato DJ Intro software:
- Insert the included CD into your computer's CD-ROM drive. (Free updates to the Serato DJ Intro software are available online at http://www.serato.com. We recommend checking the website for the latest update of Serato DJ Intro before installing it on your computer.)
- A pop-up screen should appear automatically. Double-click the .dmg file to begin the installation process.
- Follow the on-screen instructions to install the software.
To start using ung MIXDECK QUAD:
- Connect using MIXDECK QUAD to an available USB port on your computer. (If possible, use a USB port on the rear panel of your computer.)
- Open Serato DJ Intro by going to Applications
![]() Serato DJ Intro.
Serato DJ Intro.
For more information on how to use Serato DJ Intro, see the manual on the CD.
USING OTHER SOFTWARE PROGRAMS
When using other software programs with MIXDECK QUAD, if you experience too much latency after adjusting your software latency settings, we recommend the free ASIO4ALL (Audio Stream Input/Output) driver for PC at www.asio4all.com. ASIO drivers generally perform better and with lower latency since they create a more efficient communication between audio devices and software.
COMPATIBLE iOS DEVICES
MIXDECK QUAD is compatible with the following iOS devices (not included):
- iPhone 4S
- iPhone 4
- iPad 2
- iPad
- iPod touch (4th generation)
Note: MIXDECK QUAD's dock will charge a connected and compatible iOS device.
SETUP WITH iOS DEVICES
To play audio from a standard media player app:
- Set MIXDECK QUAD's rear panel iOS AUDIO switch to AUX 3.
- Set MIXDECK QUAD's Channel 4 Input Selector to Aux 3.
- Use MIXDECK QUAD's Channel 4 controls to control the audio sent from your iOS device.
To control a 2-deck DJ app with MIXDECK QUAD:
- Set MIXDECK QUAD's rear panel iOS AUDIO switch to PGM/CUE MONO.
- Set two of MIXDECK QUAD's Input Selectors to MIDI USB1 and MIDI USB2.
- On MIXDECK QUAD, set those decks' Source to "USB-MIDI."
- Use those channel faders and deck controls on MIXDECK QUAD to control the left and right decks in the app.
Note: An app may have two or four decks. Only set as many of MIXDECK QUAD's Input Selectors to MIDI USB1 and MIDI USB2 as there are decks in your software app. For example, if your software only has two decks, only have two of MIXDECK QUAD's Input Selectors set to MIDI USB1 and MIDI USB2.
Note: Since some apps may only support certain channels on MIXDECK QUAD, make sure the channels you selected communicate properly with the app. For example, an app may allow you to use only Channels 2 and 3 on MIXDECK QUAD (such as Algoriddim djay) to control the app.
Note: Only iOS 5 or higher supports Core MIDI. This means MIXDECK QUAD will only control Algoriddim djay if your iOS device is using iOS 5 or higher. Devices with iOS 4 can only be used with the iOS AUDIO SWITCH set to AUX 3.
SETUP WITH USB
To play audio from a program that does not have a software mixer:
- Set MIXDECK QUAD's rear panel USB AUDIO switch to USB 1/2.
- Set MIXDECK QUAD's top panel Input Selectors:
- If the software is a standard media player (e.g., iTunes, Windows Media Player, etc.), set one of MIXDECK QUAD's Input Selectors to MIDI USB1.
- If the software is a two-deck DJ software program (e.g., Serato DJ Intro), set two of MIXDECK QUAD's Input Selectors to MIDI USB1 and MIDI USB2.
- Use MIXDECK QUAD's channel controls to control the audio sent from your computer.
To control a 2-deck DJ program that has a software mixer (e.g., Algoriddim djay):
- Set MIXDECK QUAD's rear panel USB AUDIO switch to PGM/CUE.
- Set two of MIXDECK QUAD's top panel Input Selectors to MIDI USB1 and MIDI USB2.
- Use MIXDECK QUAD's mixer to control the DJ program's mixer.
Note: A program may have two or four decks. Only set as many of MIXDECK QUAD's Input Selectors to MIDI USB1 and MIDI USB2 as there are decks in your software. For example, if your software only has two decks, only have two of MIXDECK QUAD's Input Selectors set to MIDI USB1 and MIDI USB2.
Note: Since some programs may only support certain channels on MIXDECK QUAD, make sure the channels you selected communicate properly with the program. For example, a program may allow you to use only Channels 2 and 3 on MIXDECK QUAD to control the software.
DECK FEATURES

- EJECT – Press this button to eject the CD. If a CD is currently playing, this button will have no effect.
- USB – Connect your favorite USB storage device to this connector to allow the MIXDECK QUAD to read and play back your music files. The MIXDECK QUAD only supports the MP3 format so please make sure that your audio files are encoded as MP3s if you would like to use them with the MIXDECK QUAD.
Note: MIXDECK QUAD supports the HFS+, FAT and NTFS files systems. HFS+ GUID Partition Table is not supported at this time. - SOURCE – Press the SOURCE button and turn the PARAMETER knob to choose which audio source you want to play; CD, USB, USB-MIDI (when using MIXDECK QUAD as a USB MIDI controller for external software). This button will not function if the MIXDECK QUAD is currently playing.
- TRACK KNOB – Used to skip from track to track, for folder navigation and as an "enter" button.
- BACK – When navigating a CD or device with folders, this button will take you back to the previous level (folder).
- PLAY – Starts the music. The music will begin playing from either the cue point or the last point of pause. Pressing this button while the unit is playing will restart the song from the last set cue point, which can be used to create a "stutter" effect.
- PAUSE – Stops the music while in play. Pressing play following this sets a new cue point. Holding down the button while scratching or stuttering the music will stop the music at the current position, allowing you to capture a loop in or cue point.
- CUE – Returns and pauses the music at the last set cue point. The cue point is the last place in which the unit was paused and then play was pressed. Pressing a second time allows for temporary play of this point. You can easily edit the cue point by turning the wheel. As you rotate the wheel the music will sound. By stopping the wheel and pressing play a new point is set.
- JOG WHEEL – The jog wheel serves many functions depending on its current mode.
- If a track is not playing, the JOG WHEEL will search slowly through a track's frames. To set a new cue point, rotate the JOG WHEEL then begin playback when you have determined the proper position. Press CUE to return to that cue point.
- If a track is playing, the JOG WHEEL will temporarily bend the pitch of the track. Rotating the JOG WHEEL clockwise temporarily speeds it up while rotating it counterclockwise slows it down. This is a useful tool for beatmatching.
- When the SEARCH button has been activated, rotating the JOG WHEEL will scan rapidly through the track.
- When the SCRATCH button has been activated, rotating the JOG WHEEL will "scratch" over the audio of the track, like a needle on a record.
- SCRATCH – Turns scratch mode on or off. If scratch mode is on, the button will light up and the center part of the jog wheel will scratch like a turntable when you spin it. If scratch mode is off, the center part of the jog wheel will pitch bend when you spin it.
To change the scratch mode or style, hold down SCRATCH and turn the PARAMETER knob. - SEARCH – When engaged, search mode will allow you to use the center of the jog wheel to quickly scan through the current track. If you do not touch the wheel for 8 seconds you will automatically exit search mode. Search speed can be adjusted by holding the SEARCH button and turning the PARAMETER knob.
To adjust how quickly SEARCH scans through your tracks, hold down SEARCH and turn the PARAMETER knob. - STOP / START TIME – Use these knobs to adjust the speed that the music starts when you press play (START TIME) or the speed that the music stops when you press pause (STOP TIME).
- TAP – Pressing this button in time with the beat will help the built-in BPM counter detect the proper tempo. Holding the button for 2 seconds will cause the BPM counter to reset and recalculate.
- RANGE/KEY LOCK/% – The pitch button controls the range of the pitch fader as well as enabling and disabling key lock mode. Press and release the pitch button to cycle through pitch fader settings of +/- 6%, 12%, 25% and 100%. You can also disable the pitch fader by pressing the pitch button again after selecting 100%.
The other function of this button is key lock. To engage key lock mode, hold the pitch button for two seconds. This feature allows you to change the speed of the song without changing the key. The key of the song will lock to whatever position the pitch fader is at when key lock is engaged. To change the key of a song manually, hold PITCH / KEY LOCK and turn the PARAMETER knob. - PITCH FADER – This controls the speed of the music. Moving towards the "+" will speed the music up, while moving towards the "-" will slow it down. The percentage of pitch adjustment is shown on the display.
- PITCH BEND – Allows you to briefly adjust the speed of the music faster or slower for as long as the button is held. Useful for quick speed adjustments to help match the beats of two songs that might be at the same tempo but have beats that hit at slightly different times.
- BLEEP / REVERSE SWITCH – Use this if you want to play a CD backwards. "Bleep" mode will play the music in reverse out of the buffer while the CD timer continues to advance. When you release the switch, the CD will continue to play where it would have been if you had not engaged the switch. "Reverse" mode will play music in reverse and the CD time will also count backwards.
- LOOP IN / OUT / RELOOP – These buttons are used to define your beginning and ending loop points (LOOP IN and LOOP OUT) or to replay or restart your loop (RELOOP). For more information about this feature please see the looping section of this manual.
- TRIGGER BUTTONS – These buttons can be used for 3 possible functions, chosen by holding the REC button and turning the PARAMETER knob. For more information see the "Multi Mode Trigger Buttons" section later in this manual.
- SHIFT – Used with the looping feature, the shift switch allows you to cut your loop in half or double it. If Smart Loop is on you will be limited to a minimum length of 1 beat.
- REC – This button is used in conjunction with the 3 assignable TRIGGER BUTTONS to record samples and set hot start points. When used in conjunction with the parameter knob, this allows you to set the mode for the three multi-mode trigger buttons.
To choose a mode, hold the REC button, then while continuing to hold REC, hold the desired TRIGGER BUTTON and turn the PARAMETER knob to select the option you want to change. For more information see the "Multi Mode Trigger Buttons" section later in this manual. - (BUTTON) MODE – This button is used to change the function of the 3 assignable buttons. Pressing this button will cycle between LOOP-2, HOT CUE and SAMPLES. For more information see the "Multi Mode Trigger Buttons" section later in this manual.
- FX – Pressing this button will turn effect mode on or off. If the button is illuminated, effects mode is on.
- FX SELECT – Use this toggle switch to choose which effect you want to use. There are six different effects available. See the effects section in this manual for more information.
- WET / DRY FADER – Use this to adjust how much of the effect will be mixed into the main mix. The 0% or "dry" side of the fader will give you less of the effected music and more of the original music while the 100% or "wet" side adds more of the effected music and less of the original music.
- PARAMETER – This knob has multiple uses depending on what you are doing when you turn it.
By default, spinning this knob will adjust a parameter of the effect you have currently chosen with the FX SELECT switch. For more information see the effect section later in this manual.
Other settings can be adjusted by holding down an appropriate button while turning the PARAMETER knob. - PROG (Program) – This button helps you create a program – a sequence of tracks to play continuously. To create a program, press PROGRAM when the CD player is paused. To enter a track into the program, use the TRACK KNOB to select the desired track then press PROGRAM to enter it. Repeat this process for each track you want to enter (in the order you want them to play). When you have finished, press PLAY / PAUSE to start playing the program. The tracks will play in the order you entered them. To cancel your program as it is playing, press and hold PROGRAM for three seconds.
Holding down the PROG button and turning the PARAMETER knob will bring you to a list of menu options. Please see "Parameter Knob Features" section of this manual for more information. - TIME – Toggles the display to show elapsed time, time remaining on the current song, or time remaining of an entire audio CD.
- RECALL / STORE – Pressing and holding the RECALL button for 2 seconds will allow cue points to be stored. More than one cue set can be stored per CD. Cue sets will be numbered sequentially per CD.
When a CD with stored cue points is inserted, the display will indicate that there are "Cue Points Available". To recall your stored cue points press and release the RECALL button. If more than one set of cue points has been saved on a CD, the PARAMETER knob will allow you to cycle through your stored cue sets. - (PLAY) MODE – There are four playback modes:
Single: Plays the selected song, then pauses and cues the next track.
SingleReplay: Repeats the current song until manually stopped.
Random: Plays all songs on the CD in a random order.
Continuous: Plays all songs on the CD in order then repeats at the beginning.
To view file names or ID3 tag information when playing MP3s, hold RECALL / STORE and press (PLAY) MODE. - LCD DISPLAY – All information and functions are displayed here. CD text (if available), ID3 tag information and effects settings are all shown here.
FRONT PANEL

- HEADPHONES – Connect your 1/4" or 1/8" headphones to this output for cueing and mix monitoring. Headphone output controls are located on the top panel.
- MIC INPUT – Connect a 1/4" microphone to this input.
- MIC GAIN – Adjusts the audio level of the microphone signal.
- MIC BASS – Adjusts the low (bass) frequencies of the microphone channel.
- MIC TREBLE – Adjusts the high (treble) frequencies of the microphone channel.
Tip: If you experience feedback when using a microphone at loud levels, try turning down the high frequencies. - CROSSFADER (CF) SLOPE – Adjusts the slope of the crossfader curve. Flip switch to the left for a smooth fade (mixing) or to the right for a sharp cut (scratching).
- CROSSFADER (CF) MODE – Reverses the assignment of CF Assign A and B on the CROSSFADER.
REAR PANEL

- POWER BUTTON – Press this to turn the unit on and off.
- POWER IN – Use the included power adapter to connect the mixer to a power outlet. While the power is switched off, plug the power supply into the mixer first, then plug the power supply into a power outlet.
- USB SLAVE – Connect the MIXDECK QUAD to a computer via this USB jack and your MIXDECK QUAD can be used as a software controller device using USB MIDI protocol. You can also use MIXDECK QUAD as your computer's soundcard. (Remember to select MIXDECK QUAD as the playback device in your computer's sound settings. You can use MIXDECK QUAD as a soundcard with or without using it as a software controller.)
- DECK 1 OUTPUT (RCA) – To use MIXDECK QUAD with timecoded CDs, use standard RCA cables to connect this output to the interface for your digital DJ software.
- DECK 2 OUTPUT (RCA) – To use MIXDECK QUAD with timecoded CDs, use standard RCA cables to connect this output to the interface for your digital DJ software.
- GROUNDING TERMINAL – If using phono-level turntables with a grounding wire, connect the grounding wire to these terminals. If you experience a low "hum" or "buzz", this could mean that your turntables are not grounded.
Note: Some turntables have a grounding wire built into the RCA connection and, therefore, nothing needs to be connected to the grounding terminal. - LINE | PHONO SWITCH – Flip this switch to the appropriate position, depending on the device connected to the AUX INPUTS. If you are using phono-level turntables, set this switch to "PHONO" to provide the additional amplification needed for phono-level signals. If using a line-level device, such as a CD player or sampler, set this switch to "LINE."
- RECORD OUTPUT (RCA) – Use standard RCA cables to connect this output to a recording device, such as a CD recorder or tape deck. The level of this output is based upon pre-master levels.
- BOOTH OUTPUT (RCA) – Use standard RCA cables to connect this output to a booth monitoring system. The level of this output is controlled by the BOOTH VOLUME on the top panel.
- MASTER OUTPUT (RCA) – Use standard RCA cables to connect this output to a speaker or amplifier system. The level of this output is controlled by the MASTER VOLUME on the top panel.
- MASTER OUTPUT (BALANCED) – Connect this low-impedance XLR output to a PA system or powered monitors. The level of this output is controlled with the MASTER VOLUME on the top panel.
- USB AUDIO SWITCH – Select to route audio from either PGM/CUE or USB1/USB2. (see the section SETUP WITH USB for more details).
- iOS AUDIO SWITCH – Select to route audio from either PGM/CUE MONO or AUX 3 (see the section SETUP WITH iOS DEVICES for more details).
- AUX 3 – This 30-pin port receives audio from an iOS device, provides power to an iOS device, and supports Core MIDI for all controls and parameters of compatible iPad apps, such as Algoriddim djay. To use this feature, please see the SETUP WITH iOS DEVICES section of this manual.
Note: Only iOS 5 or higher supports Core MIDI. This means MIXDECK QUAD will only control Algoriddim djay if your iOS device is using iOS 5 or higher. Devices with iOS 4 can only be used with the iOS AUDIO SWITCH set to AUX 3
MIXER PANEL

- MIC INPUT – This input accepts 1/4" and XLR connections. The signal from this input can be sent to a channel using the CROSSFADER ASSIGN function.
- CUE MIX – Turn to mix between Cue and Program in the Headphone channel. When all the way to the left, only channels routed to CUE will be heard. When all the way right, only the Program mix will be heard.
- CUE GAIN – Adjusts the level of the headphone audio.
- BOOTH VOLUME – Adjusts the Booth output level.
- STEREO/MONO SWITCH – Selects whether the audio output is in Stereo or Mono.
- MASTER VOLUME – Adjusts the output volume of the Master mix.
- INPUT SELECTOR – Selects the input source to be routed to the corresponding channel. Input jacks are located on the rear panel (plus the mic input on the top panel).
- CHANNEL GAIN – Adjusts the channel's pre-fader and pre-EQ gain level.
- CHANNEL TREBLE – Adjusts the high (treble) frequencies of the corresponding channel.
- LED METERS – Monitors the audio level of the Master mix.
- CHANNEL MID – Adjusts the mid-range frequencies of the corresponding channel.
- CHANNEL BASS – Adjusts the low (bass) frequencies of the corresponding channel.
- CROSSFADER ASSIGN – Assigns a deck to the left or right side of the crossfader.
- CHANNEL FADER – Adjusts the audio level on the corresponding channel.
- CROSSFADER – Blends audio that is assigned to the crossfader.
Slide this to hear Deck A and slide this to the right to hear Deck B.
LCD FEATURES

- PLAY / PAUSE – This shows when the unit is playing or paused.
- CUE – Flashing when the unit is setting a cue point. Lit continuously when the unit is paused at a cue point.
- TRACK NUMBER – Shows the current track number.
- TOTAL TRACKS – Shows the total number of tracks on the CD.
- MP3 – Indicates when there are MP3s present on the disc or connected USB device.
- MINUTES – Shows the minutes elapsed or remaining depending on mode setting.
- SECONDS – Shows the seconds elapsed or remaining depending on mode setting.
- FRAMES – The CD player breaks down a second into 75 frames for accurate cueing. This shows the frames elapsed or remaining depending on mode Indicates whether the time shown on the LCD is the elapsed time for the track, remaining time for the track, or total remaining time for the entire CD.
- TIME MODE – Indicates whether the time shown on the LCD is the elapsed time for the track, remaining time for the track, or total remaining time for the entire CD.
- BPM – The tempo, which is indicated in BPM (beats per minute).
- PITCH (%) – Shows the percentage change in pitch.
- RANGE (KEY LOCK) – Indicates when Key Lock Mode is engaged. The number next to the lock icon indicates how far away the track's current key is from its original key (in semitones).
- LOOP – Indicates when a loop is programmed. When the indicator is flashing, a loop is currently playing.
- TEXT DISPLAY – Displays folder names, CD information, and MP3 tag information.
PARAMETER KNOB FEATURES
SCRATCH
Holding the SCRATCH button and turning the PARAMETER knob will allow you to choose the desired scratch mode:
Vinyl: This mode allows you to use the JOG WHEEL to scratch just like you would with a vinyl record. When you press on the JOG WHEEL, the music will stop where it is until the wheel is released.
Forward: When you use the JOG WHEEL to scratch, only the forward motions are heard. This simulates using a crossfader to cut out the backspins.
Bleep: Allows you to "insert" a scratch while the music continues to advance. One you are done scratching, the music will continue to play where it would have been if you hadn't scratched.
Bleep Forward: Essentially a combination of Bleep and Forward Scratch Modes. Allows you to "insert" a scratch but only plays the forward motion of the platter.
PITCH
Holding the PITCH button and turning the PARAMETER knob allows you to change change the key of the current song from "L" (lower key) to "H" (higher key) in 40 semitone increments (with 0 being no key change).
SEARCH
Search speed can be adjusted by holding SEARCH and rotating the PARAMETER knob. Options based upon 1 wheel rotation are 15 seconds, 30 seconds, and 1 minute.
PROGRAM / PARAMETER OPTIONS
Holding the PROGRAM button and turning the PARAMETER knob will bring you to the following menu options. Pressing down on the PARAMETER knob will allow you to modify the parameters for the menu option that you have selected:
Scratch Delay (On, Off): Activates a slight delay when releasing the platter in Scratch Mode.
Power On Play (On, Off): When on, this option will cause the CD player to begin playing as soon as the power is turned on.
Memo All Clear (No, Yes):Clears all stored cue points and loop point information.
Sleep Mode (On, Off): When sleep mode is engaged the unit will go into a "sleep" state after a few minutes of inactivity
Preset Clear (Yes, No): Reset all global parameters to their default settings.
Version Number: When the PARAMETER knob is pressed, the operating system version numbers will be displayed for as long as the PROG button is held.
Power On Demo (On, Off): When this option is on, the unit will go into a "demo mode" where the platter LEDs will illuminate in a pattern as soon as the unit is powered on.
MULTI-MODE TRIGGER BUTTONS

By pressing the circular MODE button, you can choose the desired mode for the three trigger buttons shown above.
There are three modes available:
| LOOP-2: | In this mode the three TRIGGER BUTTONS act as another set of loop buttons that behave in the same way as the buttons above them. This gives you the ability to set two completely separate sets of loop points. For more information on looping, see the following chapter. |
| HOT CUE: | This mode will allow you to set up to three "hot cue points". These are similar to regular cue points, except that when the TRIGGER BUTTONS are pressed, the unit will instantly jump to the defined point and begin playing. To define a hot cue point, make sure you are in hot cue mode by pressing the MODE button until "Mode: Hot CUE" is displayed on the lower portion of the screen. Press REC to arm recording, then press the desired TRIGGER BUTTON. Whatever point you are at on the CD at the moment you press the TRIGGER BUTTON is the point that will be recorded to the TRIGGER BUTTON. To instantly start playing from your hot cue point just press the same TRIGGER BUTTON again. |
| SAMPLE: | The third mode is sample mode. Sample mode allows you to record an audio sample up to 5 seconds long, on each of the 3 TRIGGER BUTTON. There are also three playback options you can choose for each of the three sample TRIGGER BUTTONS. To choose a mode, hold the REC button, then while continuing to hold REC, hold the desired TRIGGER BUTTON and turn the PARAMETER knob to select the option you want to change. To modify the selected option, press down and release the PARAMETER knob then turn the knob to the desired setting. Press down on the PARAMETER knob to lock in that option choice. The three playback options are: |
LOOPING
The MIXDECK QUAD has a seamless looping feature, which means that if you define a loop, there is no delay when the music loops back to the beginning. This looping feature allows you to be very creative with your mixes, allowing you to extend desired sections of a song for as long as you want, or create remixes on the fly!
There are three buttons used for looping:
LOOP IN: This is the point where you would like a loop to start. By default, a "loop in" point is automatically set at the beginning of the song. To define a new "loop in" point, press the LOOP IN button when the song reaches the desired point where you would like a loop to begin. The LOOP IN button will light, indicating a new "loop in" point has been set. The RELOOP/STUTTER button will also illuminate indicating that you can now press it to immediately go back to the "loop in" point and begin playing. If you wish to change the "loop in" point, just press the LOOP IN button again.
LOOP OUT: Sets the end point of the loop. The first time you press LOOP OUT while a song is playing, the LOOP OUT button will blink, and the song will begin playing in a seamless loop, starting from the "loop in" point and ending at the "loop out" point. To release, or end the loop, press LOOP OUT a second time and play will continue forward when the song passes the previously set loop out point. The LOOP OUT button will then be continuously lit, indicating that the loop is now in memory for re-looping purposes.
RELOOP / STUTTER: Repeats play or "stutters" (if repeatedly tapped) from the loop in point. If a loop has previously been set, it plays and repeats that loop, until the loop is released by pressing the LOOP OUT button.
SHIFT: Adjusts the loop length by half length or double length increments. Move the shift switch to the right to increase loop length or to the left to shorten the loop.
Hint: he assignable 1-2-3 TRIGGER BUTTONS can be used as a second set of loop buttons. Read the preceding chapter for more information on these multi-mode trigger buttons.

Press LOOP IN to set the beginning of the loop, then press LOOP OUT to set the end point of the loop. Once you press LOOP out, the MIXDECK QUAD will loop between these two points. If you press LOOP OUT again, the MIXDECK QUAD will exit the loop and continue playing normally.

If you press LOOP IN but then decide you want to set a different "loop in" point, just press LOOP IN again. Then press LOOP OUT to start looping between the IN and OUT points.

The "loop in" point can also be used as a way to "stutter" play beginning from a certain point in a song. Just press LOOP IN to set the "stutter point", then press RELOOP to begin play from the stutter point. Each time you press RELOOP the MIXDECK QUAD will jump back to the stutter point and play from that point.
EFFECTS
Use the FX SELECT switch to choose the desired effect. Press the EFFECTS button to toggle the effect on and off. You can use the WET/DRY fader to adjust the effect presence in the mix. Most effects can by synched to a ratio of the BPM counter by holding down the PARAMETER knob while turning it, or controlled manually by turning the PARAMETER knob without holding it down.
There are six effects available:
| FILTER: | An isolation (band pass) filter that lets you play only a specific frequency of the music. Rotation of the PARAMETER knob moves the filter frequency. If you press down on the PARAMETER knob while turning it performs a coarse adjustment to the frequency. If you just turn the PARAMETER knob without holding it down it will perform a fine adjustment of the filter frequency. |
| ECHO: | Creates a delay effect. The rate can be adjusted with the PARAMETER knob. Holding down the PARAMETER knob while turning will allow you to synch the effect to a ratio of the BPM counter. |
| CHOP: | Simulates turning a mute button on and off in time with the music. The speed of the effect is controlled by turning the PARAMETER knob and can also be synched to a ratio of the BPM counter by pressing down on the PARAMETER knob while turning it. |
| PAN: | Alternates playing the right then left speaker channel based on either the tempo of the BPM counter or the speed selected manually. To set the rate, turn the PARAMETER knob. You can synch the speed to a ratio of the BPM counter by pressing down on the PARAMETER knob while turning it. |
| PHASER: | Sweeping phase shifter effect. It is similar to the flange effect, except that the flange effect has a more pronounced harmonic sound, reminiscent of a jet engine passing overhead. A phase shifter is enharmonic, and has a more "swooshing" sound. The speed of the effect is controlled turning by the PARAMETER knob and can also be synched to a ratio of the BPM counter by pressing down on the knob while turning it. |
| FLANGER: | Sweeping effect with a more pronounced harmonic sound than the phaser, reminiscent of a jet engine passing overhead. The speed of the effect is controlled turning by the PARAMETER knob and can also be synched to a ratio of the BPM counter by pressing down on the knob while turning it. |
Wet/Dry Fader
In addition to the PARAMETER knob there is also a WET/DRY fader that allows you to adjust the balance between effected and unaffected audio. As you move the fader from DRY to WET you will more and more of the effected sound.
USB MASTER MODE
By connecting a USB mass storage class device such as a USB hard drive, thumb drive or portable media player to the MASTER USB connector on the top of the MIXDECK QUAD, you can access, play, and scratch your music files in the same way you might play a normal audio CD.
Note: MIXDECK QUAD supports the HFS+, FAT and NTFS files systems. HFS+ GUID Partition Table is not supported at this time.
To access your USB device:
- First make sure it is connected to the USB MASTER connector on the top panel of the MIXDECK QUAD.
- Press and release the SOURCE button.
- Turn the PARAMETER knob until the display indicates "USB-MASTER", then press down on the PARAMETER knob.
- After the MIXDECK QUAD has first analyzed the partition structure (max 9 partitions), then analyzed the folder structure (max 999 folders) of the USB device, you can then navigate through your USB device by following the instructions below.
USB Mass Storage Device
To access files on a USB mass storage class device, use the TRACK knob to choose which folder you want to open, then press down on the knob to enter that folder. You can then use the TRACK knob to either navigate to another folder level or choose an audio file in the current folder that you want to play.
Hint: To organize a large music collection you might consider creating a separate folder for each artist.
Please note:
- Because not all MP3 devices are USB mass storage class, not every player will be compatible with the MIXDECK QUAD.
- If there are no MP3 files inside a folder you are browsing on your external device, the MIXDECK QUAD will display "No MP3 files in this folder, PLS try another one."
- To change MP3 display mode, hold the RECALL / STORE button and press the (PLAY) MODE button to toggle between file name, ID3 song title, ID3 album title and ID3 artist name.
Tips For Using USB Devices With Your Device
- When disconnecting a USB device from the MIXDECK QUAD, always make sure to use the SOURCE button to switch to CD/MP3 Mode before disconnecting. Make sure that the letters "HD" are not blinking on the display when disconnecting a USB device.
- Disconnecting a USB device while the MIXDECK QUAD is in USB MASTER Mode could possibly cause data on the USB device to become corrupted and unreadable.
- Note: There is a limit of 999 songs per folder or playlist. Use multiple folders or playlists to separate large numbers of songs.
- We do not recommend using MP3 files over 300MB as this may affect the performance of the MIXDECK QUAD.
- For large capacity HD, the MIXDECK QUAD can read a maximum of 9 disc partitions. Each partition is limited to 999 folders, and each folder is limited to 999 songs.
USB MIDI MODE
You can also connect the MIXDECK QUAD to a computer via USB to use the MIXDECK QUAD's CD decks as controllers for software programs that are compliant with USB MIDI protocol. Check with your software manufacturer to find out if your software supports a USB MIDI controller.
To activate USB MIDI mode, connect a USB cable from the MIXDECK QUAD USB SLAVE connector to a USB port on your computer. Then press SOURCE and turn the parameter knob to select "USB-MIDI."
Note: Before connecting MIXDECK QUAD to your computer, insert the included CD into your computer to install the necessary drivers
UNIT FIRMWARE / SOFTWARE
MIXDECK QUAD works best with the latest firmware and software installed. We strongly recommend that you check for updates right away, and continue to check regularly so you don't miss out on any of the good stuff! Visit www.numark.com for the latest updates.
Documents / Resources
References
Numark
Serato | The world’s best DJ and music production software
![www.asio4all.com]() ASIO4ALL Official Home – Universal Windows ASIO Driver
ASIO4ALL Official Home – Universal Windows ASIO Driver
Download manual
Here you can download full pdf version of manual, it may contain additional safety instructions, warranty information, FCC rules, etc.
Advertisement


Need help?
Do you have a question about the Mixdeck Quad and is the answer not in the manual?
Questions and answers