Advertisement
- 1 Charging
- 2 Fitting
- 3 Turning On
- 4 Locking
- 5 Vibrate Command
- 6 Beep Command
- 7 Static Intensity Adjustment
- 8 Channel Switching
- 9 Pairing
- 10 COLLAR STATIC STIMULATION QUICK GUIDE
- 11 Troubleshooting
- 12 Training Notice
- 13 Safety Guidelines
- 14 Terms of Use and Limitation of Liability
- 15 Documents / Resources
Charging
Complete charging for 2 hours. Offer only one wire in the package.

Fitting
Collar Fitting: Adjust to the comfortable size; make sure the receiver's contact points are placed snugly against your pet's skin.

Turning On
To turn the transmitter and receiver on.

Locking
Security Keypad Lock: Toggle it down to unlock.

Vibrate Command
Vibrate Command: Press the vibration button briefly and the receiver vibrates once.

Beep Command
Beep Command: Press the beep button briefly and the receiver beeps once.

Static Intensity Adjustment
Static Intensity Adjustment: Press and hold the LEVEL button while rotating the remote control switch to adjust the shock intensity. Static Command: Press the static button briefly and the receiver shocks once.

Channel Switching
Channel Switching: Able to train 3 dogs at the same time. Toggle the channel button to select the dog to train.

Pairing
Pairing: Refer to "Pairing" for more information.

COLLAR STATIC STIMULATION QUICK GUIDE
When wearing the collar, it is most suitable if one finger can be inserted under it. Too tight is not good for your dog, but too loose will dull the static function for the electrodes cannot touch your dog's skin.

Not feelling the SHOCK? Try these solutions.
If your dog has thick fur, please separate the fur apart so that both electrodes can touch the skin.

Make sure protective silicone caps are off the electrodes. They can dull the static sensation sent to your dog.

Water can help conduct electricity if you spray some water around the electrodes, the shock function can be felt more effectively.

One last thing you can try is to shear the fur where both electrodes are touched.

Note:
- Only when both electrodes are simutaneously touched, shock will work.
- If collar has a delayed reaction or fails to sync up even in short distance, make sure there is no strong signal interference in your surroundings. The remote's range could be affected by obstacles, electromagnetic field, or even stormy weather.
- If you find collar cannot work, please check whether you push the lock button on which is on the left side of remote.
- The sensitivity to static depends on your dog's size weight, amount of fur, and even skin condition.
Package Content


- Remote Control
- Receiver
- USB charging wire
- Lanyard
- User Manual
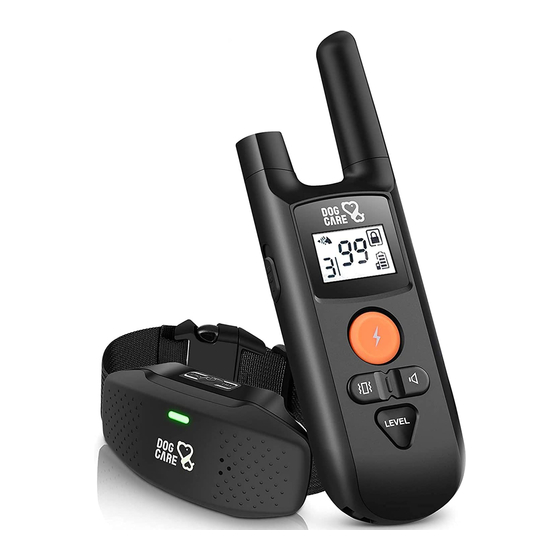
Remote Control


- On/Off Button (Static Intensity Regulator)
- Antenna
- Security Keypad Lock
- LCD Display
- Channel Switching Button
- Static Mode Button
- Vibrate Mode Button
- Beep Mode Button
- Static Intensity Adjustment Button
- Pairing Button (Reverse Side)
- LED Indicator Light
- Charging Port
- On/Off Button
- Charging Port
- Contact Points
Screen

Set up
- Charge the devices respectively for 2 hours and above.
- Remote control: The battery icon of remote control will be full after it is fully charged.

![]()

- Receiver: When red light on the receiver turns green, it is fully charged. When the red light flashes, it is low battery.

- Remote control: The battery icon of remote control will be full after it is fully charged.
- Set up the voltage level.
Press and hold Static Intensity Adjustment Button and simultaneously rotate Static Intensity Regulator until the digit on the screen reaches a suitable intensity.


There is individual +1 second+ difference, always use the right voltage for your dog.
Wearing the Receiver Collar
- Put the collar on the dog.

- Adjust the nylon belt to the right size.

- Cut off the excess part of the belt with scissors.

- Burn the be it's end with the lighter to prevent the thread from fraying.

- If your dog has thick hair, please separate the hair at the electrodes with a comb from the Contact Points area so that Contact Points are placed snugly against your pet's skin.

- When properly fitted, you should be able to fit a finger or two snugly in between the collar and your pet's skin.


Training Mode
- Press the vibration button briefly, and the receiver vibrates once; hold the button, and the receiver vibrates continues.

- Press the beep button briefly, and the receiver beeps once; hold the button, and the "beep" sound continues.

- Press the static button briefly, and the receiver shocks once; hold the button is invalid.

- Press the channel switching button to choose which receiver you want to control if you pair more than one receiver.


How to pair the remote with multiple receivers
Pair the remote control and receiver This dog training collar supports maximum 3 receivers with only 1 remote control. (Remote control and receiver have been paired with channel #1 from delivery.)
- Toggle the channel switching button, and select channel 2 or 3 After selecting, the display will show the channel number.

- After confirming that the receiver is turned off, hold the On/Off Button of receiver for 3 seconds until the LED Indicator Light on receiver flashes alternately in red and green.

- Hold the Pairing Button on the remote control for 1.5 seconds. When the receiver makes a beep, the pairing is completed.


Troubleshooting
- No display on LCD Display when the device is turned on. Or the device is unable to turn off.
- The operation function is abnormal. Press the Pairing Button and the LEVEL Button at the same time to restart the remote control.
- Remote control/Receiver runs out of power quickly.
- Make sure the charger and Remote control/Receiver is securely connected.
- Charge it up to 2 hours or above.
- Remote control doesn't work.
- Recharge the Remote control.
- Check the keypad lock, Unlock the remote control.
- Pair Remote control and Receiver again.
- The Receiver doesn't respond.
- Make sure the Receiver had been paired.
- Check your Remote control, make sure this Receiver is on the corresponding channel.
- Check your Remote control, make sure the Receiver and Remote control have enough power.
- The training system has no effect on my dog.
- Make sure the Receiver has been turned on and the Contact Points are placed snugly against your pet's skin.
- Try increasing the Shock/Static level.
- The training mode is only available in short range.
- Make sure there is no strong signal interference around you. Weather, obstacles, passing vehicles and many other factors can interfere with the signal.
- The Receiver beeps, vibrates or shocks by itself constantly or occasionally.
- Make sure any button of Remote control has not been touched.
- Pair the Receiver with the Remote control once again.
Training Notice
- This product is only used for training dogs; please do not use it for other purpose. Giving some food to dog will help to achieve the best effect.
- Please do not use it for dogs under 6 months, aggressive, old, sick or pregnant.
- Use verbal commands first, and supplement with a corrective stimulus only as needed. Be consistent with your verbal commands, using the same words every time. Work with your pet on one behavior at a time to avoid confusion and frustra tion. Use as little stimulus as possible and only to reinforce verbal commands when necessary. Do not over correct your dog.
- For example, use the beeps as warning by pressing Beep button. The dog will become conditioned to the beep preced ing the corrective stimulus and will soon learn to recognize the beep as a warning along with your verbal command. Do not rely on this product solely to train your dog. Some dogs will not respond to this product. We cannot guarantee the effectiveness of this or any trainer on your dog. If your dog shows signs of growling, snarling, biting or aggression while using the collar, discontinue use immediately and contact a professional trainer for advice.
Safety Guidelines
- It is strictly prohibited to disassemble the receiver in any situation, otherwise the waterproof function may be damaged to violate warranty rules.
- In order to guarantee normal diving function, please insert the waterproof rubber charging lid in place.
- Please use remote control and receivers of a complete set, and do not use other product to pair with the receiver.
- If you want to test the product, please use professional test accessories provided. Do not test with hands to avoid accidental injury.
- If there is any water at the charging hole, please wipe it dry before charging.
- This product is not a regular collar and cannot replace collar to lead a dog.
- Avoid leaving the collar on the dog for more than 12 Hours per day, it may cause a condition of Skin Infection.
Terms of Use and Limitation of Liability
- Use of this product means you accept all the terms and conditions.
- This product is a professional dog training device. You are not recommended to use this product if your dog is clever and less than 8 pounds in weight. If you're not sure whether the product is suitable for your pet dog, please consult the professional handler or contact us.
- This product is a professional dog training device and cannot be used for other purposes. Please do not violate local laws in using this product.
- We are not responsible for any direct or indirect damages caused by use or misuse of this product; all risks in using this product are the responsibility of the user.
- Please contact the dealer for parts warranty, goods return or exchange. We provide technical support only.
- We reserve the right to change the terms, conditions and notices of this product are offered.
FCC Statement
This device complies with Part 15 of the FCC Rules. Operation is subject to the following two conditions:
(1)This device may not cause harmful interference, and
(2)This device must accept any interference received, including interference that may cause undesired operation.

Changes or modifications not expressly approved by the party responsible for compliance could void the user's authority to operate the equipment.
Note: This equipment has been tested and found to comply with the limits for a Class B digital device, pursuant to Part 15 of the FCC Rules. These limits are designed to provide reasonable protection against harmful interference in a residential installation. This equipment generates uses and can radiate radio frequency energy and, if not installed and used in accordance with the instructions, may cause harmful interference to radio communications. However, there is no guarantee that interference will not occur in a particular installation. If this equipment does cause harmful interfer ence to radio or television reception, which can be deter mined by turning the equipment off and on, the user is encouraged to try to correct the interference by one or more of the following measures:
- Reorient or relocate the receiving antenna.
- Increase the separation between the equipment and receiver.
- Connect the equipment into an outlet on a circuit different from that to which he receiver is connected.
- Consult the dealer or an experienced radio/TV technician for help.
Product Specification
Model
TC05
Collar's Dimension
Neck Circumference: 4"-27"
Receiver's Casing
IP65 waterproof
Rain resistant
Remote/Receiver's Battery
450mAh/250mAh
Charging Voltage
Remote: DC 5V/300mA
Receiver: DC 5V/200mA
Remote/Receiver Charging Time
Full Charge at 2-3hrs
Charging Port
Micro USB
Operating Environment
32℉-104℉
<95%Rh
Remote/Receiver's Standby Time
Remote: 90 days
Receiver: 90 days
Remote to Receiver's Signal Range Distance
656Ft

Documents / ResourcesDownload manual
Here you can download full pdf version of manual, it may contain additional safety instructions, warranty information, FCC rules, etc.
Advertisement


Need help?
Do you have a question about the TC05 and is the answer not in the manual?
Questions and answers