
Related Manuals for Davis Instruments Vantage VUE Sensor Suite


Summary of Contents for Davis Instruments Vantage VUE Sensor Suite
- Page 1 Weather Box ® Sensor Suite Weather Envoy™ WeatherLinkIP™ 3465 Diablo Ave., Hayward, CA 94545 USA .davisnet.com...
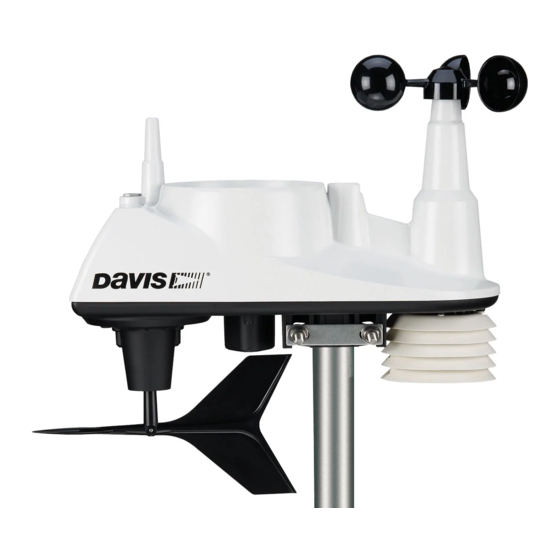
- Page 3 Weather Box User Guide Weather Box has everything you need to quickly get your weather data onto your computer, the web, and your smartphone. It includes a Vantage Vue® wireless Integrated Sensor Suite (ISS), which collects outside weather data. The ISS sends the data wirelessly to the included Weather Envoy via a powerful, frequency-hopping, spread-spectrum radio.
- Page 4 Hardware Battery cover with thumbscrew U-Bolt 3-Volt lithium battery Debris screen Backing plate 0.05” Allen wrench 1/4” lock washers #6 x 1” Pan Head Screws 1/4” hex nuts Note: If any of the hardware components are missing or not included, contact Customer Service toll free at 1-800-678-3669 about receiving replacement hardware or other components.
- Page 5 Attach the Wind Cups to the Anemometer The Vantage Vue anemometer measures wind speed. The wind cups are mounted on the anemometer shaft on the top of the ISS assembly. 1. Gently slide the wind cup assembly down onto the anemometer’s Install cups onto Tighten set screw stainless steel shaft.
- Page 6 Install the Rain Collector Tipping Spoon Assembly 1. Locate the tipping spoon assembly cavity on the underside of the ISS Base. 2. Insert the wider end of the tipping spoon assembly into the slot first, sliding it under the raised lip of the slot. 3.
- Page 7 Connect the Weather Envoy Prepare the Weather Envoy • Connect the Weather Envoy to your local computer • Install AC power source • Install optional batteries • Mount your Envoy • Connect Envoy to WeatherLink software • Set up the Envoy using WeatherLink software Connect Weather Envoy to Local Computer Note: When connecting the Ethernet cable from the Envoy to the router, it is important that the Envoy...
- Page 8 Install Backup Batteries The Weather Envoy is supplied with an AC power adapter. You should install batteries to act as backup power. Batteries will provide enough power to operate for less than one day. 1. Find the battery cover on the back side of the Envoy case. 2.
- Page 9 Mount Your Weather Envoy You can place your Envoy on your desktop or install it on a wall near your router. Envoy Location You should place the Envoy in a location where it is easily accessible and can be easily connected to a router.
-
Page 10: Download The Mobile App
Wall Mounting the Envoy 1. Use the provided wall mounting template as an example of hole spacing and alignment when installing your Envoy. 2. Use the template as a guideline for the hole markings on the wall where you want to mount the Envoy, and use a pencil to mark the location for the two mounting screws. -
Page 11: Install The Software
Install and Configure WeatherLink Software Install the Software Follow the steps below to install the WeatherLink software. 1. Place the WeatherLink software CD in your CD ROM drive. The install program should start automatically. If the install program does not start, select Run from the Start menu, type D:\SETUP (or the correct letter for your CD ROM drive), and click OK to begin the installation. -
Page 12: Running The Software
Configure WeatherLink Software Walk through the following procedures to setup and configure your WeatherLink software and the connection to your Weather Envoy. Running the Software To run the software, double-click the WeatherLink icon. If no stations have been assigned in the program directory, the software prompts you to add a station (see below for details). - Page 13 3. Select one of the three available radio buttons that best describes the type of TCP/IP connection you want to setup: • Local Device ID — Connects to the WeatherLinkIP data logger through a Local Area Network connection. Use this option if your computer is on the same subnet as your WeatherLinkIP data logger.
- Page 14 Mount the ISS Choosing a Location for the ISS To ensure that the Vantage Vue weather station performs at its best, use these guidelines to select the optimum mounting location for the ISS. Be sure to take into consideration ease of access for maintenance and wireless transmission range when siting the station. Note: When selecting a location for installing your ISS, especially on a rooftop, make sure it is a location far from power lines.
- Page 15 • Ideally, mount the ISS so that it is between 5’ (1.5 m) and 7’ (2.1 m) above the ground in the middle of a gently sloping or flat, regularly mowed grassy or naturally landscaped area that drains well when it rains. You can also mount the ISS on the roof, between 5’ (1.5 m) and 7’...
- Page 16 Note: A mounting pole is not included with your Vantage Vue ISS and must be purchased separately, either from Davis Instruments or from your local hardware retailer. Recommended Accessories for Pole Mounting • Use the Mounting Tripod (#7716) for easiest mounting.
- Page 17 3. While holding the mounting base of the ISS against the pole, place the two ends of the U-bolt around the pole and through the two holes in the C-shaped bracket on the base. 4. Slide the metal backing plate over the bolt ends where they extend out from the far side of the bracket.
- Page 18 Finishing the Installation Clearing Data Collected During Testing and Installation Now that the ISS is mounted outside, any data that was collected during testing and mounting should be cleared. To clear all the collected data: 1. Run WeatherLink software. 2. Select Clear from the Setup menu. 3.
-
Page 19: Maintenance And Troubleshooting
Maintenance and Troubleshooting Vantage Vue ISS Maintenance Cleaning the Radiation Shield The outer surface of the radiation shield should be cleaned when there is excessive dirt and build-up on the plates. Use a damp cloth to clean the outer edge of each ring. Note: Spraying down or using water excessively to clean the radiation shield can damage the sensitive sensors or alter the data the ISS is transmitting. - Page 20 3. When all parts are clean, rinse with clear water. To clean the tipping spoon assembly, it must first be removed from the ISS base. 1. Unscrew the thumbscrew securing the tipping spoon assembly to the ISS base. Slide the assembly down and away from the base.
- Page 21 Davis stations use a very robust radio and are becoming more and more common. There may be a Davis station nearby that is already transmitting on Transmitter ID 1, and your Envoy is picking up its signal rather than yours. You should change the transmitter ID of your ISS and the Envoy.
- Page 22 The first beep tells you the processor is running. The second beep verifies the installation of the data logger. (If you do not hear two beeps, contact Davis Instruments Technical Support.) The data logger is communicating with the Envoy, but data is still not being communicated to WeatherLink.com and/or WeatherLink software.
-
Page 23: Contacting Technical Support
• In the Station Configuration dialog box, set the Download archive data when Bulletin or Summary is started drop-down box to Always or to Confirm each time. In the WeatherLink software, no wind direction reading (or dashes instead of a reading) appears in my database. - Page 24 7395.346 Rev. A 9/22/15 ©Davis Instruments, 2015. All rights reserved. Vantage Vue and Weather Envoy are trademarks of Davis Instruments Corp, Hayward, CA. Information in this document is subject to change without notice. Davis Instruments Quality Man- agement is ISO 9001 certified.
Need help?
Do you have a question about the Vantage VUE Sensor Suite and is the answer not in the manual?
Questions and answers