
Subscribe to Our Youtube Channel
Related Manuals for Lancaster CBF048 017P


Summary of Contents for Lancaster CBF048 017P
- Page 1 MODEL CBF048_017P SPREETAIL Assembly Instructions Please mention model # CBF048_017P_V1 Please mention model # CBF048_178M_V1 877-472-4296 www.wearespreetail.com...
- Page 2 Consumer Service Department. Please be aware of your product’s Limited Warranty for the return/refund policy from the store, We, at Lancaster, cannot handle the product which is out of product’s limited warranty since we only provide available parts. Thank you!
-
Page 3: Tools Required
English TOOLS REQUIRED Phillips Screwdriver - Not Included Standard (Flat Head Screwdriver) - Not Included Allen Key - Included Power Tools: Set to Low Torque RECOMMENDED Electric Screwdrivers may be helpful during assembly; however, please set a low torque and use extreme caution. High Torque Over Tightened IMPORTANT NOTICE! This product is intended for INDOOR use only. -
Page 4: Parts Identifier
English PARTS IDENTIFIER PART NUMBER FIG NUMBER FOR FIG. 1 PART QUANTITY PART NAME Billiard Mainframe FOR FIG. 4, 8 FOR FIG. 5 FOR FIG. 7 FOR FIG. 6 End Apron Soccer Playfield Hockey Playfield Support Brace FOR FIG. 4 FOR FIG. - Page 5 English ACCESSORIES FOR FIG. 3 FOR FIG. 3 FOR FIG. 3 FOR FIG. 3 Billiard Ball Set Triangle Chalk FOR FIG. 16 FOR FIG. 16 FOR FIG. 16 FOR FIG. 3 Brush Pusher Felt Pad Round Puck FOR FIG. 15 Soccer Ball HARDWARE FOR FIG.
-
Page 6: Before Assembly
English BEFORE ASSEMBLY Find a clean, level place to begin the assembly of your product. Verify that you have all listed parts as shown on the part list pages. If any parts are missing, call our customer service. ASSEMBLY FIG. 1 Pre-installed Pre-installed Pre-installed... - Page 7 English ASSEMBLY FIG. 3 Pre-installed Pre-installed DO NOT LEAN THE HOLD BY THE CABINET DO NOT HOLD THE TABLE TABLE ON ITS LEGS TABLETOP BY THE LEGS CAUTION Two strong adults are recommended to turn over the table as shown. 1.
- Page 8 English ASSEMBLY FIG. 4 Pre-installed Pre-installed Note: Do not tighten the Screws at this step. FIG. 5 Note: Make sure the Soccer Playfield slide into the right groove. The groove for Soccer Playfield. the right groove. Note: The playing surface should face down when assembling.
- Page 9 English ASSEMBLY FIG. 6 FIG. 7 The groove for Hockey Playfield. Note: Make sure the Hockey Playfield slide into the right groove. CBF048_017P (Continued on the next page.) www.wearespreetail.com...
- Page 10 English ASSEMBLY FIG. 8 Note: Go back and make sure that all connections are tightened. FIG. 9 CBF048_017P (Continued on the next page.) www.wearespreetail.com...
- Page 11 English ASSEMBLY FIG. 10 FIG. 11 CBF048_017P (Continued on the next page.) www.wearespreetail.com...
- Page 12 English ASSEMBLY FIG. 12 FIG. 13 CBF048_017P (Continued on the next page.) www.wearespreetail.com...
- Page 13 English ASSEMBLY FIG. 14 Order of players (Overhead View) Note: The Rods have a hole at the end where their Handles will go. = Red & The Hole & & The Hole Note: Players of the same team color should assemble Handles on the same side, and each team’s players should be facing their opponent.
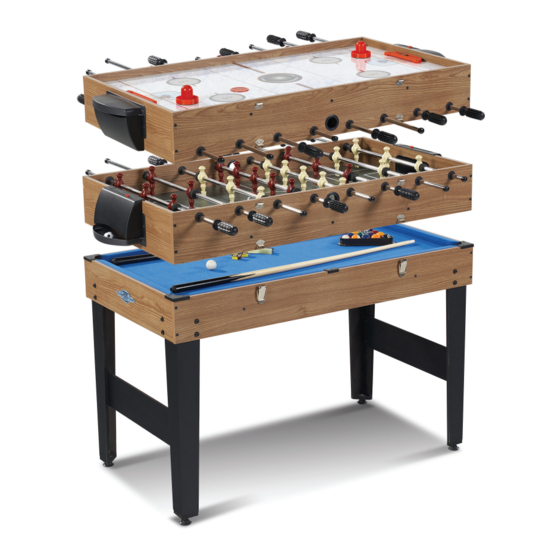
- Page 14 English ASSEMBLY FIG. 15 The Hole GAME 2: Soccer Place the Soccer table on the top of the Billiard Frame. Play the game using the Soccer Ball (37). CBF048_017P (Continued on the next page.) www.wearespreetail.com...
- Page 15 English ASSEMBLY FIG. 16 Note: Tear off the backside papers of the Felt Pads (35) and stick them onto the bottom of the Pushers (34). GAME 3: Glide Hockey Reverse the Soccer table and then place on the top of the Billiard Frame. Play the game using Pushers (34) and Pucks (36).
- Page 16 www.wearespreetail.com...
Need help?
Do you have a question about the CBF048 017P and is the answer not in the manual?
Questions and answers