
Subscribe to Our Youtube Channel
Related Manuals for Lancaster CBF054_037P


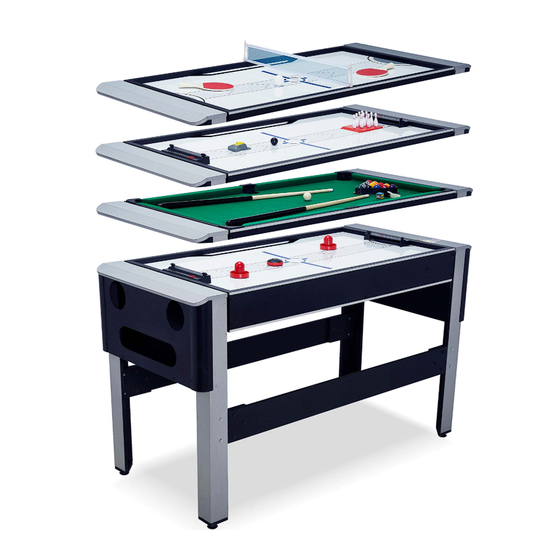
Summary of Contents for Lancaster CBF054_037P
- Page 1 MODEL: CBF054_037P VM Innovations ASSEMBLY INSTRUCTIONS ATTENTION DO NOT RETURN TO THE STORE Contact MD Sports Customer Service * For additional resources and Frequently Asked Questions, please visit us at themdsports.com...
- Page 2 3 - Since you build all tables upside down, please inspect tabletops or playing surfaces right away before putting together, all damaged table tops/playing surfaces need to be returned to the store. Please contact with retailer for their return policy. CBF054_037P www.themdsports.com...
- Page 3 Adult Assembly Required. WARNING: CHOKING HAZARD Do not use or keep product No Children in Strong Adults Needed Keep away from pets outdoors. For indoor use only. Assembly Area No wet/humid conditions. CBF054_037P www.themdsports.com (Continued on the next page.)
- Page 4 CBF054_037P PARTS LIST FOR FIG. 1 FOR FIG. 2 FOR FIG. 14 FOR FIG. 5 Hockey Mainframe Billiards Playfield Top Rail End Apron - A FOR FIG. 6 FOR FIG. 6 FOR FIG. 11 FOR FIG. 4 Ball Shelf End Apron - B...
- Page 5 CBF054_037P PARTS LIST FOR FIG. 1 FOR FIG. 1 FOR FIG. 1 FOR FIG. 13 Corner Pocket Side Pocket Plastic Strip Hockey Goal FOR FIG. 12 FOR FIG. 11 FOR FIG. 12 FOR FIG. 11 5x28mm Zinc Bolt 5x28mm Bolt...
- Page 6 Carefully cut or tear the four corners of the box so that the bottom of the box can be used as your work surface. FIG. 1 FIG. 1B X 12 FIG. 1A FIG. 1C Note: DO NOT insert Bolt (#47) all the way. See FIG. 13B for details. CBF054_037P www.themdsports.com (Continued on the next page.)
- Page 7 FIG. 2 X 18 FIG. 3 FIG. 3B FIG. 3A X 12 CBF054_037P www.themdsports.com (Continued on the next page.)
- Page 8 FIG. 5 FIG. 5A Locking Pin IMPORTANT: Make sure that Note: Be sure that the holes the Pin from the Locking Pin are on the outside. is in the direction that is shown. CBF054_037P www.themdsports.com (Continued on the next page.)
- Page 9 FIG. 6 FIG. 7 FIG. 5 Assembly FIG. 6 Assembly CBF054_037P www.themdsports.com (Continued on the next page.)
- Page 10 X 12 FIG. 8 FIG. 7 Assembly FIG. 9 CBF054_037P www.themdsports.com (Continued on the next page.)
- Page 11 FIG. 10 FIG. 9 Assembly FIG. 8 Assembly FIG. 11 FIG. 11A X 12 X 12 X 12 CBF054_037P www.themdsports.com (Continued on the next page.)
- Page 12 FIG. 12 FIG. 10 Assembly FIG. 11 Assembly FIG. 12A CBF054_037P www.themdsports.com (Continued on the next page.)
- Page 13 Top View of correct Swivel Bolt and Washer Placement FIG. 12 Assembly Note: Keep the Locking Pins (#32) open. Note: Close the Locking Pins (#32) to secure the Mainframe (#1). FIG. 13A FIG. 13C CBF054_037P www.themdsports.com (Continued on the next page.)
- Page 14 Note: Peel off the felt from the Felt Pads (#17) and attach to the bottom of the Pushers (#19). FIG. 15A FIG. 15 Bowling Set Note: Be sure to remove the Hockey Goal setup before attaching the Table Tennis Net & Post. CBF054_037P www.themdsports.com (Continued on the next page.)
- Page 15 Note: To complete this step, the billiards side must be facing upwards. If not, disengage all 4 Locking Pins (#32), swivel the table and then re-engage the Locking Pins. FIG. 17B Note: Open the Locking Pins. CBF054_037P www.themdsports.com (Continued on the next page.)
- Page 16 Note: To operate the Hover Puck (#18), just turn on the Switch on the underside of Hover Puck to the ON position. The Hover Puck will operate for 20-30 minutes when fully charged. YOU ARE NOW READY TO PLAY! CBF054_037P www.themdsports.com (The last page)
Need help?
Do you have a question about the CBF054_037P and is the answer not in the manual?
Questions and answers