Advertisement
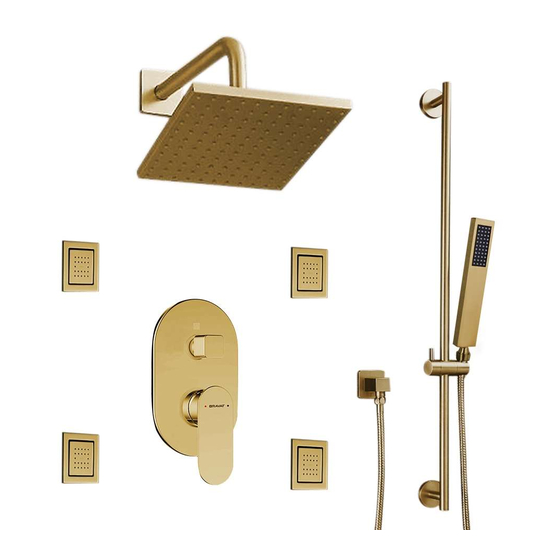
BRAVAT BRUSHED GOLD SQUARE SHOWER SET WITH
VALVE MIXER 3-WAY CONCEALED WALL MOUNTED
PRIOR TO INSTALLATION
Please read installation instructions below. All plumbing should be
installed in accordance with applicable building codes and regulations.
Unpack and inspect the items for any shipping damages. If you find
damages, do not install.
All products must be installed by a professional and certified plumber
otherwise warranty may be voided.
POSSIBLE TOOLS REQUIRED*
Plumbers Tape
Thread Sealant
FontanaShowers
FontanaShowers
FontanaShowers
FontanaShowers
INSTALLATION INSTRUCTIONS
Tape Measure
Drill
Level
Adjustable Wrench
Pencil or Marker
1
©
©
Product code: FS1071
Hex Wrench
Screwdriver
fontanashowers.com
Customer Service: 800-684-4489
*not included
Advertisement
Table of Contents

Related Manuals for Fontana Showers BRAVAT FS1071


Summary of Contents for Fontana Showers BRAVAT FS1071
- Page 1 FontanaShowers FontanaShowers © © Product code: FS1071 BRAVAT BRUSHED GOLD SQUARE SHOWER SET WITH VALVE MIXER 3-WAY CONCEALED WALL MOUNTED INSTALLATION INSTRUCTIONS PRIOR TO INSTALLATION Please read installation instructions below. All plumbing should be installed in accordance with applicable building codes and regulations. Unpack and inspect the items for any shipping damages.
- Page 2 FontanaShowers FontanaShowers © © Wall Mount Shower Installations Instructions Step 1: Step 2: Step 3: Step 4: Step 5: Step 6: fontanashowers.com FontanaShowers FontanaShowers Customer Service: 800-684-4489...
- Page 3 FontanaShowers FontanaShowers © © Step 7: Step 8: Step 9 (Note): Product shown is only for installation display purpose 1. Remove the old shower head by using the channel lock pliers or monkey wrench. Be sure to turn the pliers counter-clockwise to loosen the old shower head. (tip: right is tight, left is loose.) 2.
- Page 4 FontanaShowers FontanaShowers © © Hand Shower Installations Instruction Step 1: Step 2: Back Cap Cover Step 3: Hand Shower Holder Slide Bar End Support Hand Shower Outlet Installation • Complete the outlet pipework ensuring it ends in an appropriate 15mm x 1/2" BSP female thread elbow. Note: This fitting is not supplied as variations in installations require the selection of a suitable solder or compression fitting.
- Page 5 FontanaShowers FontanaShowers © © Body Jets Spray Installations Instruction G1/2 Step 1: Attach the escutcheon to the body Step 2: Apply teflon tape to threaded tail pipe spray. of the body spray Step 3: Press the escutcheon against the Step 4: Screw the Body spray tightly into the finished wall female of water Supply Pressure Balancing Loop:...
- Page 6 FontanaShowers FontanaShowers © © Mixer Installations Instructions Step 1 Step 2 Cold Close Open 90° Step 3 Step 4 Step 5 Connections Shower Hand Shower Body Jet Mixer Hot Water Cold Water Inlet Inlet fontanashowers.com FontanaShowers FontanaShowers Customer Service: 800-684-4489...
- Page 7 FontanaShowers FontanaShowers © © General Information All products manufactured and supplied by Fontana are safe and comply to legislative requirements. Providing they are installed correctly and receive regular maintenance in accordance with these instructions your user experience will not be affected. Care &...
Need help?
Do you have a question about the BRAVAT FS1071 and is the answer not in the manual?
Questions and answers