Table of Contents
Advertisement
Quick Links
Table of contents
.....................................................................................................................................................................................................................
...................................................................................................................................................................................................................................
...................................................................................................................................................................................................................................
................................................................................................................................................................................................................................................
......................................................................................................................................................................................................................................
................................................................................................................................................................................................................................................
......................................................................................................................................................................................................
.............................................................................................................................................
.............................................................................................................................................................
....................................................................................................................................................................................................
........................................................................................................................................................................................
.......................................................................................................................................................................................................
...............................................................................................................
.......................................................................................................................................
....................................................................................................................................
....................................................................................................................................
45
46
47
50
51
52
53
54
54
54
56
56
57
58
60
62
43
Advertisement
Table of Contents

Subscribe to Our Youtube Channel
Related Manuals for Bosch+Sohn Boso-medicus exclusive


Summary of Contents for Bosch+Sohn Boso-medicus exclusive
-
Page 1: Table Of Contents
Table of contents Product features ............................................. Contents of package ........................................Symbols on the blood pressure monitor ............................. Symbols on the power supply unit ................................Quick guide ..............................................Introduction ..............................................Purpose ................................................Blood pressure values ........................................Systolic and diastolic blood pressure value ....................... - Page 2 Table of contents Note on cuff sizes ......................................Attaching the cuff ......................................Measuring your blood pressure ..................................Interrupting a measurement ....................................Measurement display ........................................Note on guest mode ....................................... Completing the blood pressure record card / Retrieving average and classification scale ...........................
-
Page 3: Product Features
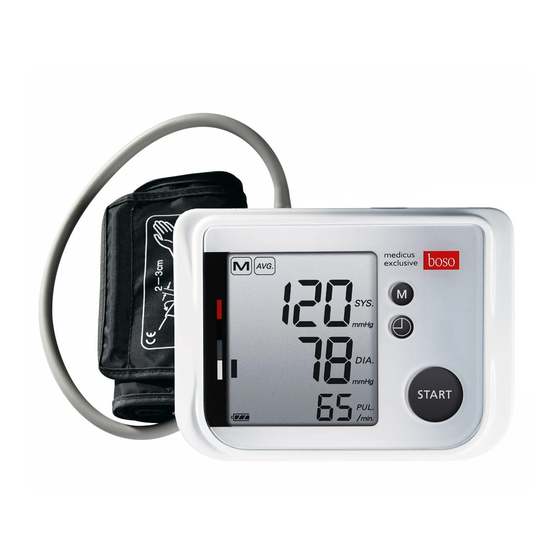
Product features Mains connector medicus AVG. exclusive M button SYS. SET button mmHg. Cuff connector DIA. mmHg. START/STOP button START PUL. /min. WHO classification LCD display... -
Page 4: Contents Of Package
Contents of package medicus AVG. exclusive SYS. 4 LR 6 (AA) batteries 1 boso-medicus exclusive mmHg. DIA. blood pressure monitor mmHg. START PUL. /min. medicus exclusive 1 User Oberarm-Blutdruckmessgerät mit Sprachausgabe 1 CA 04 universal cuff Upper arm blood pressure monitor with audio output Gebrauchs- Tensiomètre bras avec fonction vocale... -
Page 5: Symbols On The Blood Pressure Monitor
Symbols on the blood pressure monitor Symbol Function/meaning START/STOP button START M button (Memory button) SET button Direct current Serial number Year of manufacture Type BF: The device, cuff and tubing have been designed to protect the patient against electric shock. Reading in progress. - Page 6 Symbols on the blood pressure monitor Symbol Function/meaning Cardiac rhythm disorder or movement during reading. Movement during measurement. Three consecutive measurements Stored value AVG. Display average value 180 210 240 Inflation pressure AUTO Battery fully charged. Battery partly discharged. Replace battery as soon as possible. Flashing! No further reading possible.
- Page 7 Symbols on the blood pressure monitor Symbol Function/meaning Protect against liquids Systolic blood pressure in mmHg Diastolic blood pressure in mmHg Pulse per minute 0124 Device complies with the European Medical Devices Directive. Device must not be discarded with household waste. Manufacturer Read instructions for use Polarity of power supply port...
-
Page 8: Symbols On The Power Supply Unit
Symbols on the power supply unit Symbol Funktion/Bedeutung Only for use in enclosed spaces. Protection class II device Thermal fuse Fuse Device complies with the European Medical Devices Directive Polarity of the mains adapter plug... -
Page 9: Quick Guide
Quick guide ¬ Insert batteries, ensure correct position- stored (ALL), with WHO classification. ing (P. 56) The number of measurements stored is shown under ‘ALL’. This is followed by ¬ Connect cuff to monitor (P. 62) displays of the morning averages (AM), the afternoon averages (PM) ¬... -
Page 10: Introduction
Introduction Dear Customer, can only be obtained if the instrument is We are delighted that you have decided operated correctly. to purchase a boso blood pressure mon- In these user instructions, „¬“ means an itor. The boso brand is synonymous with action by the user. -
Page 11: Purpose
Introduction Purpose The boso-medicus exclusive blood pressu- Non-invasive recording of systolic and re monitor is suitable for patients with an diastolic blood pressure and pulse rate in upper arm circumference between 16 and adults. Not suitable for use on newborn 48 cm (see p. -
Page 12: Blood Pressure Values
Blood pressure values To determine the blood pressure, two val- G Diastolic (lower) blood pressure: ues need to be measured: This is present when the heart muscle ex- pands and fills with blood again. G Systolic (upper) blood pressure: This is produced when the heart muscle Blood pressure measurement values are contracts and blood is forced into the expressed in mmHg (mm of mercury). - Page 13 Blood pressure values Whether medical treatment is necessary than at the doctor’s. The German depends not only on the blood pressure, Hypertension League has therefore defi- but also on the patient’s risk profile. ned lower cut-off values for home measu- Please contact your GP if one of the val- rements: ues (systole, diastole) consistently exceeds...
-
Page 14: Starting Up
Starting up Never mix old and new batteries or The device must be installed and put into different makes. operation in accordance with the instruc- tions in this manual. If the batteries are not inserted cor- rectly, the monitor will not work and this may cause the batteries to heat up and leak, damaging the monitor. -
Page 15: Battery Status
Starting up Care for the environment The monitor has a battery status display (see P. 48) Do not dispose of used batteries and Battery fully charged. charger units in domestic waste. Battery partially charged. You can take these to collection sites for Replace battery soon. -
Page 16: Settings
Settings Use the SET button ( ) to select settings. be displayed and the automatic switch-off Press the START button to change any set- period of the device will be extended to 60 ting. minutes. N.B., this significantly increases battery consumption, and so is recommen- 1. - Page 17 Settings There is a 60-second interval after the first 11. Press the SET-button eleven times to measurement has been performed (display exit the setting. Setting will be finished af- -1-). The screen shows a timer counting ter 3 minutes you don´t press any button. down from 60.
-
Page 18: General Instructions For Self-Measurement
General instructions for self-measurement 1. Fluctuations in blood pressure are quite 4. Incorrect measurements can also occur normal. Even when measurements are in patients with a weak pulse (possibly repeated, there can be marked differ- in patients wearing a pacemaker, for ex- ences. - Page 19 General instructions for self-measurement To do this, measure the blood pressure first in both arms and thereafter always from the arm with the higher blood pressure.
-
Page 20: Preparing To Measure Your Blood Pressure
Preparing to measure your blood pressure Note on cuff sizes: Attach the cuff to the monitor by pressing the plug (click) into the socket on the left The monitor may only be used with side of the unit. (See illustration 2). the following cuff types. -
Page 21: Attaching The Cuff
Preparing to measure your blood pressure Observe the following instructions Attaching the cuff when measuring your blood pressure: The measurement should be taken from Avoid smoking or drinking coffee the bare upper arm. for one hour before measuring In the case of tightly fitting outer your blood pressure. - Page 22 Preparing to measure your blood pressure Other medical devices being used on the same arm at the same time may mal- Marking function during measurement. Artery The cuff must not be too tight. There 2-3 cm should be enough space to fit roughly two Illustration 3 fingers between arm and cuff.
- Page 23 Preparing to measure your blood pressure ¬ Place your arm with the cuff attached The blood pressure measurement on the table, holding it relaxed and should not prevent the flow of blood for an slightly bent so that the cuff is level unnecessary length of time (>...
-
Page 24: Measuring Your Blood Pressure
If the ambient temperature changes Now hold the arm absolutely still and significantly, leave the device about an do not talk. hour to adapt to the new ambient tempe- rature before using it. All the items on the LCD display appear briefly to indicate that the monitor is now The performance of the device can be ready for use (see illustration 5). -
Page 25: Interrupting A Measurement
Measuring your blood pressure The pump starts to inflate the cuff to the re- During the measurement phase the quired pressure. Increasing cuff pressure is descending cuff pressure and the flashing displayed. symbol are displayed (see illustra- tion 6). When the required pressure is reached, the pump switches off and the air is re- Please keep your arm still if the symbol leased slowly from the cuff. -
Page 26: Measurement Display
Measurement display After the end of the measurement, the in- The measurement is stored automatically built valve opens automatically and the (except for guest mode, see below). If the cuff deflates rapidly. memory store is full (90 measurements), the oldest measurement is deleted and The measured blood pressure values the current one stored. - Page 27 Measurement display appears again even with the arm held still, The unit switches itself off automatically this may be an indication of an irregular after about 1 min. To repeat a measure- heartbeat. Please discuss this with your ment, press the START button again doctor at your next visit.
-
Page 28: Completing The Blood Pressure Record Card / Retrieving Average And Classification Scale
Completing the blood pressure record card Retrieving averages and classification scale ¬ Enter each individual value in your ¬ Transfer the total average (ALL) into record card. the relevant section of your blood pres- sure record card. ¬ When you have recorded 30 blood pressure readings, retrieve your avera- If there is no reading in the memory, “... - Page 29 Completing the blood pressure record card Retrieving averages and classification scale When the averages are displayed, a dark AVG. rectangle appears on the left of the screen (see illustration 8) indicating the level of the average blood pressure. Use the ac- SYS.
-
Page 30: Displaying Stored Individual Readings And Emptying The Memory
Displaying stored individual readings and emptying the memory ¬ To display the most recent reading stored, press ¬ Repeated pressing of „M“ the M button again after retrieving the averages. will now successively dis- The number of the measurement appears in the play all measurements con- display (see illustration 10). -
Page 31: Mains Operation
Mains operation The mains connection socket is located at Do not touch the batteries, the power the rear of the monitor. supply unit socket and the patient at the Where required, use only the boso power same time. supply unit (order number 410-7-150). This power supply unit produces a rectified Remove the power supply unit plug output of the correct polarity. -
Page 32: Error Messages
Error messages If any problems occur during the measurement, the display will show an error message instead of a blood pressure reading. Meaning of error messages: Error cause: Troubleshooting: Excessive variation in cuff pressure Hold arm still during measurement No valid pulse readings Check position of cuff (see page 63) and repeat measurement. - Page 33 Error messages Error cause: Troubleshooting: If the symbol appears The measurement should be taken again even with the arm again, with the arm being kept gheld still, this may be an completely still. indication of an irregular heartbeat. Please discuss this with your doctor at your next visit.
-
Page 34: Cleaning And Disinfection
Cleaning and Disinfection Cleaning Monitor: Disinfection Cuff: Use a soft, dry cloth to clean your monitor. For disinfectant wipes (at least 5 minutes exposure time) of the device and the cuff, Cleaning Cuff: we recommend the disinfectant antifect li- Small stains on the cuff can be removed quid (Schülke &... -
Page 35: Warranty Conditions
Warranty Conditions We give 3 years warranty from the date of No claims for damages against us are sub- purchase.The purchase date has to be pro- stantiated by the warranty. ven by the invoice.Within the warranty pe- riod defects are eliminated free of charge. In the case of justified warranty claims the After repairs the warranty period is not ex- device has to be sent along with the origi-... -
Page 36: Customer Service / Disposal
Customer service Disposal Customer service: Do not dispose of monitors and bat- Warranty and repair work must be under- teries in the domestic waste. taken by trained and authorised personnel. Do not modify this equipment without aut- At the end of its lifespan, the monitor must horization of the manufacturer. -
Page 37: Technical Data
Technical data Measurement principle: oscillometric Measurement range: Systolic: 60 to 279 mmHg Diastolic: 40 to 200 mmHg Pulse: 40 to 180 per minute Cuff pressure: 0 to 299 mmHg Memory store: 90 measurements Display: Operating conditions: environmental temperature +10°C to +40°C Relative humidity 15 to 85% Air pressure 800 hPa to 1060 hPa Transport/... - Page 38 Technical data Power supply: DC 6 V (4 x 1.5 V Mignon IEC LR 6 alkaline manganese batteries) Alternative special option: DC 6 V power supply unit, Order No. 410-7-150 Typical battery life: 700 measurement cycles (depending on inflation pressure, frequency of use and switch-off time setting) Battery check: symbol display in LCD window Weight:...
- Page 39 Technical data Protection against solid IP20 objects: IP classification is the degree of protection provided by enclosures in accordance with IEC 60529. This device is protected against solid foreign objects of 12mm diameter and greater such as fingers. This device is not protected against water.
-
Page 40: Calibration Checks - Testing Instructions
Calibration checks - Testing instructions (for trained specialist staff only) Calibration checks – every 2 years at the Note: latest – must be performed by the follow- a) When the pressure in measurement ing institutions or persons: mode increases above 299 mmHg, the –... - Page 41 Calibration checks - Testing instructions (for trained specialist staff only) 3.) Release START button. with a safety seal. Alternatively, a hole The device is now in test mode, and drilled in the bottom of the monitor for the current pressure is displayed in the the connecting screw for the housing SYS and DIA fields.
Need help?
Do you have a question about the Boso-medicus exclusive and is the answer not in the manual?
Questions and answers