
Subscribe to Our Youtube Channel
Related Manuals for Ingersoll-Rand SG


Summary of Contents for Ingersoll-Rand SG
- Page 1 Control System Medium Industrial Systems Davidson, North Carolina 28036 Technicians Guide © Ingersoll-Rand 2000 Form APDD672A Printed in U.S.A. August 2000...
-
Page 2: Table Of Contents
CONTENTS TOPIC PAGE SG INTELLISYS CONTROLLER INTRODUCTION ..1 COMPONENT REVIEW ..........2 SG INTELLISYS INPUT/OUTPUT INFORMATION ..27 INTELLISYS CONTROLLER ........29 SG DISPLAY SCREEN ..........35 OPERATOR SETPOINTS ......... 37 OPTIONS ..............38 FACTORY SETPOINTS ..........39 SENSOR CALIBRATION .......... 42 WARNINGS ............ -
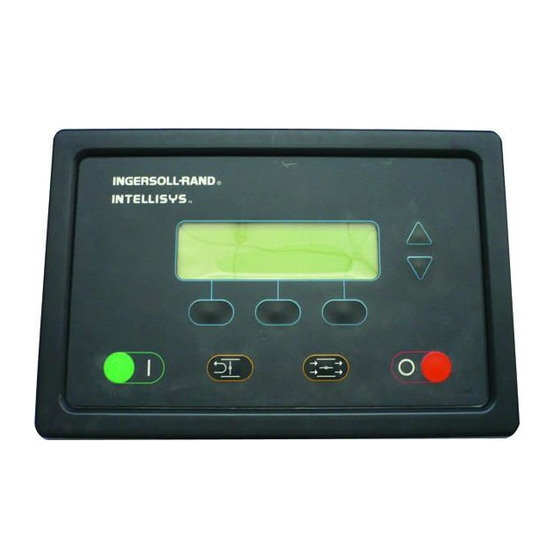
Page 3: Sg Intellisys Controller Introduction
WORLDWIDE EPROM REVISION LEVEL 1.3 AND HIGHER The Intellisys control system is an exclusive Ingersoll-Rand design developed for reliable compressor operation. The controller display can be programmed in nine languages and various units of measure for the pressure and temperature readings. -
Page 4: Component Review
Operation of the control system will be easy The fuses are Class CC high performance and after the following explanation of the control have a unique shape on one end to fit into a system components is read and understood. corresponding shaped fuse holder. - Page 5 regulated down to 12 VDC and sent onward to the The other element, the short-circuit section, Intellisys. operates on short-circuits up to the interrupting rating of the fuse. A connection diagram for possible primary volt- ages is shown on the transformer and in the A chart on the compressor’s electrical schematic is Operator’s Manual.
- Page 6 1TB - Terminal Block This switch is not used on single stage compres- sors and a jumper wire is installed at the 1TB A double row terminal block having 14 poles that connection points. serve as common connection points for wires within the control system.
- Page 7 24 VAC Circuit - Transformer (T1) to Power Always use a BBS type fuse (or equivalent) rated Supply Board (PCB1) for the amperage required by the specific compressor. The 24 VAC power from T1 connects to a bridge rectifier on the Power Supply Board and is Power-On Light (24 VAC - Starter Door) (2LT) converted to 33 VDC.
- Page 8 to the Intellisys and J4 receives input from the rotation to approximately 90 degrees. The board Intellisys to tell the drive chips how far and in which has two optical limit switches and each emits an direction to rotate the stepping motor. J3 sends infrared light beam.
- Page 9 current drawn by the motors. Should either motor Emergency Stop - Logic Circuit (ES-2) draw excessive current, the relay will open to cause the compressor to stop. The relays are A normally closed contact in the 12 volt DC circuit normally closed, operate on a 12-volt DC circuit that opens when the Emergency Stop button is and are shipped from the factory in the automatic...
- Page 10 seconds after the button is pressed on full-voltage and then correct for any minor deviations from .5 starters. volts DC. Calibration directions are included in the Operator’s Manual. Pressure Sensors - 1AVPT, 3APT, 4APT, 5CPT and 6APT There are no adjustments to the pressure sensors. Pressure transducers used to convert air pressure 1AVPT - Inlet Vacuum signals to a voltage signal between .5 and 4.5 volts...
- Page 11 within a range of 24 to 33 psi to ensure adequate 6APT Separator Delta-P Sensor coolant flow and allow the unloaded compressor to operate at a low horsepower condition. A sensor phased into production approximately mid-May, 2000 to replace the Separator Solenoid 4APT - Package Discharge Pressure (8SV).
- Page 12 cold unloaded operation, provide a Warning about running unit, the controller assumes the cold rising temperature or could possibly shut the coolant will be more viscous and the pressure compressor down with an Alarm if operating differential across the filter will be higher than conditions dictate.
- Page 13 4ATT - Package Discharge Temperature EPROM revision level 1.23 and lower: Sensor Automatic Start/Stop Monitors the temperature of the compressed air Remote Start/Stop downstream of the compressor’s aftercooler. Automatic Start/Stop with Remote Start/Stop Typically, this sensor is located in the top of the Automatic Start/Stop with Remote Start/Stop and moisture separator.
- Page 14 Larger units may have two solenoids (3SVa and there is a problem within the starter coil circuit 3SVb) wired parallel. (such as a loose wire or faulty triac) and issues an alarm. At that time, the words “ALARM” and Triac output 3 is for the fan motor starter (if used), “Starter Fault”...
- Page 15 understood. water shut-off (4SV) and remote cooler pressure relief solenoid (7SV) would also be energized. At the same instant 1Sa closed, auxiliary contact Auxiliary contact 1Mc has an arc suppressor (RC 1Sb also closed to complete a yet to be energized 3) wired across the contacts to eliminate any circuit to the coil of contactor 1M.
-
Page 16: Sg Intellisys Input/Output Information
Auxiliary contacts 1Sc and 1Sd each have an arc SG INTELLISYS INPUT/OUTPUT suppressor wired across the contacts to eliminate INFORMATION any power surges that might disrupt adjacent low voltage circuits. WORLDWIDE EPROM REVISION LEVEL 1.3 AND HIGHER As 2M becomes energized, auxiliary contact 2Ma closes between P3 terminals 9 and 10. - Page 17 * Switched inputs are the action of contacts opening or closing within the circuit. The Stepper Limit switches are solid-state de- vices but the effect is the same. There is a 1-second delay on all switched inputs. Triac Outputs * Out 1 - Energizes contactor coils 1M and 2M Out 2 - Energizes contactor coil 1S Out 4 - Energizes solenoid(s) 3SVa and 3SVb...
- Page 18 EMERGENCY STOP STOP Pressing this switch stops the compressor imme- Pressing this button will activate the unloaded stop diately. The compressor can not be restarted until sequence. If the compressor is running loaded, it the switch is manually reset. Turn the switch knob will unload and continue to run unloaded for an clockwise to reset.
- Page 19 ARROWS These up and down buttons have multiple func- tions relating to the right half of the display screen. When lists are presented, the buttons are used to move up or down through the items on the list. The small arrrow(s) displayed in the upper right corner of the display screen indicate when you can move up (designated by arrow head pointing up) and/or down (designated by arrow head pointing down)
- Page 20 on individual page to large for 8-1/2 x 11 -33-...
-
Page 21: Sg Display Screen
SG DISPLAY SCREEN When power is first applied to the compressor, the Intellisys makes a check of the required inputs and displays “Checking Machine” during this time. If all inputs are correct during the three second check, the display changes to “Ready To Start”. Infor- mation concerning line pressure (if any) and the software revision level is also shown. -
Page 22: Operator Setpoints
OPERATOR SETPOINTS first or last item on the current status list has been reached, use the Up or Down button to reverse the Operator Setpoints are user-adjustable settings in scrolling direction. There is a small arrow prompt the controller logic that can be changed using the within the display indicating which of the two buttons to use. -
Page 23: Options
Operator setpoints can be exited by pressing An OPTION item value can be changed and the either the STATUS or MAIN MENU buttons. If no routine exited the same as OPERATOR buttons are pressed within 30 seconds, the display SETPOINTS. automatically returns to the CURRENT STATUS screen showing Package Discharge Temperature FACTORY SETPOINTS... - Page 24 Rated Pressure No Starter (remote)... logic provides only one 120/ 110 volt output to energize the remote starter circuit. A remote direct on line starter requires only 10.5 11.6 14.0 one 120/110 volt output. 1030 1140 1380 Kg/cm 10.5 11.6 14.0 (Remote) star-delta, solid-state &...
-
Page 25: Sensor Calibration
Total Hours...Allows the hour meter to be reset to Press the MAIN MENU button and then use the match the total run time of the compressor. down arrow to highlight SENSOR CALIBRATION. One of the three pressure sensors will appear in Loaded Hours... - Page 26 Pressing the STATUS button will display the CUR- enabling the High Dust Filter option causes the RENT STATUS screen. The STATUS button controller to issue a Change Inlet Filter warning. changes to a WARNING button indicating other Warnings still exist. The RESET button disap- Also, when the inlet vacuum (1AVPT) exceeds pears at this time.
- Page 27 The service level can be set at installed and sensor 6APT is recognized as the factory or by an Ingersoll-Rand service missing or broken. representative. Either service level will issue a “SERVICE REQUIRED”...
-
Page 28: Alarms
1.3 and lower. Higher revision levels will display this ALARMS (!) as a warning) This will occur if the compressor is unloaded and the inlet vacuum is less than 3 psi When an Alarm occurs, the exclamation mark ( ! ) (.2 bar). - Page 29 incoming power supply has been removed from the Should the temperature at the discharge port rise compressor. above 228( F (109( C) in a running compressor, the controller shuts the compressor down with an CONTROL POWER LOSS... This alarm is issued alarm.
- Page 30 MAIN MOTOR OVERLOAD... This alarm occurs The alarm could be caused by a loose connection at when the contacts of the drive motor overload relay P5 for pressure sensors or P6 for temperature sen- (1OL) open and remain open for at least one sec- sors.
-
Page 31: Stepper Motor Operation
INVALID CALIBRATION 1AVPT or 3APT or 4APT... beam as the shaft rotates. When the light beam is this alarm is issued when the sensor output signal interrupted, the Intellisys tells the drive chips to exceeds 10% of the range during the calibration pro- stop sending electrical pulses to the stepper motor cess. - Page 32 When the Start button is pressed, the Intellisys If the tab does not enter the closed limit switch and checks to confirm the tab is in the closed limit interrupt the light beam as described above, the switch with the light beam interrupted. If the light CHECK INLET CONTROL SYSTEM alarm will be beam is not interrupted, the inlet valve is either issued.
- Page 33 However, when the tab moves one step beyond The compressor continues to run unloaded until the light beam, which is the normal sequence, the the control system directs the unit to load. Intellisys ceases to monitor the closed limit switch and begins to monitor sump pressure.
- Page 34 As the closed limit switch light beam is interrupted unload point is reached. during the normal unload sequence, the stepper motor stops at the light beam. At this time, the During modulation, the Intellisys monitors Pack- Intellisys stops monitoring the closed limit switch age Discharge Pressure and inlet vacuum to direct and begins to monitor sump pressure.
- Page 35 The compressor is designed to run with the The process to get the Intellisys “smart” is as unloaded sump pressure in the 24 to 33 psig range follows. to save power. However, oil flow to the airend depends on sump pressure and a range of 24 to 33 A) Calibrate any of the pressure sensors as out- psig is required.
- Page 36 -64-...
- Page 37 DECAL, WIRING SCHEMATIC FULL VOLTAGE -65-...
- Page 38 DECAL, WIRING SCHEMATIC STAR DELTA -66-...
- Page 39 DECAL, WIRING SCHEMATIC STAR DELTA -67-...
- Page 40 IDENTIFICACION ESQUEMA ELECTRICO ESTRELLA DELTA -68-...
- Page 41 DECALQUE, LEGENDA DO ESQUEMA ELÉTRICO ESTRELA TRIÃNGULO -69-...
- Page 42 DIAGRAM, PROCESS AND INSTRUMENTATION AIRCOOLED WITH AFTERCOOLER -70-...
- Page 43 DIAGRAMA, PROCESO E INSTRUMENTACION ENFRIADO FOR AIRE CON POSTENFRIADOR -71-...
- Page 44 DIAGRAMA DE PROCESSO E INSTRUMENTAÇÁO, REFRIGERADOS A AR COM PÓS RESFRIADOR -72-...
- Page 45 DIAGRAM, PROCESS AND INSTRUMENTATION ° WATERCOOLED AFTERCOOLER - 90 -73-...
- Page 46 DIAGRAMA, PROCESO E INSTRUMENTACION POSTENFRIADOR ° ENFRIADO POR AGUA - 90 -74-...
- Page 47 DIAGRAMA DE PROCESSO E INSTRUMENTAÇÁO, REFRIGERADOS A ° ÁGUA COM PÓS RESFRIADOR - 90 -75-...
- Page 48 DIAGRAM, PROCESS AND INSTRUMENTATION ° WATERCOOLED AFTERCOOLER - 115 -76-...
- Page 49 DIAGRAMA, PROCESO E INSTRUMENTACION POSTENFRIADOR ° ENFRIADO POR AQUA - 115 -77-...
- Page 50 DIAGRAMA DE PROCESSO E INSTRUMENTAÇÃO, REFRIGERADOS A ° ÁQUA COM PÓS RESFRIADOR - 115 -78-...
- Page 51 Intellisys Serviceman's Guide EACH Form APDD422C SSR Model SE Control System $8.00 Serviceman's Guide EACH Form APDD585D SSR Model SG Control System $8.00 Technicians Guide EACH Form APDD672A Principles of Operation 50-450 HP Single $8.00 Stage Rotary Compressors Serviceman's EACH...
Need help?
Do you have a question about the SG and is the answer not in the manual?
Questions and answers