Noble UL30 Instruction Manual
Hide thumbs
Also See for UL30:
- Installation, operation & service manual (65 pages) ,
- Installation, operation and service manual (66 pages)
Advertisement
Table of Contents
PREPARING
Check Machine
Before operating machine, verify:
• Strainer is in place and clean.
• Wash/rinse arms are screwed securely into place and end-caps are tight.
• Wash/rinse arms rotate freely.
Strainer
Wash/Rinse Arms
WASHING
Pre-Scrapping
• Dump and hand-scrape dishware to remove foodsoil and
other debris.
• Soak in warm water if necessary to loosen food particles.
• Place scrapped ware into dishrack.
• Rinse ware with pre-rinse hose.
Pre-Rinse Hose
CLEANING
Cleaning
• Close door.
• Push "START" button and hold for three seconds.
• Wait five seconds and flip "ON/OFF" switch to "OFF" position.
• Machine will go through a cycle and then drain automatically.
• When draining stops, open door, remove and clean strainer, and set aside.
"ON/OFF" Switch
DELIMING
1. Follow "Fill Machine" instructions above.
2. Flip "WASH/DELIME" button to "DELIME."
1.888.800.5672
WAREWASHING PROCEDURES
WAREWASHING PROCEDURES
• Check detergent, sanitizer, and rinse-aid levels in containers.
• Replace if empty and prime lines.
Pre-Soaking Utensils
• Fill sink with hot water and add presoak solution.
• Immediately place flatware in sink.
• Soak flatware 15-30 minutes (no longer).
• Place flatware in proper rack and rinse .
DO NOT ALLOW PRESOAK SOLUTION IN DISHMACHINE
• Wash the flatware in dishmachine.
Flatware
• Unscrew wash/rinse arms from their manifolds.
• Verify nozzles and arms are free from obstruction. If clogged, remove
end-caps, clean nozzles with a brush, and flush with fresh water.
• Replace end-caps and ensure they are tight.
Removing Strainer
Unscrewing Wash/Rinse Arms
3. Add deliming solution per chemical supplier's instructions.
4. Close door.
5. Push "START" button.
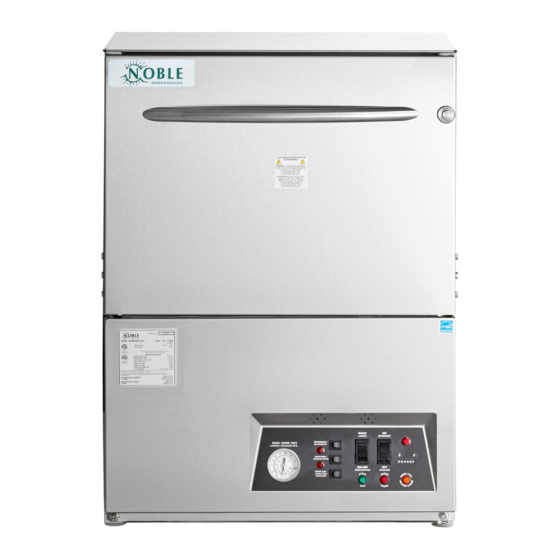
UL30
Check Chemical Supplies
Scan code for
UL30 manual.
Washing & Storage
• When wash is complete, remove and shake rack to
remove excess water.
• Sort flatware into cylinders, handle down, and wash a
second time.
• Place flatware in clean cylinders with handle up.
Wash/Rinse Arms
Tightening End-Caps
Fill Machine
• Close door.
• Flip "ON/OFF" switch to "ON" position.
• Machine will automatically begin to fill.
• Machine will run through rinse cycle and "CYCLE" light will go off.
• Ensure wash temperature is at least 120 °F before operating machine.
Temperature Gauge
"ON/OFF" Switch
Washing a Rack of Ware
• All dishes, cups, and flatware should be placed in proper
racks.
DO NOT OVERLOAD RACKS
• Open door.
• Slide rack into machine.
• Close door.
• Press "START"button and machine will begin wash cycle.
• After cycle light turns off, cycle is complete.
• When flush light is on (steady, not flashing), tank water
should be drained and refilled.
• Inspect strainer regularly throughout the day to ensure it
is not clogged.
After Cleaning
• Spray or wipe out interior of machine.
• Replace wash/rinse arms.
• Replace strainer and ensure it is laying flat.
• Use stainless steel polish to clean and protect outside of machine.
Clean Strainer
6. Wait until cycle is complete and inspect inside of machine. If not delimed, run again.
07610-004-39-29-B
Advertisement
Table of Contents

Related Manuals for Noble UL30


Summary of Contents for Noble UL30
- Page 1 • Wash/rinse arms rotate freely. • Machine will run through rinse cycle and “CYCLE” light will go off. • Ensure wash temperature is at least 120 °F before operating machine. Scan code for UL30 manual. Strainer Wash/Rinse Arms Temperature Gauge “ON/OFF”...
- Page 2 • Que los brazos de lavar/enjuagar giran libremente. • Cerciórese de que la temperatura de lavado sea de por lo menos 120 °F antes de operar la unidad. Para consultar el manual de UL30, escanee el código. Cedazo Brazos de lavar/enjuagar Indicador de la temperatura Interruptor “ON/OFF”...
Need help?
Do you have a question about the UL30 and is the answer not in the manual?
Questions and answers