
Related Manuals for AOODOR 800-039


Summary of Contents for AOODOR 800-039
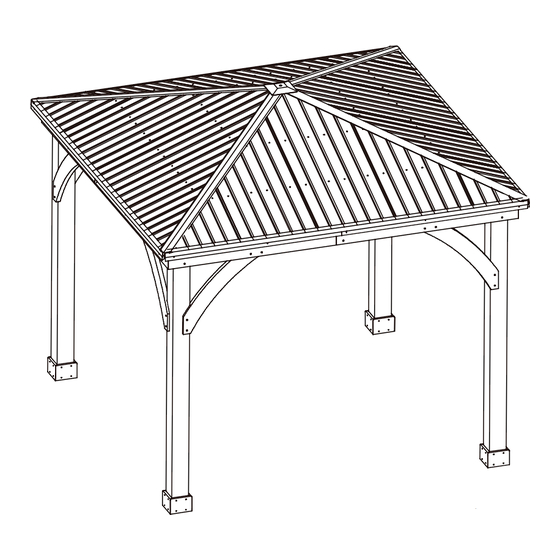
- Page 1 Assembly&Instruction Manual SKU:800-039 steel roof 10x10ft azebo Installation Guide Version 211108 Save this manual for future reference...
- Page 2 INTRODUCTION Thank you for purchasing Aoodor s Patio wood gazebo ! We hope you will find joy in our product for many years to come. To ensure your personal safety during installation and to get the most out of your investment, please read this entire manual before beginning the installation process.
-
Page 3: Important Safety Notice
To avoid injury or damage to the assembly make sure to get some help. If you dispose of Aoodor structure: Please disassemble and dispose of your unit so that it does not create any unreasonable hazards at the time it is discarded. Be... -
Page 4: Assembly Tips
Assembly Tips Following are some helpful tips to make the assembly process smooth and efficient. PRE-ASSEMBLIES: (i.e. Post and Beam Assemblies, Roof Rafter Assembly, etc) • Work on a raised, solid and flat surface such as, a table or saw horse. •... - Page 5 Parts Identification (Metal Parts) Parts Desc Ref No 039 018 800 039-019 800 039-020 800 039-021 800 039-022 800 039-023 800 039-024 800-039-025 800 039-026 800 039-027 800 039-028 800 039-029 800 039-030 800 039-031 800 039-032 800 039-033...
- Page 6 Parts Identification (Metal Parts) Parts Desc Ref No 800 039-034 800 039-035 800 039-036 800 039-037 800 039-038 800 039-039 800 039-040 800-039-041...
- Page 7 Parts Identification (Metal Parts) Parts Desc Ref No 800 039 042 800 039 043 800 039 044 800 039 045 800 039 046 800 039 047 800 039 048 800-039-049...
- Page 8 Assembly 1.1 Insert the hooks(U) to the rail(J) for mosquito netting and curtain(not included) 1.3 Attach the rail to the beam using screws(10).
- Page 9 Assembly 2.1/2.2 Attach the brakect (V2) (V3) to the beam using screws(10).
- Page 10 Assembly 3.1 Joint 4pcs rafter corner(K1) with inside hub(N1) using bolt(7). Joint 4 pcs rafter(K2) with inside hub(N1) using bolt(7).
- Page 11 Assembly 3.1.Joint 2 pcs rafter connector tube(M) together with the rafter bracket(T) and attach them on the rafter(K2) using bolt(7). 3.2.Joint 2 pcs rafter connector tube(M) together with the rafter corner bracket(T1) and attach them on the rafter corner(K1) using bolt(7). 3.3.Cover the peak cap(N) on the inside hub(N1) and using bolt(7).
- Page 12 Assembly Place the ladder in the center of gazebo and need 5 persons for this step. One person hold the hub and four person hold the rafter corner than put the roof over beam. 4.1/4.2.Attach the rafter to the bracket using bolt (7).
- Page 13 Assembly...
- Page 14 Assembly...
- Page 15 Assembly...
- Page 16 Assembly...
- Page 17 Assembly...
- Page 18 Assembly...
- Page 19 Assembly Please don’t hesitate to contact us for any further questions, your satisfaction is guaranteed. customerservice@aoodor.com https://www.aoodor.com/...
Need help?
Do you have a question about the 800-039 and is the answer not in the manual?
Questions and answers